Barbecue made of bricks. Brick barbecue - do-it-yourself construction
Often the concepts of barbecue and barbecue are confused, as they are built for cooking on smoke and coals. But a brazier is needed for cooking barbecue, and a barbecue is a way to cook dishes on an open fire using a grill.
Usual brazier can be turned into a barbecue by attaching a grill to it.
barbecue oven are mobile and stationary, the dimensions depend on the functions performed. The simplest furnace is built in dimensions 0.18*0.07*0.9m, resembles an ordinary brazier with a grate.
A slightly improved barbecue is being built with a place for a hob, its dimensions are 1.7*0.4*1.9m. Protozoa furnace complex has dimensions 1.2*2.2*1.9m.
Furnaces are offered for construction with a cauldron, barbecue, stove, and other devices for cooking on charcoal. You just have to choose the project that suits your needs. We will tell you in detail in this article about how to build a brick barbecue with your own hands. Drawings, photos of some projects are attached. Well, the dimensions of a brick barbecue, drawings and photographs of other models of stoves can be found on the adjacent pages of our site.
Why build an outdoor brick barbecue with your own hands?
Contemporary variety of street tiles does not make it possible to choose a single model - I want to take an element from each project. Building a brick garden barbecue oven with your own hands allows you to combine them into one perfect oven on your site.

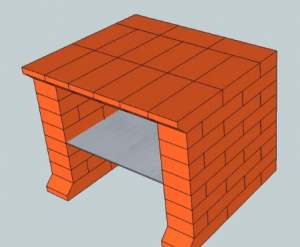
Photo 1. A small, highly aesthetic garden barbecue oven made of bricks with a barbecue and a work table. Such an uncomplicated do-it-yourself barbecue stove is built from brick and stone easily and quickly, especially if there is a special instruction for laying a barbecue with a barbecue.
TO advantages of a brick oven own construction include the following advantages:
- the possibility of creating your own project;
- the stove constructed in this way will stationary- it will not be stolen, even if the owners of the site will be absent for a long time;
- confidence in the materials and durability of the assembled furnace;
- laying a barbecue is so simple that a person without the experience of a stove-maker can master it;
- giving the plot classical style or country style;
- creating a reason for pride in front of friends.
What are the projects of a barbecue oven and a brick barbecue?

The main projects for building a barbecue for a brick cottage are divided into 3 types:
- without pipe- the simplest oven, resembling a brazier, requiring minimal construction costs;
- with pipe- an improved oven, when cooking in which the smoke will not be scattered by the wind in different directions;
- with pipe and hob- for the possibility of preparing first courses, for example, soups, borscht, fish soup.
The best option is to create furnaces with a pipe without a plate, because most often the company is going to eat hot kebabs with no less hot drinks.
The pipe in the design of the stove will protect the vacationers from the random dispersion of smoke, flying ash particles.
Brick BBQ Building: Cost Estimate
One of the first stages in the implementation of the project is the calculation of the material that will be needed to build the furnace. Garden barbecues for summer cottages have many diagrams showing how to make this or that structure, and ordering is attached to some of them. Here it is especially convenient to determine in advance the volume of necessary building materials.
Calculation of the amount of ordinary brick for construction stove with chimney(in rows): 38+10.5+10.5+10.5+10.5+33+33.5+13+13+13+13+35+35+9+9+9+9+9 +9+9+9+18+26+22+20+12+10+9+7+5+5 = 474.5 pcs.
- usual Red brick 1 grade - 474.5 pcs.;
Calculation of the amount of refractory bricks for laying out firebox(starting from row 14): 7+7+7.5+7.5+7+7.5+7+3 = 53.5 pcs.

- refractory brick to create a firebox - 53.5 pcs.;
- concrete mortar for pouring the foundation or its mixture of water, sand, crushed stone, cement in a ratio of 4:4:4:1;
- metal pipe 15-20 cm in diameter - 1 piece;
- board for the formation of formwork - 1 pc.;
- coarse sand- 17 kg;
- reinforcing mesh- 2 m;
- sheet metal- 1 PC.;
- countertop- 1 PC.;
- oven grate for collecting coal - 1 pc.;
- silicone and heat resistant sealant for sealing cracks in masonry - 1 tube;
- facing material.
Before proceeding to the construction phase, check if there is instruments:
- shovel;
- building level;
- rope;
- roulette;
- hammer.
Such tools are so simple that it is difficult to find an alternative to use them.
Attention! When building a furnace, you will need half bricks - they can be made using a grinder.
You will also be interested in:
Choosing and preparing a place for construction
The place where you can build a barbecue oven with your own hands is chosen based on comfort and fire safety. On the distance of 3-4 meters from the furnace trees, bushes, grass should not grow. If extensions, a bathhouse, and other buildings are built on the site, the stove must be built in the distance. The prevailing wind direction should not be the direction towards your own and neighboring buildings.

Photo 2. An improvised place to relax with a barbecue in garden thickets. Surely you have such a corner on the site where a brick barbecue fits perfectly. The photo does not allow us to estimate the size of the site, but even a small stove will look better than such a scorched piece of land.
If we discuss the comfort of using future cooking in an outdoor oven, it is most convenient to place the structure next to recreation area- patio, gazebo, terrace. If there are no such places on the site, you can choose any place for a barbecue, and place a table with chairs next to it. Keep in mind that you will need a lot of water and wood for cooking and maintaining the stove. The size of the working area of the furnace is selected depending on the financial capabilities and the size of the site.
- located on the leeward side of a residential building. Otherwise, the smoke will go to the house, penetrating inside and leaving traces of soot outside;
- the undesirable presence of plants next to a barbecue grill made of bricks - their vital activity will be disrupted due to high temperatures.
When a place is chosen, you should prepare platform for the oven zone. The soil is cleared of the fertile layer: grass, bushes, trees. It is allowed to remove trees from your site without the consent of the local authorities, provided there are no environmental restrictions.
Attention! Remember that roots left in the ground can sprout, damaging flooring furnace zone.
Usually, during the planning and clearing of the area for future construction, coniferous and fruit trees. After that, you can go to the stage of pouring the foundation according to the shape and size that the barbecue drawing scheme you have chosen suggests.
Brick barbecue construction
Oven on personal plot, no matter what type it belongs to, this structure is quite intricate and requires a certain amount of knowledge. Therefore, for everyone who decides to build a barbecue for a summer residence with their own hands, step-by-step instruction , which is given on this page of the site, is simply necessary. If laying barbecue ovens with your hands is a process unfamiliar to you, you are unlikely to be able to lay out even the first row without such instructions brickwork.

Prior to construction, it is desirable to carry out an approximate drawing to calculate the required amount of materials and the correct construction of the structure.
Stove builders with extensive experience do not use a masonry drawing (they already know by heart how to lay out a brick barbecue with their own hands).
If you are not a specialist, you - in addition to the usual drawing - will also need ordering brick barbecue, masonry drawings or a detailed diagram of barbecue masonry.
Any brick barbecue oven is built in layers - one row of bricks after another. The number of bricks in each row is not the same and they can be stacked in different ways. In order to know exactly how to fold a brick barbecue with your own hands and not confuse anything, you need drawings with order. Even a novice stove-maker, having such drawings in his hands, is sure that the projects for ordering barbecue ovens will help to avoid gross mistakes during the construction.
How barbecue stoves are made for brick cottages: foundation (in stages)
The heavy weight of a brick oven requires a solid foundation. Equally suitable tape And monolithic foundation. We will use the recommendations of furnace specialists and give preference to the monolithic version.
Attention! Best to pave working area around the oven.
So, let's start building a barbecue with our own hands - step by step instructions for pouring the foundation:

- digging a pit 1.5*2 m with depth up to 0.4 m.
- the bottom is leveled with a shovel;
- covered with a layer of sand 10 cm thick, filled with a small amount of water, rammed;
- a wooden formwork fastened with self-tapping screws is installed;
- reinforcing mesh is laid;
- the foundation is poured with concrete mortar;
- leave for a week to freeze.
Attention! When mixing, air accumulates in the solution, due to which the strength of the structure decreases. To eliminate air, you need to make holes in the uncured concrete.
Brick BBQ: base
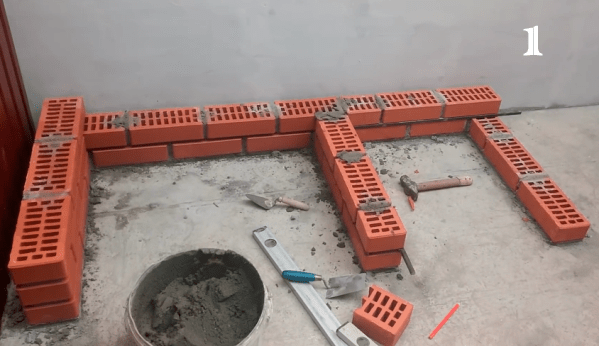
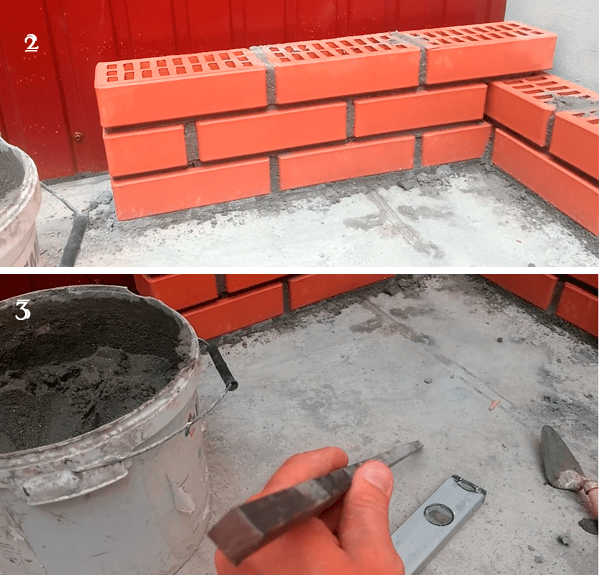
The base on which the entire structure of the stove will be installed is the first stage from which the laying of a brick barbecue begins. The step-by-step instructions that we provide here should help to avoid mistakes, due to which the entire structure may ultimately be unusable.
Attention! At the stage of laying out a barbecue with your own hands, red burnt bricks of the 1st grade and a cement mortar are used step by step.

After the foundation has hardened, it is carefully studied for presence of cracks. They need to be sealed and wait until they harden.
Next, marked furnace outline. Experts recommend pulling the cord between pieces of reinforcement stuck in the corners. Bricks are laid along the cord, lubricated with cement mortar and 2 layers are laid, starting with half a brick.
You should check the evenness of the masonry with a level.
Attention! Tap with a hammer on the top and side of each laid brick - this strengthens the adhesion of building materials.
A grate for coals is laid on the second row. Apply the mortar to the end of the brick to increase the reliability of the masonry.
Subsequent rows will start with halves of a brick. Further, 5 rows of bricks are laid according to the presented scheme. Starting from the 6th, will be located oven tray- a small protrusion is made here. 3 rows are laid according to the scheme, and a new ledge for oven table basics.
Advice! Choose the height of the oven and table, guided by ease of use. You can freely relate to the number of initial rows - they do not affect the strength and reliability of the structure.
You will also be interested in:
Barbecue oven masonry: firebox
Attention! At this stage, you will need 2 types of bricks - ordinary red and refractory, a solution of clay and sand. The bricks will be laid out in 2 rows - the outer one is made of red brick, the inner one is made of fireclay. The bottom of the firebox should also be lined with refractory bricks.
Basis for firebox And countertops made in the form of a screed. Bars of boards are laid out with a thickness of one brick of bricks, cut into the size of the span. From above it is poured with a solution of concrete, left for 5 days.
The height of this part of the furnace depends on its shape: 9 bricks for a rectangular one, 7 for an arched one. Depth - up to 70 cm. The pipe is displayed after a few rows.

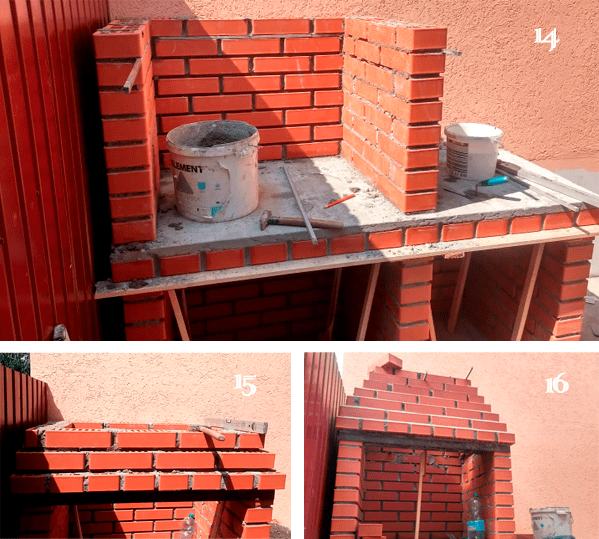
Photo 3. There is a process of building a brick barbecue. The photo was taken at the stage when the laying of the barbecue oven is almost ready and the construction of the woodshed is being completed. Another module is in the process of laying the first row of bricks.
Attention! To remove the chimney, the masonry area is gradually reduced, each row is reduced by half a brick in length and ¼ in width. From the 7th row, the laying of a pipe up to 13 rows high will begin.
Chimney masonry
Attention! At this stage, red brick and cement mortar are used.
A chimney in a brick barbecue located in the gazebo is bought at a hardware store or welded from sheet material . To seal the free space between the pipe and the furnace, apply heat resistant sealant. The gazebo must have a fireproof opening for the chimney.
Important! A cap is put on the upper end of the pipe to create the correct draft and protect the furnace from precipitation, which can impair its functionality.
It is easier to buy a tabletop in a store by attaching it to the created ledge silicone sealant. To make it yourself, you need to plaster with cement and tile or stone the surface after installing the slab.
Decorating a stove with a pipe
After removing the chimney, you can take care of the appearance of the barbecue. To do this, decorating the barbecue and barbecue oven with your own hands is done: the floor covering is laid out with non-slip material, for example, porcelain stoneware. In this case, a special glue is used. They pass along the facade with a grinder and clean it with a brush to remove the remnants of the solution. You can use tiles or wild stone to improve the aesthetic appearance of the structure.
Additional Attributes
To increase the comfort of rest next to the outdoor stove, it is advisable to take care of additional attributes.
To decorate the site and the possibility of a cozy time in the evening, you should supply electricity and perform table lighting, hearth, space under the roof, the boundaries of the recreation area or site.

Photo 4. A detailed diagram of a barbecue made of bricks by English-speaking specialists. In addition to the oven itself, the figure also contains a description of the work table with the required dimensions. If you are going to build a brick barbecue with your own hands, drawings of this kind will be necessary.
work table to prepare food for cooking, rack for placement of spices, utensils and accessories are located next to the working area.
It is possible to completely place the furnace with a pipe in glazed gazebo and cook delicious kebabs all year round or mount a canopy for basic protection from precipitation.
As furniture for relaxation, a table, benches or chairs are purchased or created. Designers do not recommend buying cheap plastic furniture - it will spoil the atmosphere of outdoor cooking and can cause a fire. It is better to give preference to forged, wooden, wicker furniture in natural colors.
Fire safety
Remember to follow fire safety rules. Nobody wants to interrupt the rest for a challenge fire service and elimination of the consequences of ignition of nearby objects.
Fire Prevention Stove Installation Rules:
- the need to build on a solid foundation;
- metal sheet finishing or other non-flammable floor material in front of the stove;
- accommodation at a reasonable distance from flammable substances, trees, bushes, buildings.

Photo 5. A set of imported fire extinguishers of various sizes. For fire safety purposes, any brick barbecue oven must be equipped with one of these items: the photo shows how rich the choice of the owner of the cottage is.
Operating rules:
- when the oven is idle, it is covered case so that precipitation does not disrupt functionality;
- protect children from a location close to the furnace;
- do not leave a lit stove, especially with food, without supervision.
Various brick barbecue ovens: projects, photos, drawings
When you can’t stop at any one brick barbecue project, photos, diagrams, barbecue masonry drawings can make a choice. Explore the selection of illustrations we have prepared to understand which of the projects you like best. Pay Special attention on the complexity of the proposed design: will you be able to carry out this or that project with my own hands?

Photo 6. A fragment of an instruction showing how a barbecue oven is made of bricks. A barbecue laying order like this makes the job much easier, and especially for those who have never built a brick barbecue with their own hands. Drawings, so try to choose exactly with the order.

Photo 7. Graphic diagram of a brick barbecue. With your own hands, laying down a brick barbecue for a summer residence according to such a project will not be difficult at all.

Photo 8. Computer model of a brick barbecue: order and construction scheme. Barbecue folding will be easier with more detailed diagram, but even such a drawing speeds up the construction of the structure.

Photo 9. A computer-generated approximate diagram of a brick barbecue. Masonry drawings attached to such a scheme will give accurate information about the size of the structure and the order of its construction.

Photo 10. Schematic sketch of a pedestal for a barbecue project. Dimensional drawings are required, no matter what type of oven you choose - stone or brick, small or large, complex or not.

Photo 11. Computer generated brick barbecue project. Downloading a similar project for free is very useful when you want to lay out a brick garden barbecue with your own hands.

Photo 12 The photo was taken at the stage when the foundation is ready and several rows of bricks have already been laid.

Photo 13. A small outdoor brick barbecue. The drawings of such a structure are extremely simple, however, if you decide to set up a brick barbecue with your own hands, an order that describes in detail the laying of bricks is desirable in this case as well.
h 
Photo 14. Brick oven with two pipes. On our site you can see the most unusual barbecue projects. A photo of this model, for example, shows that a do-it-yourself barbecue and barbecue stove, folded with your own hands, can resemble a stove from a Russian hut in outline.

Photo 15. There are a wide variety of types of barbecue for brick cottages. The photo shows an elongated model folded in a corner. It is noticeable on the side wall that the original brick masonry scheme was used.

Photo 16 This building consists of three simple sections. It can be seen that a rather unusual brick barbecue layout was used.

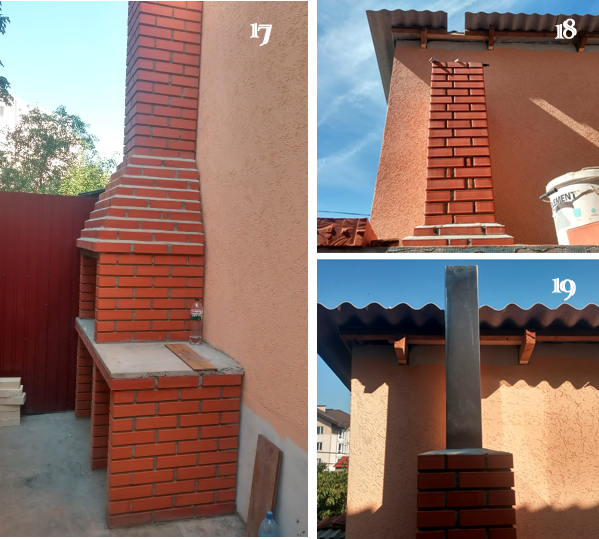
Photo 17 outdoors. To build even such a relatively simple do-it-yourself barbecue oven, brickwork ordering may be necessary.

Photo 18 country house with a barbecue area and a stove with a large chimney. To build such a rather complex brick barbecue with your own hands, diagrams with detailed dimensions and sequence of actions are simply necessary.
Useful video
Watch the video posted here, in which you can see how to make a brick barbecue with your own hands. All other stages of construction are also shown.
Average rating: 5 out of 5 .
Rated: 1 reader .
There are different options for the designs of barbecues, most of which you can buy in the store or order from the masters. If the budget is limited, many structures are built independently. Good example- do-it-yourself brick brazier. Drawings and photos, step by step instructions and detailed description are given in the article. Its design is perfect for landscape design any suburban area. Within the framework of the article, we will describe in detail this process, “from A to Z”.
How to make a brick brazier with your own hands? Look for step-by-step instructions, drawings and photos below!
Brick brazier device or what may be included in it
A brick barbecue device can be of a simple type or more complex. Device simple brazier:
- several rows of bricks;
- brazier.
More complex structures are presented either as one massive building, or as a whole complex of buildings. All of them have a similar building structure and layout:
- foundation;
- plinth;
- lower side walls;
- brazier;
- upper side walls;
- chimney.
As outbuildings may perform:
- smokehouse;
- bake;
- tandoor;
- washing;
- cauldron;
- countertops for food preparation;
- niches for storing dishes.

Methods for determining the quality of a brick
Each type of brick has certain characteristic features. You can learn about them from the marking, which is presented in the form of letters and numbers on the product. The properties of the material meet the requirements of regulatory documents and determine its scope. This is especially important when building a brick brazier with your own hands. Drawings and photos, step-by-step instructions and ordering are presented in the corresponding section of the article.
It is necessary to be able to independently determine the quality of the building material. There are some simple ways that will help you with this. In addition, in this way it is easy to check the integrity of the manufacturer.
When choosing a brick, you need to look at:
- appearance. The form must be correct and not have any significant damage. Tolerances from the norm are within two millimeters for one of the sides;
- vibration and sound. Try lightly hitting the brick wall with a hammer. If it is of high quality and there are no internal cracks in it, the hammer will bounce and ringing will appear;
- internal structure. There should be no chips on the product, and the uniform color of the section is welcome. Fireclay should not crumble from bricks.

These measures will help you decide which brick is needed for the barbecue in your case. Remember: high-quality materials are the key to a strong and durable design. Only in this way will it be able to withstand exposure to high temperatures and serve you for many years.
A brick that makes a dull sound when struck with a hammer indicates the use of low-quality raw materials in its manufacture and a violation of production technology.
Characteristics of refractory bricks
The question of which brick to use for the barbecue worries those who decide to build a structure with their own hands and want to choose best material for construction. Since the material will be used at high temperatures, it must meet important technical requirements:
- heat resistance. The brick must be designed for use at temperatures over 900 degrees. Such a temperature should not lead to its destruction even with prolonged exposure;
- the lower the thermal conductivity, the better. So you will reliably protect the buildings that are nearby;
- high mechanical strength.
The optimal characteristics of bricks for barbecue are:
Requirements according to GOST
The brick that is used for laying the barbecue must meet certain requirements in accordance with state regulations. We are talking about the following indicators: strength, temperature limit, and so on.
To assess the quality use GOST 8691-73. It determines the exact indicators in production:
- dimensions;
- weight;
- volume.
Density and fullness
The density and fullness of the material depends on the composition of the raw materials used in the manufacture. If it is clay, then the indicator should be in the region of 1800-2000 kg / m3, if quartz sand– 1800-1950 kg/m3.

Also important is the extent to which the manufacturing technology is observed. When constructing barbecues, it is necessary to use a solid brick, as it has a good strength indicator. This type is resistant to various factors impacts (unfavorable weather conditions, high temperatures).
Strength
For each brand of product, the value of strength is different. It depends on whether the recipe and brick manufacturing technology, as well as GOSTs, are observed.
Fireclay bricks have the best strength indicator. It is equal to 22 N / mm 2. Such products are great for the construction of fireboxes for barbecues and stoves. Strength is a determining parameter when choosing a material.
temperature limit
This indicator depends on the material and technology by which the brick is made.
For fireclay, this indicator is in a large range of 1640-1740 degrees. Such material is suitable for arranging a brazier.
Usual ceramic brick freely withstands lower temperatures - up to 1200 degrees Celsius. Therefore, we recommend using it for masonry lower levels brazier, external walls, as well as a smoke box.

Other sections of the structure can be made of brick with less stringent requirements.
Thermal conductivity
The thermal conductivity index is responsible for the ability of a material to give off heat. Since the brazier is located near other buildings, it is important to provide them reliable protection. This can only be achieved by using bricks with low thermal conductivity.
There is a certain coefficient called the thermal conductivity coefficient. The lower it is, the more refractory the brick is.
For ceramic, this indicator is up to 0.8 units, and for fireclay - up to 0.6.
Resistance to aggressive substances
During the combustion of firewood, coal and other raw materials, products are formed that adversely affect the brick. To the most common substances that have negative impact per brick include:
- acids;
- alkalis;
- salt.
Under their influence over time, the material is destroyed. To prevent this, it is necessary to choose brands resistant to aggressive substances. We recommend using fireclay bricks.
Silicate, hollow and quartz bricks are unlikely to be suitable for use in such conditions, due to their composition. In an acidic environment, they begin to break down.
Water absorption
The main feature of fire-resistant brick is that it has voids inside. This is due to the raw materials from which it is produced and the production technology itself. As a result, such products are able to absorb water, both from the atmosphere and in direct contact with it. Blocks can accumulate up to 25% of liquid. Depending on the quality, this indicator may vary.
The higher the water absorption of a brick, the less resistant it is to frost: if, for example, a product has this indicator at the level of 10%, then, as a rule, its frost resistance is very low.

Silicate bricks have a water absorption coefficient of up to 15%. Builders do not recommend building foundations and plinths from it, as it will quickly lose its strength and break.
The optimal water absorption rate for bricks is 8%
Frost resistance
This indicator characterizes the ability of the material to withstand low and high exposure temperatures, subject to the maximum absorption of a large amount of moisture. To calculate the indicator in production, the brick is subjected to freezing and thawing in a special way, and then it is measured whether there have been any significant changes in its structure.
The number of freezing cycles is an indicator of frost resistance. Optimal value this indicator varies by regions. For example, in warm regions of Russia, 15-20 F is considered the norm, and in areas with a more severe climate, 35-50 F.
The frost resistance index is regulated by several GOSTs:
- GOST 530-2012;
- GOST 379-95.
Dimensions and accuracy of geometric shapes

This indicator is one of the most important for any brick, since it directly depends on the quality and size matching whether the final masonry will be even. Refractory is no exception. Its dimensions are regulated by the rules of GOST 8691-73.
According to the requirements, the product must have 11 standard sizes. At the same time, the length, thickness and height are in a certain ratio among themselves (standard brick: 250x120x65). As for deviations, they should not deviate from the norm by 5, 5 and 2 mm, respectively.
The control of this parameter is carried out directly at the enterprises that are engaged in the manufacture of bricks. From a batch of products, several are selectively taken and their compliance with the standard is assessed.
Choosing a brick manufacturer
Bricks are produced by domestic and foreign factories. They offer a large selection of products that are distinguished by their characteristics and can be used in the construction of barbecues. We offer three manufacturers for consideration: the Vitebsk brick factory (we will use it in the construction of the brazier), the Borovichi factory and LODE.
| The name of the company | Characteristic features of a brick |
|---|---|
|
|
|
|
| LODE
|
|


When choosing a brick, there are several factors to consider. The main ones are the requirements of standards and the cost of masonry. The operational properties of the brazier depend on how correctly the brick is chosen. In this matter, it is recommended not to save and give preference to quality material
Advantages and disadvantages of brick barbecue
Before assembling a brick brazier, you need to dig deeper into the topic and understand the types of materials from which braziers are made.
by the most popular materials for the assembly of braziers are:
- heat-resistant steel (for example, grade 09G2S);
- cast iron;
- brick;
- concrete blocks;
Craftsmen make them from improvised materials:
- gas cylinder;
- ordinary large natural stone;
- metal barrel.
Among purchased barbecues have become widespread:
- folding;
- electrical.
These types of braziers differ from each other primarily in price, dimensions, and also weight. If you still can't decide which option is best for you, we invite you to take a look at the comparison table below.
| Type of barbecue | Advantages | disadvantages |
|---|---|---|
|
|
|
 |
||
|
|
|
 |
||
|
|
|
 |
||
| Folding brazier |
|
|
 |
||
|
|
|
 |
||
| Electric grills |
|
|
 |
||
Which brick is better for building a barbecue
Modern market building materials offers customers a large selection of bricks of different shapes, sizes and colors. They are produced by different factories and differ from each other in a number of key parameters. Below, we will try to figure out which brick for the barbecue is best suited. More detailed information in the table:
| Picture | brick name | Dimensions, mm | Porosity, % | Density, kg/m3 | Thermal conductivity coefficient, W/m*K | colors |
|---|---|---|---|---|---|---|
| 250 by 120 by 65 | 8% | 1800-1950 kg/m3 | 0,7-0,8 | White gray | ||
 | 250 by 120 by 88 | 6-8% | 1515 kg/m3 | 0,66 | White gray | |
 | 250 by 120 by 88 | 6-8% | 1000-1450 kg/cm3 | 0,4 | Gray | |
 | 250 by 120 by 65 250 by 120 by 88 | 8% | 2000 kg/m3 | 0,5-0,8 | red, brown, yellow, light brown | |
 | 250 by 120 by 88 | 6-8% | 1100–1400 kg/m3 | 0,57 | dark brown | |
 | 250 by 120 by 65 250 by 120 by 138 | 6-8% | 1600 kg/m3 | 0,34-0,43 | dark brown | |
 | 250 by 120 by 140 250 by 250 by 188 380 by 250 by 219 510 by 250 by 219 | up to 14% | 790-960 kg/m3 | 0,22 | brown, dark brown, yellow | |
 | 380 by 250 by 219 | up to 14% | 700-1200 kg/m3 | 0,11 | brown, dark brown, yellow, red | |
 | 240 by 115 by 52 240 by 115 by 65 240 by 115 by 71 210 by 100 by 65 240 by 115 by 113 | until 6% | 1900-2100 kg/m3 | 0,8-0,9 | brown, red, yellow | |
 | 250 by 124 by 65 | 3-8% | 1700–1900 kg/m3 | 0,6 | brown, red, yellow, beige |
To the material that is used in the construction of a brazier made of bricks with their own hands, they are presented special requirements, since the integrity and service life of the future structure depends on it.
The best option is fire-resistant brick. It allows you to get a safe, durable and robust design. You can build a brazier from the following types of bricks:
- from red;
- from fireclay;
- from white;
- from facing;
- from ceramic;
- from silicate.
We build a brick brazier with our own hands: step-by-step instructions, drawings and photos
Despite the fact that building a brazier out of bricks with your own hands is a simple task, it has a fairly large number of stages. Each of them has its own small construction features, which together lead to a large positive result. Therefore, it is important to draw up a plan for how you will build the future structure and strictly adhere to it. The object of this master class in the photo below.

- Spend preparatory work. Analyze the topic, learn in more detail the features of barbecues and more about their designs.
- Determine a place for the structure on your site and prepare it.
- Make a blueprint.
- Buy everything necessary tools and materials - everything you need to work on the project.
- Decide on the order. As part of this step, you will prepare a plan for how to properly lay brick for your barbecue.
- Lay the foundation of.
- Prepare masonry mortars.
- Put the grill out to dry.
- Put the brazier on the solution.
- Build a canopy.
Preparatory work
Let's start with preparation. Take enough time to dive into the topic and learn all the details of the project. Look at examples of popular garden barbecues, their features, pros and cons. This will save you from wrong actions in the future. As a result, you will definitely know how to build a brick brazier. After that, you can proceed to the stage of selecting a place on the site.
We determine the place for installation on the site

Choosing a place for building a brazier made of bricks with your own hands, drawings and photos, as well as step-by-step instructions for which are located below, should be carried out taking into account its safe and convenient operation. You should not place the building:
- Near the house or other buildings. The minimum distance from structures is three meters.
- Under hanging tree branches.
- Back to back with a support in the form of a fence, the walls of the house.
- Near objects that are flammable.
Such restrictions are not determined by chance. During cooking, the structure heats up, it is likely that sparks from coals and other raw materials will fly. When choosing a place, you must be guided by the requirements of fire safety.
You can draw a plan of your site to make it easier to imagine where to place the barbecue complex.

- Availability ground water. It is better to choose a place where they are not;
- Direction of the wind. It should not lead to ventilation and smoke problems;
Before you build homemade brazier from a brick on the site, let's deal with its project and draw the dimensions - more on that later.
Project, drawing and diagram on paper
It is not easy to prepare a project and drawings of a brick brazier with your own hands with dimensions. This work requires certain knowledge and skills.
This stage involves determining the dimensions of the future structure. They will be used in drawing up the project plan. On the drawing you need:
- draw all structural elements;
- designate dimensions;
- indicate the exact location of the elements.
In this case, it is important to observe the accuracy of proportions. Thus, it will be possible to visually assess the appearance and ergonomics of the future structure. We offer a plan and a drawing below. The only blot is that this plan shows a brazier with countertops instead of a stove, but otherwise its design is similar. You can see what the stove looks like in the photo below.
 , as well as the explanation and description below
 Detail drawing designs are shown below.

- The total width of the structure is 8 bricks - 2000 mm;
- Length 3 bricks (not shown in the drawing) - 750 mm;
- The height of the slab in 12 bricks is 780 mm;
- The internal height of the combustion chamber in 12 bricks is 780 mm;
- The total height, together with a smoke chamber of 43 bricks, is 2795 mm;
Tools and materials
When the brick brazier scheme is ready, you can take care of the tools that will be required to complete the plan. You will need:
Instruments:


Gloves
Rope and pegs
Cement tank
Bulgarian
materials:


Ordinary brick 180 pcs
Brick Sh-8 - 175 pcs
Brick Sh47 for the arch - 26 pcs

fireclay sand

corner
Cleaning door 140x140

Furnace door 410x410

Cast iron tiles
How many bricks do you need for a barbecue? For this project, 831 pieces will be required, as detailed above. In addition, we need cement, sand, clay, rebar, metal corners, tiles, and more. Only if all the materials are available, you can start the main work.
Mounting
It's time to proceed directly to the construction of the barbecue with your own hands. When doing work, it is important to consider each brick row. This will be described in more detail below in the paragraph on ordering, but for now we suggest that you familiarize yourself with the types of solutions that are useful for work.
Masonry mortar
When building a brazier in the open air, 3 types of mortar are used. This is due to the different heating temperatures of different parts of the structure.

| Solution type | Application | Description |
|---|---|---|
| Cement-sand | The outer verst of masonry is the foundation, the first rows of the brazier (up to fireclay bricks), the head and neck of the chimney. | Solution for cement base used in places where there is no strong heat. Not suitable for laying the inside of the oven. |
| clay-sand | Masonry of the inner verst, namely, the thermal storage zone, the source and fluff of the chimney. | More heat-resistant (up to 400 degrees) than the cement analogue, and also environmentally friendly. The shelf life of the solution is not limited! In case of evaporation of moisture, it is treated by diluting water. |
| We use for laying the combustion chamber. | When buying fireclay clay, make sure that it is not spoiled and has not been in a humid room for a long time. During operation, such clay can withstand up to 1800 degrees Celsius. The solution based on it is plastic, but when dried it is extremely durable. |
In the manufacture of fireclay mortar for barbecue from bricks to areas with increased heat load, you will need:
- fireclay sand;
- ordinary clay;
- water.
To do refractory mortar, do the following.
- To get started, take the clay (a full ten-liter bucket), add water to it and stir until a homogeneous slurry. Leave for 3 days until swelling.
- Next, take more water and add to the solution. Gradually mix in the sand. The resulting mass should be in consistency like thick sour cream, for example. The optimal ratio of sand:clay = 2:1.
- In case of water overflow, add a little more clay to the solution.

Clay-sand mortar
Let's make, we need:
- gray or white clay;
- shovel;
- sand;
- water.
- It is necessary to soak fireclay and ordinary clay 1:1. After the latter swells, mix with a spatula so that there are no lumps.
- Add sand in a ratio of 4:2 with clay and water. We do not use cement in such a solution.
- The last point is to check the readiness of the solution. We take two bricks and put them on top of each other with a 5 mm mortar seam, removing its excess. We give 40 minutes to dry and check the quality of the hitch - we lift the structure by the upper brick so that the lower one remains suspended. If it does not come off - the solution is of high quality. This concept is called adhesion.

cement mortar
We prepare a cement mortar, for its manufacture we will use:
- cement brand M400;
- water;
- sand;
- mixing container.
Manufacturing technology cement mortar for brick brazier not so complicated anymore:
- We use the proportions cement:sand = 1:3.
- Sand should be free of any impurities, as the process of weathering the mortar from the masonry will accelerate. The yellower the sand, the lower quality it is.
- We use a container - 1 bucket of cement, for 4 buckets of sand. We get 40 liters of the mixture, because. cement still fills the gap between the sand.
- Add water at room temperature at the rate of 0.75 liters per 1 kg of cement, stirring the solution.
- Check for adhesion, as in the previous paragraph.

On average, for laying 100 pieces of brick with a seam of 5 mm, about 30 liters of mortar will be required.
Since this structure has a lot of weight, you can’t do without a strong foundation for a brick brazier.

- Breakdown of the foundation and marking of the site. With the help of a tape measure, the place where the structure will be located is measured. Next, a spatula, pegs and rope are used;

- Digging a pit. Its depth should be 30-35 cm for a monolithic slab. This is quite enough (but it all depends on the soil in your area). Length - 2200 mm, width - 950 mm.

- We fill up a layer of sand by 10 cm and make a sand cushion, pouring water and a rammer. Next, we lay a mixture of crushed stone and sand 3: 1, also 10 cm.
- Around the base, you can make a horizontal waterproofing layer, into which we fill the clay and carefully tamp.
- We lay the lining roofing material of the brand RKP-350 (400) for vertical coating waterproofing. This is a fairly durable and affordable material. This stage is mandatory if the groundwater level in your area is at a depth of more than 1 meter from the bottom of the barbecue foundation.

- The construction of formwork from planed timber (or any durable substitute) around the perimeter of the pit. It should rise about 8 cm above the ground. It is reinforced with props from two edges and in the middle of the structure in order to prevent destruction during concrete pouring. Formwork is needed to ensure that the monolithic slab is smooth.
Treat the boards with machine oil before laying to make it easier to remove.
- We lay reinforcement (8mm) at equal intervals of 10 cm in length and width (reinforcement). We knit the reinforcement with wire and primer with cement milk of the dough consistency. It is installed on linings so that when pouring it is approximately in the middle of the plate.

- We use cement brand M400. The solution in this proportion is cement: sand: gravel = 1: 2: 4. Dilute with water to a thick slurry.
- We pour in one go to get a monolithic slab without cracks from the inside.

- The surface must be leveled with a spatula.
- The first 3 days we cover the plate with plastic wrap in order to protect it from drying out.
- Formwork can be removed after 6-8 days.

After the foundation for the brick brazier is ready, it is necessary to leave it for a while. 3 weeks will be enough (however, it all depends on the thickness of the structure). During this period, he will sit down and gain the necessary strength, so that it will be possible to start bricklaying.
Do-it-yourself brick brazier ordering
Do-it-yourself brick brazier allows you to:
- Calculate the number of bricks required for construction (831 pcs);
- Calculate the required amount of mortar for masonry (~ 250 liters);
 Brick barbecue ordering (masonry drawings)
 The order is shown up to 24 rows(smoke chamber). The scheme of its masonry can be viewed on the sections, and the drawing in the corresponding section of the article.
Now let's take a closer look at each of the rows. For convenience, we introduce brick symbols:
- Vitebsk - "B";
- Private - "P";
- Brick Sh-8 - “Sh-8”;
- Brick Sh-47 - "Sh-47".
| Row | Brick |
|---|
Before you start building a brick barbecue with your own hands, you should make drawings and use them to calculate the amount of building materials needed. In this case, the scheme must be created independently, since there are no universal barbecue designs.
Drawing up an action plan
During construction, one must be guided by the general instructions that apply to any type of barbecue:
- grill should be done at least 70-80 cm, taking into account the growth of the owner;
- the stove is traditionally located 10 cm below the grill level;
- a niche for firewood and cabinets, a hook for tongs should be provided.
In this case, it is necessary to take into account all the small details, so that later it would be convenient to use the structure. When the drawings are ready, you should make a calculation, draw up an action plan and prepare a list of building materials (including for the foundation).
The list of materials for basic work should include:
- fireclay and facing bricks;
- clay and ordinary mortar;
- metal bar d-30 mm;
- steel sheet 5 mm;
- doors for the furnace and blower;
- grate.
And for arranging the base:
- building mixture;
- reinforcing bars;
- boards for the construction of formwork;
- gravel and sand.
The construction of the furnace takes place on a slab base, the frame is built from fireclay bricks. After which it is faced with stone. Suitable granite, sandstone, dolomite, rubble stone. You can show your imagination and give the fireplace any bizarre shape.

Why brick?
Very often, barbecues and barbecues for summer cottages are created from improvised materials: barrels and, a little less often you can see welded structures (from the simplest to artistic casting). Do-it-yourself brick barbecues are much less common. Many are convinced that they are practically no different from portable structures.
But the heat distribution scheme in brick structures is completely different. The heat from the coals in the open grills is directed upwards, making the heat treatment of only one side of the meat. Therefore, during processing, it is necessary to periodically turn the product over to the other side to ensure its uniform frying.
The brick structure of the barbecue acts like an oven, only without a door. Heat, reflected from its inner surface, acts simultaneously on the entire surface of the product, ensuring its uniform processing.
This significantly improves the taste of dishes, making them more juicy and tender.
In this regard, the following advantages of a brick barbecue compared to a metal barbecue can be noted:
- uniform food processing;
- the ability to build complex structures with an additional hob, smokehouse, grill and sink;
- barbecue can be made one of the most attractive parts of the site.
How to make a garden barbecue
Like any other building, a barbecue for a summer residence is built on a foundation. The pavilion should harmoniously fit into the design of the site. Since such a pavilion will be used all year round, it is better to build a garden type hearth.

The device of the fireplace must comply with the basics of safety, a pipe should be brought to the roof. The construction of such a structure has a rather complicated technology. Externally and functionally, it is a fireplace, which is used to decorate the interior of the cottage.
Thematic material:
A gazebo or a pavilion with a fireplace can be stylized as a fabulous hut for receiving guests or arranged as summer house with kitchen utensils, dining furniture, sofa and TV. If the barbecue is located in the pavilion, it is better to entrust its construction to specialists, but if you have little experience, you can try to build it yourself.
The basis of the elementary construction of a barbecue is a quadrangular frame, coal is placed in it, over which a grate is placed. It is desirable to make such a structure as a fireplace multifunctional: build a woodshed below, above it - a crockery shelf, above - directly the barbecue itself, and a smokehouse can be located above it.
In this case, the building will be multi-storey. You should decide what the design of the future fireplace should be for giving, and then make drawings and outline a construction plan.
Barbecue Options
When considering brick barbecue projects, sometimes there is a desire to supplement the drawings with your own elements in accordance with personal preferences. Some future owners, when building a brick barbecue with their own hands, equip it with an additional barbecue and stove.
Barbecues can be very diverse:
- barbecue fireplace;
- barbecue grill;
- multifunctional building;
- barbecue with one hearth;
- barbecue with barbecue and cauldron;
Accessories for such furnaces are very diverse. For example, an oven, a skewer, a tandoor, a cauldron and others. Among the complex structures are hand-masonry and prefabricated.

An interesting idea is a complex. Stationary structures can be built in the form of a three-story structure. Semi-finished products are placed in the chamber on gratings or suspended. For cold smoking, a brazier with coals and a baking sheet with wood chips are placed inside the chamber, and for hot smoking, logs of the corresponding types of wood are placed in the furnace.
Such a smokehouse has only one drawback: it strongly absorbs odors. Therefore, if you process the meat after the fish, it will acquire a specific smell, and sometimes even a taste. In this case, it is better to make this device out of iron.
Building a brick barbecue
The positive aspects of installing a barbecue oven are its decorative appearance and functionality. It is better to install such a structure not in the open air, but in a pavilion or summer kitchen.

Consider step by step plan building a barbecue for a summer residence.
Step 1: Arrangement of the foundation
Initially, a place for construction is selected. When placing a barbecue in a structure, it is necessary to prepare a foundation for it. Together with it, a base is made for a barbecue oven, it is similar to a slab foundation.
The pit is made 0.3 m larger than the dimensions of the structure, and about a meter deep. The formwork is installed and a sand and gravel "cushion" is laid on its bottom. It is covered with the first layer of mortar (0.2 m), and then steel bars are laid like a lattice. From the end of the pouring to the complete solidification of the solution, 1-3 weeks should pass.
Step 2: Preparation
Before starting construction, you should select building materials for construction. It should be remembered that for the construction of the furnace, two types of bricks are needed: the main refractory and for facing. At the same time, in the area of the firebox, only fireclay bricks that are resistant to high temperatures are laid, which also has excellent heat-saving qualities and long-term heat transfer. And as exterior finish standard refractory brick grade is acceptable.
Step 3: Construction
In the construction of the structure, an ordering scheme is used (see below). It takes into account the usual brick sizes - 230 * 114 * 65. For a firebox and a stove, brick laying should be carried out only on clay mortar, and in places that are not in direct contact with fire, the usual one is allowed to be used.
For pre-mixed fireclay mortar, red clay, cement, sand and water are required.
Step 4: Firing
After the furnace is erected, firewood or coal is laid in the firebox and barbecue, and then set on fire. This is necessary for firing the inner surface of the furnace walls. The heat is brought to the maximum possible.
This is one of the most functional ovens for summer cottages. For small areas, a simplified scheme is suitable. When choosing the type of garden barbecue, all its parameters must be taken into account: functionality, size, location in the summer cottage. For the convenience and durability of the structure, it would be advisable to build a gazebo or pavilion.
Step 5: Drying
After heating the oven, the next step is drying. It should be carried out in the summer with clear weather - at least 5 days, and in the fall with cloudy - up to 20 days. At the same time, it should be covered from possible rain with a protective film.
The final step will be decorating the oven. It is necessary to free the bricks from excess mortar, apply paint in the right places to highlight the seams. After that, the barbecue oven is completely ready for use for its intended purpose.
We will send the material to you by e-mail
It is hard to imagine a vacation in a country house without meat roasted on coals. Metal braziers, no doubt, are convenient and inexpensive designs. But no matter how carefully you treat them, any metal burns out over time, and you will have to think about a new purchase. In addition, the metal brazier must be removed after use so that hunters for other people's good do not covet it in your absence. The most correct and reasonable way out is to build a brick barbecue in the country. The editors of the site have collected for you, in our opinion, the most interesting ideas finished projects, as well as detailed instructions construction from foundation to exterior finish.
A beautiful barbecue oven will decorate your yard
The main thing in the design of a garden brazier is the correct distribution of heat. For this, a barbecue and a brick brazier have three vertical walls and a chimney for extracting combustion products. The heat from the fuel rushes up into the hood, so working at such a barbecue is a pleasure. These garden ovens keep heat for a long time, so you can roast more than one batch of meat while the coals cool.
It's all about the practical side of things. But there is also a purely aesthetic one - such do-it-yourself designs can become a real decoration of the recreation area on your site. The main thing here is to observe reasonable proportions and correctly combine the architecture of the building with the overall design project of the estate. The most popular today is the country style, which combines rustic simplicity and practicality with solidity and special aesthetics. Natural stone in the decoration and powerful canopies that can hide from the weather are the main features of this style.
Look at the photo of how brick barbecues can look like.


Pros and cons of brick barbecues
Skeptics may object: why bother with such costly and heavy construction, when it is much easier to get by with a factory-made brazier made of thick-walled metal? Let's look at the pros and cons of a brick garden fireplace.
| Advantages | disadvantages |
|---|---|
| Long service life - such braziers do not rust and do not burn through. | The solid design takes up a lot of space, requires the allocation of a separate area that is safe for working with open fire. |
| Excellent heat retention, which allows you to save fuel and evenly fry meat. | The brick brazier is not mobile, it cannot be moved. |
| Possibility of including the structure in the general architectural ensemble, decent decoration of the recreation area. | For the construction of a barbecue, a special heat-resistant material is required. |
| The possibility of building with your own hands and the variability of finishes. |
The dimensions of a brick barbecue directly depend on your needs. Drawings and photographs of the most various designs it is easy to find on the Internet, it will not be difficult to choose the option that is right for your yard.

Related article:
Brick barbecue complex: dimensions and design
If you have planned the construction of a brick outdoor barbecue, it makes sense to consider an integrated design. It can include work surfaces for arranging dishes and cutting meat, a firewood rack for storing fuel, a cauldron, additional devices for smoking meat and fish.

You can focus on the following dimensions:
- the minimum width of the oven is 60 centimeters, the optimal one is 80. The dimensions largely depend on the brick used;
- the height of the grill is 70 centimeters. These parameters can be adjusted according to your height;
- the stove itself, the place for fuel are located 10 centimeters below the grill;
- the height of the barbecue is at least 2 meters, and taking into account the chimney - all 3.
These are the dimensions of the simplest design. Add to them countertops and other fixtures you need, and get the overall dimensions of the complex.
How to choose the right place for a barbecue design
Location - important point in the construction of a barbecue complex. Here are some tips for choosing a territory:
- an open fire stove cannot be built near wooden buildings and other flammable objects;
- it is better to choose the location of the complex away from home so that the smoke and aromas of food do not go through open windows;

- the smoke from the stove should not disturb your neighbors, otherwise your barbecue plans may be thwarted by the arrival of the fire brigade.
If we summarize these requirements, it turns out that the most a good option the location of the barbecue is the backyard on the leeward side.

Related article:
Brick BBQ Projects: Popular Models
Any construction begins with a project. You can not do without it in this case. The sketch of your future complex needs to be turned into order. It's not easy, so for beginners best advice will take advantage of the drawings and photographs of brick barbecue projects with the finished order. So, it will be easy to imagine the location of each brick. For free, such drawings for making a brick barbecue with your own hands can be found on many resources. We have selected a few examples for you.


How to build a brick barbecue oven with your own hands
It would seem that the construction of a brazier is a simple matter. Nevertheless, it is worth approaching it with all responsibility. The durability of the structure will depend on your approach. Properly selected material and stable construction, good finish are all ingredients for success.
The choice of material and the necessary tools
To build the foundation, you will need cement, sand and gravel or crushed stone. Reinforcement of the foundation is carried out using metal reinforcement. For the furnace, in addition to bricks, you will need to buy a stainless steel sheet, a metal pallet, roof tiles, a metal corner and a wooden beam.
And now about which brick to use for barbecue. Keep in mind: the brazier can only be built from special, refractory bricks, and not every building material is distinguished by such qualities.

Only fireclay or ceramic bricks are suitable for building a barbecue. The furnace itself is usually made from fireclay, and ceramic is used to build a pipe. The main requirements for bricks for barbecue:
- brick density in the technical documentation - from 20 to 100 units;
- frost resistance (marked in the documents with the letter F) - from 30 to 300;
- the brick must not have cracks, chips or other visible defects;
- the porosity of the material should be low, and the color should be uniform.
You can quickly check the brick right in the warehouse: hit it with a hammer. From a good solid brick, the tool will bounce. Poor quality will immediately “pop up” with cracks.

For work, you will need the usual tools of a bricklayer: a shovel and a trough for preparing a binder mixture, a trowel, a building level, a tool for jointing.
The basics of making a do-it-yourself drawing of a brick barbecue
It all depends on whether you are going to build just a stove with a hood or build a gazebo around it. If we are talking only about the barbecue, then a primitive drawing with a size calculation will do. It should be based on the dimensions of building materials. Foundation height - usually 3-40 centimeters, dimensions - one square meter. Under the brazier, a firewood is usually planned. Much more difficult if you are planning a brick barbecue in the gazebo. Here you have to start with the layout of the canopy itself, calculations of its area and the location of the brazier.

There should be a meter of free space in front of the barbecue so that it is convenient to cook. You also need to think about where the table will be located, and plan a place for pulling out chairs.
Step-by-step instructions for building a barbecue oven with an oven and a cutting table
Let's figure out how to independently create a monolithic brick barbecue with a cutting table.
| Illustration | Action Description |
|---|---|
 | Work begins with determining the location and marking the site for the barbecue complex. After marking, select the ground by about 20 centimeters and install the sides for pouring. |
 | Fill the prepared place with crushed stone and prepare the reinforced frame for pouring. |
 | Fill the prepared area with concrete. Use for filling quality cement marks not less than 300. |
 | The lower part of the barbecue can also be folded from foam blocks. They will not be exposed to heat, as they do not directly contact the brazier. |
 | The author of this project used original idea- I used wave slate to fill the base of the brazier. I made bumpers for it and fixed it on the mortar directly on the base masonry. |
 | Pour the base with concrete mortar and wait a few days until it becomes. |
 | For the brazier, you need to make a metal pallet from thick-walled steel. |
 | A small oven for baking on an open fire can be made from an old gas cylinder. |
 | After installing the stove, you can mark out a place for the brazier and proceed to laying its walls. |
 | Perform laying in sequence. By the way, the back wall can be made of less “smart” brick, as it will still turn black from smoke after the first cooking. |
 | To install the chimney, gradually narrow the masonry upwards. |
 | The chimney can be adapted from concrete pipe or an old metal barrel. |
 | Lay out the cutting table ceramic tiles. This surface will be easy to clean. |
 | The lower part of the structure must be closed. To do this, make wooden doors. |
 | Install the doors and place inside the firewood and the necessary equipment for cooking: baking sheets, grates, and so on. |
 | Place a meat rack over the roaster. To install the grate during the masonry process, you need to remove the metal pins on which it will rest. |
 | Enjoy the process. In such a complex, you can cook pies, and bake meat and vegetables. |
Video: brick barbecue step by step
How beautiful to decorate a brick barbecue
The design of the barbecue complex can be very diverse. You can use natural stone, it looks very colorful against the backdrop of the garden. Tile, colored bricks, plastering and the use of real tiles are popular.
You have a cottage. You want to make it not only beautiful, but also convenient and comfortable for your family and friends to relax. And not to cost too much. Don't know where to start? Do-it-yourself braziers and barbecue for a summer cottage made of bricks from a photo are an ideal start for arranging a summer cottage. We assure you that after reading this article and looking at the drawings, you will build an ideal barbecue on your site, on which you will then cook delicious and healthy food.
A step-by-step guide to preparing and building a barbecue with your own hands from brick
Preliminary work (planning and drawings)
Before you build a brick brazier, you need to carefully consider what it will be like. We recommend paying attention to the following points:


When you decide what kind of barbecue you want to make, draw up detailed drawings with exact dimensions. Thanks to them, you will not only be able to correctly build the structure itself, but also calculate the amount of materials needed.
Choosing a place for the barbecue
Brick barbecue grills can be located anywhere in the summer cottage - in the garden, in the gazebo, on the terrace - as long as it is convenient. But we advise you to consider the following recommendations:
- The first and most important point is fire safety! Do not build garden barbecues near wooden buildings, dry trees and bushes.
- There should not be a playground nearby.
- It is convenient if the oven and Brick wall summer kitchens will be located nearby, so as not to run far for groceries and everything else.
If the project provided for a sink, build a water supply nearby.
In order for the future brazier to stand well and firmly for many years, make its base as reliable and stable as possible. The dimensions and strength of the foundation depend on the dimensions of the planned structure. In any case, the foundation area should be approximately 50 cm larger than the barbecue on each side.

After two weeks (if the heat is less), when everything hardens well, you can start building a barbecue with your own hands.
Choosing a barbecue brick
Here again, fire safety should be remembered. If the barbecue is indoors, you should take a special refractory fireclay brick, it has a lot of clay, due to which it withstands high temperatures well and quickly warms up the room.

Types of bricks that are used to build a barbecue
If the future construction is planned to be outdoors, then professionals do not recommend doing everything from fireclay bricks, as it does not like moisture. It is better to take a full-bodied ceramic brick M200 or facing. Laid out of fireclay bricks inner part the firebox itself.
Optionally, at the final stage of building a barbecue, its decorative finish is done.
We prepare the solution
For lining, a cement-sand mixture is needed, and for laying the furnace itself, clay-sand mixture with the addition of a small amount of cement for strength. You can take the finished mixture for ovens and cook it according to the instructions.
To prepare a clay solution yourself, you will need:
- red clay;
- sand;
- cement;
- water.
Clay is filled with water and left for 5-6 days. Then it is thoroughly mixed, sand and cement are added little by little (a glass of cement 400 per bucket) and mixed again. The mixture is ready to use.
After the foundation has solidified before construction, two layers of roofing material must be laid on it for waterproofing. This is done so that the brick draws less moisture from the base, this will extend its life.
After that, we determine the position of the wall, apply the mortar and begin to build a brick brazier with our own hands.
Be sure to check everything with a level so that the masonry is even, as this will affect the quality of the furnace in the future.
Laying a simple brazier made of bricks (ordering)
To build such a brazier, carefully consider the scheme according to which step-by-step masonry is carried out, the so-called ordering. 

The so-called half-brick laying is performed: each odd row (1.3, etc.) begins with a whole, and each even (2, 4, etc.) from a half. This is done for a bunch of bricks. 

On top of the 4th row we lay the overlap, on which you can then put the dishes. 
On the 8th row, you need to put 4 thick-walled corners, as shown in the figure. The 9th row is laid on the corners.
In the 10th row, all the beauty of this barbecue is “piano keys”. They can be cut with a grinder from white fireclay and red facing bricks.

The last 2 rows - and the brazier is ready. Please note that in the 11th and 12th rows, longitudinal halves of bricks are used.


Skewers and a grill will then lie on them.

View from all sides
This is how our brazier-piano made of bricks looks like from different sides.

Option 1 - drawing with dimensions (click to enlarge)
Final result with dimensions.

Option 2, improved - drawing with dimensions (click to enlarge)
Another version of the barbecue grill. It is wider and back wall built from the bottom. Watch the video for the laying process of this option.
It was the most, which is easy to build on your own, even without experience in this area.
DIY brick barbecue - step by step construction with real photos
Consider another option, more complicated - how to make a brick barbecue with your own hands, which includes two lower compartments for firewood, dishes and other small items, a combustion chamber, a countertop and a chimney at the top.
For the construction of the structure itself, in this case, facing bricks were used, and refractory for the inside of the furnace.
Initial construction stage
We start laying in the same way as described above. The lower part will be in the form of the letter "Ш", only the branches are different in width. What will be wider for firewood, above it there will be a firebox and a chimney. The second is for dishes and other accessories, there will be a countertop at the top.
We make even seams between rows
So that everywhere between the bricks there is the same and even seam, here, when laying, a metal bar is used, in the context of which there is a square with a side of 12 mm. But we advise you to take thinner - 5-10 mm will be enough. You also need to constantly control the level of verticality and horizontal masonry.

Brick laying process
The bar is placed on the edge, as shown in photo 4, then carefully smeared with mortar. On the side where they put the bar, we put the mixture on a par with it, on the other a little more, a slide. We lay a brick, from the side of the plank we hold it with our hand, and on the other, lightly tapping with a hammer, we align it to the level. When the solution dries a little, remove the bar.
In order for the masonry process to progress faster, there should be several planks, as they are needed for each row.

Lay out the bottom part - the first 10 rows
According to this principle, 10 rows are laid out.

We prepare the basis for the firebox and countertops
Next will be the firebox and countertop. On the 10th row we put reinforcement with a diameter of 12 mm. The distance between the rods is 70 mm. Formwork is placed between the reinforcement so that the mixture does not fall down when the seams between the bricks are filled.
Professional advice: it is better to take metal corners, as there is a possibility that the reinforcement will bend under the weight.

We lay out the brick and fill it with mortar
At the same distance from each other, bricks are laid out over the entire area. Those that fall on previously erected walls are placed on the mortar, the rest are simply on the formwork. Then the gaps between the bricks and the surface are filled with mortar.
We form the combustion chamber and the vault
After drying, a firebox is erected - 8 rows are laid out vertically. Further rear part, which is located near the wall, is also being erected, and the remaining three sides taper up by half a brick. So 9 more rows are laid out.
Building a chimney
The next step is the chimney. In this case, 20 rows are made of bricks, and at the top there is a stainless chimney. A high pipe is needed so that the smoke does not interfere with either you or your neighbors, and the draft is better.
The last stage of construction - we finish the countertop and firebox
And the finishing touches - the countertop is laid out with tiles, and the inside of the firebox - with refractory bricks.

Final result
After a few days to dry completely, the barbecue is ready to use.
We recommend watching a video where there is the whole process of laying a garden brick oven.
Below in the gallery you can see more photos of barbecues and barbecues for summer cottages made of bricks with your own hands, and choose the one that suits your site in terms of style, functionality and location.

 In the gazebo
  On the terrace
  With hob
  On the street
  With built-in smokehouse
There is no fundamental difference between barbecues and barbecues, except that on the first one, food is cooked on skewers, and the second on the grill. Both can be done on the same structure, the construction of which will be discussed.
Often, a country barbecue is a simple outdoor building in the open. A brick barbecue is a more complex device that can be located in a summer kitchen, gazebo or outdoors, but it already has a chimney and in most cases a cover to protect it from rain and snow.
A temporary brick cooking device is a great summer option
If you do not plan to visit the country house in winter, then a barbecue or barbecue made of bricks without mortar is perfect for this purpose. In the spring it can be easily and quickly folded, and disassembled for the winter.

Masonry scheme without mortar
Here is a diagram and step-by-step instructions that show the manufacture of such barbecues and brick barbecues.
If the barbecue is planned to be small (9-10 rows of bricks), you can simply level and compact the ground well. For a larger structure, it is better to fill the foundation.
We begin to lay out bricks according to the same principle as in the previous versions, but in a circle and with gaps of about 50 mm.
On top of the 5th row we lay a steel sheet, which will serve as a pallet for coal.
We put 2 more rows and install the grate for cooking. Then 2 more rows for protection from the wind.
To build such a round barbecue brick, you need a little more than 100 pieces.
This is one example of a temporary barbecue, you can change it at your own discretion. Or choose for yourself and build one of the options presented below in the photo.


