Do-it-yourself frame cottage. Projects of country houses: looking for an economical and durable option
One-story frame country house – perfect solution for those who want to equip a warm and comfortable home with their own hands for a small price and as quickly as possible. Such a house for a summer residence can be built with your own hands in just a season!
Advantages of frame houses
However, if you are going to do the construction with your own hands, then you can not do without additional wood processing. Frame buildings are proud of their durability. According to experts in the construction of such buildings, the house can last more than 50 years.
Disadvantages of frame country houses
But besides the advantages, there are several important ones. The first drawback is the fire hazard. You may ask why we talked about the fire resistance of such buildings earlier? The answer is quite simple - country frame houses are built of wood, which supports combustion. Therefore, it is important to treat wood with flame retardants, which reduce the possibility of fire to a minimum. This also applies to the appearance of mold and rot, to which all building materials are subject. That is why when buying wood, you need to follow all the stages of its drying and processing. by special means, but it is better to purchase material from trusted suppliers.
Many attribute a reduced level of strength to single-story frame buildings. This is true when compared with brick or stone houses, but you are afraid that the house will be demolished. strong wind or a hurricane is not necessary. But for this it is necessary to comply with all stages and construction technology. The main disadvantage is that such buildings do not "breathe". The problem is that building materials that have been treated with various impregnations begin to pass air worse. To solve this problem, you just need to install a high-quality ventilation system in the country.
Another fact that is considered a minus is the low level of sound insulation. The use of additional soundproofing materials will help. As you can see, frame structures have both pluses and minuses. And they should be considered in order to make the right choice. However, given the number of advantages and disadvantages that can be eliminated quite simply and economically, the benefits of building such a house on suburban area visible to the naked eye. It remains only to tell how the construction of a frame country house with your own hands is going on.
Construction of a country house frame house do-it-yourself begins with the creation of the foundation - the foundation. In this case, the foundation is needed ordinary, as for simple house. The only difference is that since one-story houses are most often erected, it is simply impractical to make too much depth of occurrence. The best option is a strip or prefabricated concrete block foundation. True, in order to achieve durability, you can not do without high-quality waterproofing.
You can equip the base of asbestos pipes. In this case, the main condition is the uniform arrangement of the supports. To do this, mark the points along the perimeter in increments of 1 meter. After that, in each marked place, we dig a hole with a depth of up to 1 meter and a width equal to the diameter of the pipes. We expose the pipes vertically, ram the soil and fill it with concrete.
If you do all the work with your own hands, then to prepare a suitable mixture, you need to take cement, sand, gravel in proportions of 3: 1: 4. After pouring the cement, it must be left for several days so that the mixture dries and gets stronger. In this case, it is desirable to close the structure from direct sunlight, otherwise the cement may crack.
Do-it-yourself flooring - the second stage in construction
After pouring the foundation, we proceed to the arrangement of the floor. Work begins with the laying of a waterproofing layer - for this, we line the roofing material along the perimeter of the walls. Next, we lay out the boards on top of the roofing material, treat them with an anti-rotting composition and leave to dry. It is important to remember that laying should be as accurate as possible. The distortion of the material even by a millimeter will lead to a violation of the geometry of the entire building.
The accuracy of setting angles is important - as much as possible tolerance should be no more than 1 cm. Fixing the subfloor, which can be unedged board, is carried out using anchor bolts - for them, holes are drilled in the concrete base in increments of 2 meters. Next, we fasten the logs, laying the selected material for insulation between them. At the next stage, we lay the finishing floor boards, which are compacted with construction brackets and attached to the logs with nails.
Make sure that all elements of the building are made of wood of the same grade. Otherwise, differences in expansion coefficients will lead to a skew of the house. The finished floor must be cleaned with a planer, polished and treated with oil or drying oil. If in the future you are going to cover the floor with linoleum or other flooring, then polishing the floor with a planer can be omitted.
Do-it-yourself wall and frame construction at home
Construction one-story house do-it-yourself includes the construction of a frame with walls. The work is divided into several stages:
- The construction of the lower harness, which is made of connected bars using the tongue-and-groove method in such a way that not the slightest gap remains. Experts do not advise the use of metal fasteners, because upon contact with metal, wood can begin to rot. Therefore, it is better to use wooden dowels.
- Installation of vertical boards. In places where the boards will be placed, you need to install dowels. Do-it-yourself construction starts with the installation of corner posts mounted on dowels. The beam must be set vertically, using a temporary spacer to fix the angle.

- Upper frame trim. This stage is carried out after strengthening the racks and their subsequent fixation in a vertical position. All corners must be strictly straight. Installation of ceiling baubles, which should be located every 50 cm, coinciding with the location of the vertical racks.
- Installation of support bars, which are installed where they will be located interior partitions. This will avoid sagging of the ceiling and give strength to the structure. After mounting the frame, the building should be sheathed with boards. Do not forget about the need to install windows - it is best if their size does not exceed 20% of the size of the walls.

The roof of the house - step by step
You can assemble the roof either on the ground, after which it is transferred upstairs, or immediately on the house. Choose the option that is convenient for you. First you need to prepare the rafters - comb the ends on the bars, which should form an angle of 50 ° at the end connection. For fasteners, it is best to use nails and crossbars. As a result of the work, you should have roof elements resembling the letter A.
Next, we create a crate - nail the boards to the rafters at a distance of 10 cm so that they go beyond the ends by 25 cm. After that, the crate is covered with roofing material (waterproofing) or another durable synthetic film. Attach the material with a construction stapler. At the last stage, we lay the roof. We fasten the selected material over the roofing material.
At the same time, laying work begins from the bottom rows, and the sheets themselves are mounted with an overlap. The roof that extends beyond the edges of the crate is cut off. At the last stage, a ridge strip is attached and a drainage system with several drains is built. A variety of materials can act as a roof: corrugated board; metal tile; ondulin.
The last stage of work - insulation and finishing
First you need to make a choice thermal insulation materials. They are chosen depending on the purpose of the house. From the inside, the walls can be sheathed with boards or drywall using self-tapping screws. Drywall, in turn, is pasted over with wallpaper or painted - here you have to choose for yourself. Don't forget to insulate your home.
If you use the country house as permanent place residence, it is desirable to use expanded polystyrene or mineral wool. For summer cottage you can use a lighter and more inexpensive insulation.
We lay the material for insulation between the beams in this way and fix it with brackets. We lay a waterproofing film on top of the material and stuff a crate of thin laths - this will ensure normal ventilation. Outside, the house can be finished with siding panels, clapboard or any other material for exterior cladding. By the way, choosing wood paneling, nail it at an angle of no more than 45° and do not do it firmly, as the wood may swell or dry out a little over time.
As you can see, everyone can build a house with their own hands. You just need to purchase the materials and follow all the instructions exactly. After all, this is the only way to enjoy all the benefits. frame houses.
Our step by step instructions We will divide the construction of a frame house into several stages:
It is worth noting that each stage of the construction of a frame house deserves a separate article, in addition to everything, if you describe all the possible options for foundations, roofs, etc., you can get a whole book. In this regard, to improve readability, some steps in construction are described in detail in separate articles, but here - only what concerns the features specifically. frame house.
Step number 1: Preparatory work for the construction of a frame house
Preparatory work for the construction of any house are the same and include:
- Site preparation
- House layout
Site preparation
First you need to clear the site of vegetation, if not all, then at least the place where the house will be built. This will greatly facilitate the markup and make it more accurate.
If the construction site has a large slope, then, depending on the type of foundation and desire, it can be pre-leveled on the horizon using special equipment.
Attention! Do not neglect this procedure, spending 1-2 hours on clearing, in the future you will greatly facilitate your work, and measurements in the grass can be with a large error.
House layout
 Marking is a very important stage, because the layout and evenness of the corners of the walls depend on it. With inaccurate markup, it will be very difficult to correct this error in the next steps.
Marking the foundation of a frame house, as well as any other, as a rule, includes a preliminary placement of pegs (all external walls are marked), as well as marking all internal walls.
If you want to know how to properly mark the foundation for a house with your own hands, and so that all walls and corners are even and in line with the project, I advise you to read my article about this. Given the large amount of information, I had to take it out separately.
Step number 2: Do-it-yourself foundation for a frame house
The great advantage of a frame house is that almost any type of foundation is suitable for its construction. The only limitation is the type of soil on the site and your capabilities.
It is worth saying that laying the foundation for a frame house with your own hands deserves separate topics of discussion and is included in separate articles. Moreover, there are several types of suitable foundations, and which one to choose is up to you.
Here I will briefly talk about suitable foundations for a frame house, and about the cases in which each of them is used, as well as give links to their detailed description.
 The most common type of foundation for a frame house is a pile-screw. It is practically the simplest and cheap option for such a house, especially since it is not difficult to install a pile-screw foundation with your own hands.
Such a foundation is suitable for almost any soil, except for rocky ones. Particularly well suited for swampy soils, where dense soil rocks are deep and other types are very expensive.
In general, all the pros and cons of pile-screw foundations are discussed in another topic that will help you decide on the choice of support for your home.
Shallow strip foundation
 Shallow strip foundation, is also used for construction quite often. This is due to the relatively low cost of laying it, as well as the possibility of using concrete floors in the house.
Such a foundation, due to its relative fragility, requires precise adherence to the laying technology.
As a rule, a shallow strip foundation is used in good soils, and is categorically contraindicated on soil with very high level groundwater and swampy soils.
Slab foundation for a frame house
 Recently, a slab foundation is gaining more and more popularity for the construction of a frame house with their own hands. Despite its low cost, it has obvious advantages, such as versatility, reliability, durability, and it can also be used as a subfloor in the house and not be spent on it separately.
Often, instead of a classic monolithic slab, a slab foundation with stiffeners is used. This allows you to save a little on laying, and also strengthens the entire structure as a whole.
Step number 3: Do-it-yourself frame house flooring
floors in frame house not much different from the floors of other types of houses and can be wooden or concrete. The choice depends entirely on the type of foundation, capabilities and desires. 
In this step by step instructions we will consider in detail only a wooden floor, concrete - in a nutshell, since it is used less often, and it is not possible to fit everything in one article.
Concrete floor installation
 It is worth noting that the concrete floor in the frame house is arranged, in cases of a slab foundation, or a strip one. Everything is clear with the slab - the slab itself will be the floor of the first floor.
But if the foundation is strip - the concrete floor is made of lightweight concrete, such as expanded clay concrete, for example.
Wooden floor installation
Let's look at the device of a wooden floor using the example of a pile-screw foundation. For a tape, in principle, everything is done in exactly the same way, with the exception of the lower trim, it can be from a thinner beam. But first things first.
Tying the foundation of a frame house
The device of a wooden floor begins with the binding of the foundation. As a rule, the strapping is made of timber 150x150 or 150x200, depending on the thickness of the wall and the distance between the piles. The greater the distance, the thicker the beam must be to avoid sagging. 
The strapping is necessary, firstly, in order to give rigidity to the foundation, and secondly, to evenly distribute the load on the foundation, and thirdly, it will serve as a support for the future floor of the frame house.
In order to easily carry out the strapping process with your own hands, we divide it into several stages:
- The beam is laid out along the perimeter of the foundation, the length of the walls and diagonals are checked. At this stage, the final and accurate marking of the walls is carried out, according to the project. By the way, do not forget about the waterproofing, which we put under the harness in the form of roofing material.

- The next step is to outline the points of joining the timber, they should be located on the pile, as these will be the weakest points that should not “hang”. This applies to houses whose walls are longer than the length of the purchased beams.

- The beam is joined with an overlap of 20-30 cm, as shown in the photo. To do this, the so-called "locks" are cut out from the end.

- The corners are joined in almost exactly the same way. This is clearly visible in the photo.

- The beam is attached to the foundation with bolts or studs. To do this, it is necessary to drill holes, both in the head of the foundation and in the beam itself. For ease of further installation, protruding parts - bolt heads or nuts with studs - must be deepened. The joints are additionally punched with nails of 150 mm or 200 mm, depending on the size of the beam.

- Once the perimeter is ready, we move on to the final step - tying the foundation under the inner walls of the frame house. This bar, to the already installed outer one, is attached in the same way. For reinforcement, you can additionally apply mounting metal corners.

When the binding of the foundation of the frame house is ready, we proceed to the next step in our instructions - the construction of the floor frame.
Floor frame in the house
It is worth noting that already at this stage it is desirable to provide for all communications entering the house, such as water and sewerage. Electricity and gas can be supplied later, but if everything is foreseen in advance, there will be much less problems later.
The next step is to install the lag, on top of the harness. If the distance between the supports is about 4 meters, then it would be better to use a beam measuring 100x200mm or 100x150mm. You can use a board 50x200mm or 50x150mm, stitching them in two. 
If the distance is less than 3 meters, you can use a board with a size of 50x150mm or better 50x200mm.
Installing a log is a simple step in assembling a frame house, but there are some nuances that need to be provided for in this manual:

Do-it-yourself waterproofing and insulation of the floor of a frame house

It is worth noting that waterproofing, as well as vapor barrier, should be installed with an overlap, according to the instructions for the material, while eliminating the ingress of moisture into the insulation, both from the outside and from the inside. And the insulation itself fits tightly, without cracks.
So we reviewed the instructions for arranging the floor of a frame house, now it's time to start on the walls.
Step number 4: Arranging the walls of a frame house
The next step of our instructions will install the walls with your own hands. Just like with the floor, we will fasten all boards and beams with nails and (or) mounting metal corners, some fastenings can be made with studs.
It should be noted that almost the entire frame is assembled from a board measuring 50x150mm or 50x200mm, depending on the required wall thickness and the required thickness of the insulation. 
Some people think that it would be better to install a beam at the corners of a frame house, but this is not entirely correct, and why - a little later, during the installation process, I will tell you about everything.
So, let's start assembling the frame of the walls of the future house.
For a better understanding and assimilation, we will divide our instructions for arranging the walls of a frame house into several stages:
- Assembling the walls of a frame house. Windows and doors
- Installation and fastening of walls vertically in place
Assembling the walls of a frame house with your own hands. Windows and doors
We will assemble the walls on the finished floor of the frame house, this is the most convenient option. But it must be taken into account that in this case, it is necessary that all dimensions are accurate so that the walls do not turn out to be longer or shorter than the already arranged floor.
To understand what I'm talking about, first look at sectional wall of a frame house and then I'll talk about everything in order.

Now we will analyze step by step how to assemble all the walls of a frame house with our own hands:
- First of all, we need to decide on the height of the ceiling in the house. Let's say that the height of the draft ceiling will be 280cm. So the vertical bars frame walls should be 280-15=265cm. The diagram shows where 15 cm came from.

- The distance between the uprights, as a rule, is chosen based on the width of the insulation sheet, as a rule, its width is 60 cm. If the insulation is on a cotton basis, then the distance is 2 cm less for closer contact.

- The top and bottom boards of the wall are laid out on the floor and the places where the vertical posts will be nailed are marked. Then the racks themselves are laid out and pierced with nails 120-150mm. You can additionally fasten them with corners.

- It is worth noting that each wall will be less than the thickness of the wall than the length of the floor. This is clearly visible on the diagram.

- If the length of the wall is greater than the length of the board, then the wall is assembled from several parts. This is also done in cases where there are few helpers, because the whole assembled wall will have a lot of weight.

- As a rule, jumpers are mounted between the racks to stiffen the entire structure. There are no strict rules on the number and frequency of installation, it all depends on the length and height of the walls, but usually they break through one or two per gap between the racks. The second option is better and is visible in the photo, in the case when they break through one at a time - they are mounted in a checkerboard pattern (one at the bottom, the next at the top). This can be done later, when the walls are installed. Most often, jumpers are made with the expectation that they will serve as a joint for plywood or osb-boards, depending on further work.

- Window and door openings in the wall of the frame house are arranged as shown in the diagram.

- This is what it looks like in real life.

The most common mistake when assembling the walls of a frame house is that many people forget to take into account the thickness of the board in the calculations, thus the wall is not as long as we would like.
Putting the walls in place


It is worth noting that when assembling the walls, it is necessary to use a cord, pulling it from one corner to another, otherwise, the corners will be even, but the walls will not.
Upper harness and structural reinforcement
So, the wall frame is assembled, now it is necessary to make the upper trim from the same board as the walls.
The upper trim is necessary, first of all, for a stronger adhesion of the corners, and also gives unity to all parts of the frame walls and distributes the load between them. 
To do this, it is necessary to pierce the board with 120-150 mm nails over the walls, around the entire perimeter, including internal bearings, so that all joints are blocked with an overlap of at least 25-30 cm. Except for corners where the overlap will be equal to the wall thickness. 
The next step in our instructions will be to strengthen the entire structure as a whole. There are several options, the most common is reinforcement with plywood or OSB-plate. 
As a rule, having broken one side around the entire perimeter (internal or external) with sheets of OSB-plate, the frame of the house already becomes very rigid.
Internal partitions of a frame house
The device of internal partitions is almost no different from the device of external walls, except that they have softer requirements in terms of thickness and insulation. 
- Internal partitions, unlike external walls, can be made thinner. Everything will depend on preferences and comfort for soundproofing.
- The insulation, inside the partitions, will serve, first of all, as a sound-absorbing material, rather than as thermal insulation.
- It is allowed to insulate internal partitions without waterproofing and vapor barrier materials.
These are all the main differences between the internal walls and the external ones, otherwise they are arranged in exactly the same way.
Step #5: Frame House Roof
The roof of a frame house is practically no different from the roof for other houses, be it concrete, brick or any other. I will even say more, the installation of a roof for a frame house will be less laborious than, for example, for a block or brick house, because its fastening to the walls will be much easier. 
It is worth noting that the construction of a roof is a very responsible process, but if you do not have a complicated layout of the house, then you can easily do it yourself.
Building the roof of any house, including a frame house, is a very big topic, where there are many nuances. Firstly, there are many types of roofs, and it is not possible to describe everything in detail in one article. And secondly, in order not to confuse you, I, perhaps, will transfer this topic to a separate article.
Step number 6: Warming the frame house
So we got to the final stage of building a frame house - its insulation. Everything needs to be insulated - the floor, walls and ceiling.
You can read more about insulating a frame house with your own hands in another step-by-step instruction, here we will discuss only general points.
When choosing a heater for the walls of a frame house, it is necessary to take into account not only the characteristics of the heater itself, but also the features of the tree, with which not all types of insulation will interact well.
Here is a small instruction for warming a frame house with your own hands:
- Outside, over the OSB sheets, a special waterproofing membrane is stretched. Which side - should be in the instructions for it.
- Inside the house, between the racks, insulation is laid, in several layers, depending on the requirements for the house and the thickness of the wall. Each layer is laid with an overlap on the joint of the previous one in order to avoid cold bridges.
- Floor insulation works in the same way.
- It is better to insulate the ceiling from the attic, after stuffing vapor barrier film from below on the ceiling beams and hemming them with a board or plywood.
- After laying the insulation, it is necessary to fill a vapor barrier film on top of it, it will protect the insulation from moisture from the inside.
- Depending on the needs and further finishing works, on top of the film, sheathing material is stuffed onto the walls - a board or slats, but most often - OSB sheets, on top of which, in the future, a fine finish is carried out.
As you can see, there is a lot of text. But, I believe, all stages of construction have been described in detail here. do-it-yourself frame house, despite the fact that some points have been moved to separate topics, but this is only for your convenience.
I hope that by following this step-by-step instruction, you will be able to acquire a warm, cozy and reliable home without much difficulty and at minimal cost.
Clean air outside the city can not be compared with the atmosphere of a large city, which is why many of its residents would like, if not to move there permanently, but to enjoy it more often. That's why buying suburban area and the construction of a country house can be the first step towards the construction of a real country cottage in the future. But first things first.
Why not do it yourself
Alas, but the very thought of it scares away many, because. they believe that this is a very difficult and troublesome business. However, now it is possible in the shortest possible time to learn the basic techniques that will help even a person who knows nothing about construction to build a quite decent cottage. Projects of frame houses for summer cottages can be viewed on our website.
Of course, professional work will be of better quality and more reliable. However, it is worth resorting to the help of construction organizations in cases where you have all the materials and money necessary for construction, but there is no free time. If it is enough, you can try to implement all your ideas in the project of a country house.
Tip: the money you save is better used to buy better materials.

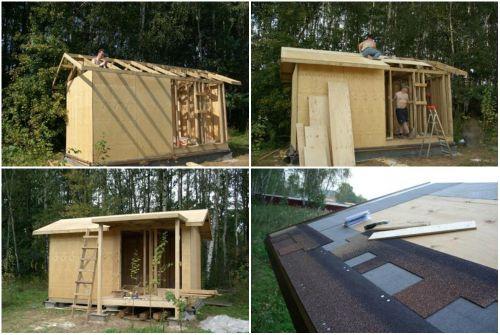
In the photo - a simple project of a frame country house 6x6 m
frame house
- The first stage of construction will be preparation - you need to make a project for the future structure, after which, based on the calculations obtained, acquire the required amount of building materials.
You need to think about:
- foundation;
- strapping;
- frame;
- walls;
- roof.
- Let's take a closer look:
| Foundation | This building element must not be forgotten even when building the smallest structure. Don't worry, you can easily make it yourself. Prepare:
|
| strapping | To do this, prepare a beam with a section of 150x150 mm or 200x200 mm, which should be attached with anchors over the blocks. |
| frame | It is made from a bar with a section of 50x150 mm, which must first be treated with an antiseptic. |
| Walls |
After checking the level, you can proceed with the installation of the upper trim. |
| Roof | For the manufacture of the ridge and rafters, boards with the same cross section as the frame ones are suitable. But the cross section of the attic beams should be 25x100 mm. Installation of jibs allows you to increase the strength of the roof. The rafters are attached to the top trim using corners and 100 mm nails. If you plan to use for finishing the roof flexible tiles, on top of the rafters it is necessary to lay a layer of plywood (thickness 9 mm). |

Additionally
- It is advisable to divide the house into two main units - housing and a utility room, which should occupy about a quarter of the entire area, and be used to equip a toilet or pantry. A small window will suffice for a utility room, but a full-fledged one should be installed in the living room.
- So that both in the heat and in the cold, staying in a country house is comfortable, it must be carefully insulated. For this, it is recommended to use mineral wool, which is laid on the inside of the walls. To protect the heat-insulating layer from moisture, you should also take care of the vapor barrier. If linoleum is used on the floor, its vapor barrier is not needed.

- For interior wall cladding, lining or plasterboard is suitable, the price of the second is lower. It is worth noting that the use of drywall will increase the total weight of the walls, then you will have to do more.
- The installation of the ceiling is carried out similarly to the walls. In this case, the heat-insulating layer is best laid on top.

- The instruction requires mounting a vapor-tight membrane on the outer walls, on which the crate for the outer skin will be placed. For this, boards 25x100 mm are used, which are overlapped.
In fact, in a short period of time, you can build a quite decent country house, where you and your family can spend pleasant days away from the city smog and bustle.
Typical mistakes during construction
- Construction too big building . Frame houses for a summer residence should not be huge, since certain financial expenses are required for their maintenance. You should design a house of exactly the dimensions that you need at the moment, no more, no less.
- Too thick walls. This is also associated with the extra spending of money, because. an increase in the total weight of the building implies the use of a stronger foundation. The construction of the lungs in conjunction with a high-quality thermal insulation layer will save you from problems with heating.
- Basement or basement use. If there is no special need for them, it is better to refuse. Since their arrangement requires additional hydro- and thermal insulation, as well as the implementation of communication systems. And this is again associated with additional construction costs.
Tip: when building a fireplace, it would be most rational to place it in the middle of the room, this will allow it to heat evenly all rooms.
Output
This article has summarized the main steps that you should take when you decide to build your own small frame country house. Experts recommend not starting the process until you have full set building materials. The video in this article will help you find more information on this topic.
If you have recently acquired a summer cottage, then the issue of building a small country house is very relevant for you. It can store household items, expensive tools, as well as create a small lounge and kitchen. In this article, we will look at how to make construction of a country house inexpensively with your own hands, and also find out what materials you can decently save on.
Building a country house inexpensively with your own hands
Of course, like any construction, it also needs to start with a budget calculation. How much money are you willing to spend on this project? If enough, then you can think about building a brick house. Otherwise, it is recommended to use the borrowed frame house technology. The advantages of this method are obvious - saving money, as well as the efficiency of the work performed. In a couple of weeks your house will be ready for operation.

Stages of building a country house:
Creating a project. If you do not want to contact a specialized agency, then you can create your own project, which will be convenient for you personally. The main thing that you have to do in any case is to show your finished project professionals to avoid possible problems in future. As for the area of the future home, it all depends on your personal preferences and capabilities. 40 sq.m. is quite enough.
Purchase of building materials. What materials are needed to build a country house with your own hands? Today, the market offers a huge variety of high-quality, efficient and durable materials that are suitable for any construction:
- A log or beam. Wood will be needed in any case. Depending on the quality of raw materials, the cost of timber will fluctuate. Carefully inspect the material, it is important that it is thoroughly dried.
- Brick or cinder block. They are low cost, durable and reliable. Although building a house with these materials will not greatly affect the cost, be prepared to spend an impressive amount on subsequent wall decoration.
- SIP - panels. quality, modern materials which not only save you money but also time. A house made of SIP panels is warm, dry and comfortable.

Important! If you want to save money on materials, study the market well. You will be able to find quality raw materials at a big discount. You should not focus on branded companies, since they are the ones who wind up more than 50% on the price.

Where to start building a country house on a summer cottage?
The most important element of any country house is the foundation. It depends on the duration of the operation of the structure, its reliability and strength. Of course, the foundation should not be neglected, since any mistake or wrong action will immediately be expressed in cracks and splits in the walls. Before digging a trench under the foundation, carefully calculate the weight of future materials - walls, roofs, cladding, insulation and finishes. All this adds kilograms. Usually, the depth of the foundation of the house should be at least 1 m. After pouring, it must be left for a month for tamping and drying.
Immediately after the foundation, you can proceed to the construction of the frame and installation truss system roofs. It is also worth considering high-quality sewage. If the central sewer, then you should buy a septic tank with leads to irrigation fields.
So, is it possible to build a country house cheap do it yourself? Certainly. The main thing is to plan and not rush to buy materials from the first person you meet.
See also video:
DIY garden house
Do-it-yourself summer houses for relaxation

Most summer residents live outside the city only in the summer and do not need expensive permanent houses. They want to have a roof over their heads and enough living space to accommodate family members.
How to build a house with your own hands?
An optimal economic pension is best suited for this purpose.
Advantages of summer cottages
 Boards for the home are popular due to the following advantages:
- High level construction - 2-6 weeks
- Low cost - from 3 to 8 thousand rubles per square meter. m against 18 thousand rubles. per square meter. m for houses with brick walls
- Low weight, which allows the use of cheap shallow foundations
- Resistant to freezing forces
- Ability to manufacture parts in a factory, which improves the quality of construction and simplifies assembly
- No shrinkage
- Wide range of architectural solutions
- The ability to warm up and adapt at home for life
Panel house design
 The house consists of a wooden or metal frame covered with shields.
The metal frame is made of a rectangular cross section, of wood - from a rod. For outdoor coatings:
- slats
- OSB panels
- Profiled film
- Moisture resistant plates
- Asbestos-cement slabs
- toilet
The inner skin is made from moisture resistant materials.
If the house is to be lived all year round, the walls are lined in isolation.
Construction of panel houses
Construction companies offer services for the construction of turnkey panel holiday homes or a set of parts for own construction. The first option frees the builder from most of the problems, while the other allows you to build a house for your summer house and save money.
Project selection
 A quality project is the basis for success in building a house.
Serious companies that are engaged in the production of prefabricated houses and key building kits offer dozens of standard models and offer customized design services.
Individual projects are quite expensive, so they are rarely used for economy class houses.
Creating a standard project allows you to save in design and a wide range of already prepared architectural solutions - choose the desired design and location of the house.
foundations
 Under the light panel house, spacers and recesses are used with columns and ribbons and screw pilots.
- Small hidden poles save costs and reduce construction time.
The columns are installed in increments of 1.5 to 3 meters under outer walls and columns, at the corners of the building and in places where internal walls connected to the outer walls. They are made of logs, concrete, red brick, bentonite and base blocks. The coating depth is up to 40 cm, the cross section must exceed the wall thickness. To increase stability, the columns are connected with wooden or reinforced concrete beams
- Countertops do not allow you to install a warm basement.
If the project is provided for in the project, a shallow recessed base substrate is applied under the external walls, and the foundation under the foundation is made under the internal walls. Cover depth and tape width are the same as for poles. Tape made from concrete, quarry or foundation blocks
- On weak floors, it is based on screwdrivers.
Their use allows the house to rest on solid ground that is deeper than the surface. Helicopter base can be built in 1 to 2 days without the use of heavy equipment
frame
 Panel panel house can be made from a factory made kit or from purchased materials, in-house or a contractor.
Building a turnkey house eliminates most of the problems for the developer, with the exception of monitoring the implementation construction works- it is impossible to check the quality of the assembly of the frame on its surface.
For self-assembly of the frame from factory parts, you must follow the instructions and wiring diagram that came with the kit.
The work is reminiscent of a designer's meeting and quite possible for a developer with experience in construction.
The cheapest but most worrisome option is to build the lumber itself. Depending on the size and number of floors of the house, the frame is made of a rod 100 × 100 - 150 × 150 mm or 50 mm thick.
 The frame is mounted in the following order:
- At the top of the base is the waterproofing of the roofing material
- For the foundation with built-in parts and anchor bolts for fixing the frame (thresholds) - beams, it is located on the edge of the house and under the prairie
- Place logs and give rough ground.
Lies on the edges of the base or beam beam
- Install vertical skeletal posts - first at the corners and then on the walls of the 0.6 m shelf, installed on the slot, propylene in the bottom panel, fixing the clip and nails and fixing the first temporary, then the permanent remainder.
At the same time, they constantly control their vertical and location in the same plane. The corner posts are made of sticks and you can use the same width edge plate 50mm for intermediate use
- In the upper places, the upper tape works. Frame door and window openings
Everything wooden structures must be impregnated with antiseptic compounds.
Overlapping and coating
Wooden columns are placed on the top frame of the frame and are secured with structural clamps.
Width 3-4 meters - plate size 50x150mm with a large range - 100x150-150x150mm. The beam is 0.6 m. In this case, 1.8 m wide screens (modules) are used to cover the ceiling.
 Rafting clusters are made on the floor on a panel 50x120-50x150 m.
First install the outer rafts, and then the intermediate elements that control the position of the rafters in one plane. Then make a box and close the roof. Roofing materials for the home should be light, for example:
- bituminous tiles
- metal panel
- Profiled film
- bituminous slate
wall coverings
The width of the screens must be equal to the degree of installation of the frame rails and the length to the height of the walls.
Guards are on offer at the workplace in the following order:
- Plates assembled
- On the frame, the polyethylene film was vapor barrier
- Swipe Inner Bezel Frame
- Frame facing, heater inserted inside
- Wind resistant protective membrane
- Get outer skin
 The coat should be compressed above the frame by half the width of the frame frame to hide them.
The perimeter protective frame is covered with a heater and is tightly inserted between the frame frames. The application is done with nails. Using sheet material it may be frameless. The cutting plates are attached directly to the frame and the heater is inserted between the posts.
As can be seen from the description, the construction of a country house with the forces of a brigade of two or three people of average qualification.
Using factory modules greatly speeds up assembly. Just a few weeks after the installation of the frame, you can move into a cottage and enjoy the outdoors.
Videos on weekends
simple holiday home
How to isolate a plate with your own hands in front of the track
Country houses from foam blocks: building a house over the summer

Country houses made of foam blocks are lightweight, fireproof.
Due to the large dimensions of the blocks and the exact dimensions, construction is carried out at a high speed. It is quite possible to build a house for the summer.
The use of foam blocks in the construction of various structures guarantees heat saving and fast pace of work. A country house made of this material will cost more than wood, but less than brick.
What are foam blocks good for

- They have an exact geometric shape, the dimensions are well sustained.
Therefore, they can be installed quickly.
- moisture resistant
- Inexpensive
- Strength increases over time
- They have very low thermal conductivity.
According to this indicator, one of the most the best materials for construction
- Have a small specific gravity. Therefore, they are made with quite large sizes, which has a positive effect on the speed of wall construction
- Easily processed
But there are disadvantages
- Can't take heavy loads
- Slowly gain strength.
This is where shrinkage occurs.
Do-it-yourself country house 6x6. Photo report. Part 1
As a result, cracks may occur.
Use high-quality autoclaved foam concrete - it is less prone to shrinkage.
For the construction of one-story country houses the strength of foam concrete is quite sufficient. In this case, it is necessary to reinforce the upper bearing row with reinforcement.
Foundation
Usually, during the construction of a country house, a tape shallow foundation is used.
It can be done in different ways. 
- From prefabricated blocks laid without connection, freely
- From blocks, with the device of reinforced belts above and below the blocks
- From rigidly connected reinforced concrete blocks
- From monolithic reinforced concrete
The choice of method is made depending on the properties of the soil.
The reinforced tape option is suitable for both subsidence and heavily heaving soils. In width, the tape is made with an excess of wall thickness by 10-20 cm. Laying depth - up to 60 cm.
Base - within 40 cm.
On heaving soils, a pillow made of non-freezing material is required.
Foundation construction
 Stages of implementation of a strip reinforced foundation with a shallow depth.
- markup
- trench development.
If the soil does not crumble, the trenches are arranged in the width of the foundation. Their walls will act as formwork
- Backfilling of a 30 cm sand and gravel pad in layers, compacting each layer.
The thickness of each layer is 10 cm
- Laying waterproofing material on the bottom and walls of the trench
- Installation of formwork under the above-ground part of the foundation (basement)
- Reinforcement installation
- Pouring concrete
Foundation quality conditions
To build a quality foundation, the following conditions must be observed. 
- The correct proportions of the components in the concrete mix
- There should be no air bubbles (voids) in the concrete.
To achieve this, a vibrator is used or concrete is bayoneted with a metal bar.
- There should be no breaks when pouring
After pouring, until the concrete hardens, it needs care. It is necessary to close it from the sun, water it in hot weather. Insulate in frost.
A rolled waterproofing material is laid on top of the foundation.
The overlap of the strips must be at least 15 cm.
Wall masonry
Before starting the construction of walls, it is necessary to check the horizontalness of the foundation. The allowable height difference is 3 cm.
If necessary, level with cement mortar.
The upper plane of the blocks laid in the wall must be horizontal. That is, not only the faces that run along the wall should be horizontal, but also those that are across.
Horizontal control is carried out using a level. The position of the block is corrected if necessary with a rubber mallet.
First row
 The laying of the first row must be done with particular accuracy - the accuracy of the construction of the whole house depends on this.
- Find the highest point of the foundation with a level.
The first block is laid in the corner closest to this point.
- Then blocks are installed in all other corners
- A mooring cord is stretched between the corner blocks along the outer edge of the wall.
It fills the first row
- If any irregularities in the masonry are formed, they are eliminated with a planer or sanding board. Dirt and dust are removed with a brush
Reinforcement
The reinforcement is laid on foam blocks after filling the first row, and then after laying every fourth row.
A smoothly curved rod is laid in the corners. 
- A grinder makes strobes 4x4 cm at a distance of at least 6 cm from the edge of the block
- The grooves are cleaned of dust, moistened with water
- Fits into a strobe cement mortar half the depth
- A rod moistened with water is laid
- The recess is completely filled with mortar.
A monolithic belt is made at the level of overlap.
It connects load-bearing walls along the entire perimeter and gives spatial rigidity to the entire structure.
For laying foam blocks can be used: 
- Cement-sand mortar
- Cement-sand mortar with the addition of lime
- Adhesive for wall blocks
The solution with lime does not set so quickly, has good plasticity.
Glue allows you to make thin seams.
It has a rather liquid consistency and does not seize for a long time.
block cutting
Usually a row cannot be laid using only whole blocks. We have to supplement it with cut ones.
You can cut blocks with a hand saw. The cutting line is applied with a pencil on two adjacent sides, so that the cut is accurate. The cut surface is leveled with a sanding board or planer. A smooth surface is essential for good adhesion between the mortar and the block.
load-bearing walls
 After laying the first row, you must wait 1-2 hours until the mortar sets.
Then the laying of the wall continues.
- Corner blocks are laid, aligned
- The mooring is being pulled
- The row is filled with foam blocks
- Irregularities are eliminated with a planer or sanding board
The ligation of the sutures should be at least 10 cm.
The minimum length of the outer blocks (corner, opening) is 11.5 cm.
The internal load-bearing walls are connected to the external ones by ligation.
Partitions
- On the bearing wall, the junction of the partition is indicated
- At this point, flexible connections (anchors) made of stainless steel are inserted into the seam. One end - in the bearing wall, the other - in the seam of the partition
- Anchors are fixed with nails
Anchors are inserted into bearing wall through a row.
It is allowed not to fix them with nails, but simply to press them into the solution.
Door and window openings
 Jumpers for overlapping can be bought factory-made, can be made from home-made hollow foam blocks, having a cross-sectional view of P.
- Mark the places of cuts on the foam block
- Sawing grooves, chip off inner part construction hammer
- Hollow blocks in the form of an inverted letter P are stacked over the opening on wooden supports.
It can be boards or bars. Supports can be nailed to the side walls of the opening
- Reinforcement 12-16 mm is laid inside the cavity, concrete is poured. Supports remain until the concrete hardens
You can lay the foam blocks over the opening and on the corners of the metal.
Roof
Wooden beams are usually used for the construction of ceilings in a house made of foam blocks.
The type of roof, its design and shape may be different. Its construction is not much different from this type of work in the construction of houses using other building materials.
Exterior finish
Although foam concrete, when exposed to moisture, is not impregnated to a great depth, however, the surface layer absorbs it quite well.
So if the walls are not covered with exterior trim, they darken and begin to collapse.
 As exterior finish foam block walls can be used:
- Hinged cladding installed with a gap (siding, decorative panels, house cladding with imitation timber)
- Decorative plaster
- Composite panels
- Natural and artificial stone
- Painting with silicone paints
The construction of a country house from foam blocks is relatively inexpensive, while construction takes place quickly.
If you have some building skills, it is quite possible to make such a house with your own hands.
Video on how to build a house from foam blocks

When building a house in a summer cottage, everyone wants to build one that will be comfortable to live in.
But coziness and comfort depend on the internal layout of the house. First of all.
And the layout itself depends on the size of the building, on the number of people in the family, the presence of small children. It also depends on whether you plan to live in the country only in the summer, or want to come here all year round. There are some things to keep in mind when deciding how to plan a house.
Layout of a one-story country house
Even in small house must have at least three rooms:
 The kitchen can be positioned so that the entrance to the house is through it.
In this case, the kitchen space will also serve as a vestibule, which retains cold air if you come to the dacha in winter.
During cooking, the air in the kitchen noticeably heats up, which is also good for heating the house. This option is much better than the construction of a tight vestibule.
If you want to make a canopy, then they can be made of glass. Using a profile, double-glazed windows and glass doors.
If you use the cottage year-round, you need to provide additional heating.
For example, you can plan a country house with a stove in the kitchen, back wall which opens into the next room.
This stove will heat two rooms at once. Well, in the bedroom you can install an electric heater. There are many economical modern models.
It should be noted that the house heats up much faster if good quality double-glazed windows are installed on the windows. It should be noted that the heat in the house does not depend on the size of the windows, but on how well they are glazed. Best Option, these are quality plastic windows with multiple glasses.
If a country house made of glued laminated timber contains one room and a kitchen, then the living room is divided by a partition.
Behind the partition is a bed. This home is perfect for a family of two.
If the house has another room, albeit a small one, then it is quite possible to equip a nursery there.
And the cottage will already accommodate a family of four.
These tips are also suitable for those who already have a small garden country house. But many want to increase the number of rooms and are thinking about building a second floor.
Features of the construction of the second floor
Many people think that a great option to increase living space would be the arrangement of the second floor.
But you must first find out how strong the foundation under the house is. It is likely that he will not be able to support the extra weight. You need to know about this in advance, and not after cracks begin to appear in the walls and the house begins to collapse.
In addition, there are some other features. They must be taken into account before building the second floor.
 If there is enough in the summer cottage free space, it is always better to build a spacious cottage.
It is cheaper, and it is more pleasant to live in a one-story house.
No need to climb stairs. This is especially important if there are elderly people in the house. After all, stairs in two-story cottages, as a rule, are steep. They are easier to build than flat ones. Besides two-storey house heating is much more difficult than a one-story house.
If the second floor is being built, there is no need to make concrete floors. It's easier to make them out of wood. The house will be warmer. The ladder is best raised from the kitchen if it is located immediately outside the front door.
Heat will not go to the second floor from the living room.
On the second floor, one or two bedrooms are usually made. Bedrooms are best made small so that they are easier to heat. After all, living in the country, a person enters the bedroom only to sleep.
But, it must be repeated that if the area of \u200b\u200bthe site allows, then it is better to build a more spacious one-story house instead of the second floor.
Terrace construction
 Since people spend most of their time outdoors in the summer, a covered terrace should be attached to the house.
It can be placed on the side of the entrance, then the terrace will also play the role of a porch. It needs to provide good roof which will protect from bad weather and hot sun. It is necessary to provide for the fastening of mosquito nets.
Some tips were given on how to make a country house more comfortable.
10 steps to build a country house in a summer
If a person plans to build a cottage from scratch, then he can plan it the way his heart desires. But not everything is as simple as it might seem. Below are the most common mistakes that a person makes when considering which house to build in his summer cottage.
Of course, everyone's tastes are different, but still, we will talk about those things that help reduce construction costs and increase comfort.
Mistakes when planning a country house
Too much big house
No need to build a house too big.
Thick walls in the house
Too thick walls require a more powerful foundation, and, therefore, extra costs.
Modern technologies make it possible to build light houses, for example, frame houses, or from timber. Good insulation solves all the problems with heating, and the choice of high-quality material and qualified builders makes the house very durable.
basement building or ground floor
No need to unnecessarily make a large basement or basement.
These premises require high-quality waterproofing, insulation, ventilation and heating. For all this, you need to hire specialists. Additional costs for building materials are required. Very significant. Also, do not build too high a base. This also increases costs.
If it is planned to build a fireplace in the house, then you need to build it in the middle so that the heat from it disperses to neighboring rooms.
Fireplace built by outer wall, is completely irrational.
It seems that everything is very simple. But if you avoid these mistakes when planning a house, you can significantly save on building materials and construction time.
Video example of planning a country house using a special program
Record dated: 4-2-2016

Summer residents who are just about to build their first small house will come in handy with my selection of 15 photo design ideas. country houses. I must say, there is something to learn and something to be surprised, well, what can I say - it's better to see for yourself!
I draw your attention to the fact that there are no schemes and plans here.
All material is provided for inspiration only. But, experienced builder, if you show him a picture with a structure you like, he can easily build, if not one to one, then close to the original.
The first house just captivated me with its canopy with a lancet roof. If it weren’t for this roof shape, it would have been the most ordinary country house! Agree, such a roof of a canopy, carried by slender wooden columns, gave the whole house sophistication and elegance!
Beautiful country house, do not say anything!

And in this miniature house, I really liked the turret at the very top. In terms of area, it is like a makeshift shed, but beautiful finish walls, windows, tiles on the roof and this turret make it almost a palace!
By the way, flower boxes fixed under the window greatly improve the appearance of the facade, no matter how small it is!

This house is just very pretty, especially the lattice windows and the door.

This country house caused a storm of delight in my whole family.
I showed it to them, saying that we would build the same one for ourselves in the country. A miniature terrace, and dormer windows on the roof! Just a peek. A miniature copy of a beautiful country mansion!

This house has a lot of light.
Choosing a garden house and its phased construction
because he has a very big windows. But in it, even in cloudy weather, it is light and there is a feeling of greater unity with nature! The pediment of this house is unusually designed - it is decorated with two balusters.

And in this house a second light under the roof is solved. Since there are no windows on one side, a semblance of dormer windows is made under the very roof.
True, the photo shows that the owners use it as a workshop, but for newly minted summer residents, it could also serve as a shelter for the night and from the rain.

A small wooden house with a canopy across the entire width of the roof.
A good solution - here you have a patio terrace, the wall of the house will shelter from the wind, and the roof canopy will protect from rain and from the sun.

This little white house is just a fairy tale!
Graceful, romantic, with a pergola attached to it, he just calls to settle in it and not know grief! Still White color adds sophistication to any building, even very small.

This interesting asymmetrical house has a frame structure and is lined with wood.
The originality of this building is not only in its unusual roof, but also in the glazing of two walls, which forms a “transparent corner” at the exit.

This house is simply attractive and solid.

The blue house under the tile roof with white curtains looks very attractive.
It feels like the house has a caring owner!

And this bright little house in front of a small pond made me tender. It is so small and so harmonious with its blue door and windows with tulle curtains that I wanted to sit down in front of it, put my feet in the pond and dream for an hour or two.

This house is made of wood, although it is low, but very pretty.

Well, the last house in the series of 15 best ones is a house with a trapezoidal canopy.
Beautiful, elegant, decorated with taste - what else can I say! And a terrace with him - there is a place to admire the stars in the evening!
Ideas for small cozy country houses

We could stop there, but there are so many ideas for small houses that you always want to look for something and share your findings with you.
Let me remind you that in America and Canada there is a very common hobby for designing and creating houses on wheels of an unusual shape. These are real houses. I will continue to introduce you to interesting ideas such houses. After all, if we exclude the wheels, then such houses will look great on our sites! Here is an overview video from the creators of this wonderful house.
There is no translation, but everything is clear.
My construction and life in the country
I would like to tell my story when we decided to live in the country and start everything from the very beginning. In general, it so happened that our apartments were not, and in last years We lived in rented apartments. And so living within the walls of others and frequent travel brought us - I wanted my own, peace and stability. But the way we live is not rich and can't buy anything, you decide to buy Dacha (4sotki) and then another one, we left the pages very cheap.
These sites are the same, we have prepared that they are forced to leave their homes all the bushes and trees, and yet they had the resources that I introduced sandstone and sand into the future of our house.
But after a few days we decided to give them a chance to win a house in the country, and then I brought a plate and two evenings (as the day worked), the house was almost ready. It looked like a trailer, but we were not aware of the beauty, more than the end of September and soon the cold and winter. Below is a photo of creating a timezone
Construction of a cottage in the country - the beginning
 He built it twice - he wanted it faster, but it got dark early, so he took a battery and a lamp with him. So this house was looking for another night - it wasn't dark yet.
It worked like a screwdriver and a wire, the design was the simplest, so everything was done very quickly.
Cabin construction in the country
 Then I brought foam and the house was insulated with 10 cm thick foam, and foamed with all the seams between the foam and all the slots.
He did front door. And the interior, while there were bare slab walls. The next day he brought 200 pieces. red brick and two nights built brick. A photograph of the construction of the furnace has not been preserved.
Construction of holiday homes
 The dimensions of the house are 6.3 * 3m.
interior space 6 * 2.7, common living room 16.2 square meters, which was supposed to include four adults (me, my mother and my two sisters) in the country, electricity, and this is what I thought about in advance. I made a wind generator, I installed a small battery and bought a 12/220 volt converter. The strength of such a power plant was very small, because the wind turbine was small and was the wrong dean, and very low. But one energy-saving light bulb is sometimes enough.
In general, the beginning was painful, but a week after the start of this construction, we moved on to this period. The transmission was on October 2, the same day as my sister's birthday.
In autumn, the forest was ready for the whole winter, and a porch was added to the house.
The house is insulated from the outside with a vapor barrier covered with foil and internal shiny insulation. As a result, in the first winter we learned.
Winter in the country
 In the winter we were already at home with wind power for every 150 watts, electricity was enough for light and sometimes on TV, just as the wind was very weak and there was not enough battery power, but I kept everything for improvement, including the power plant.
I described everything about the plant in the section "My little adventures"
Therefore, winter lived in such Spartan conditions. My sister and I worked, paid in the spring, took a loan 3 years ago, and at the beginning of the summer a new loan appeared, which spent the money on small things and bought a Chinese engine (110ss) for executing a tree, I went to him on a trailer.
We bought a chain saw and two solar panels. up to 100 watts, so until March they bought new batteries for the power plant.
During the summer, the porch was covered with luminous insulation to keep it from overheating in the sun, and solar panels were installed on the wall.
Even the light on the street and in the house repeated the wiring.
Solar panels
 During the summer, the wood was prepared for the whole year, and the motorcycle made 35 trips from nearby forest plantations.
So I bought corrugated board, wood, cement, and I put a new corrugated panel fence in the front.
wood collection
 In parallel, I poured a concrete cushion under the base of our future home.
There was no bathing under the foundation, it just grew and leveled the surface and shed a 40 cm wide strip around the perimeter of the house.
How to build a house in Dachau: characteristics and phases of construction
The thickness of the concrete is 10-15 cm. Below the photo are parts of the concrete. This is how we lived in the fall, photo after the rain, there was a bit of a mess outside when I was looking for and spinning jars under the winter potatoes.
Life in the country

Life in the country
 In addition, 11 meters were excavated in Dachau, I dug it myself, for almost a month I was in a hurry and poured concrete with concrete, but I finished it.
So, the tile broke through. He dug out a basement at the site of the future house, filled the basement with concrete, and then the roof made a hatch. Small details were made on details, but I will not list all the little things, only the important ones. I wrote about the break here - Well, with my job 2.
Okay
 This year, at the beginning of spring, I took 7 cubes of plates, bought ruins and cement, and started with a basic overflow.
The lower part of the photo is the preparation of the irrigation panels. Last year, the center of the concrete base under the kiln was flooded.
Foundation formwork
 After installing the panels of panels around the perimeter, he reinforced a 10 mm throw in two threads.
Then I invested in concrete and, in the end, turned out to be like this.
Foundation filling
 The panel was attached to 6mm hex pins, and after ejection, it is easy to remove and remove the shell.
Foundation filling
 Then build the wall frame. The dimensions of the house are 6.30 * 10.80 m. The skeleton put one, sometimes the truth helped the sister to give or save something. All this turned him into screws that pull themselves. bottom and top, then he used a homemade galvanized sheet metal plate.

Decorated house with your own hands

Decorated house with your own hands

Decorated house with your own hands

Decorated house with your own hands
 Currently, at the moment, the money for further construction is over.
Now you need to make money with corrugated cardboard and place a frame around the roof.
Continuation - the second part of the frame
Communication with the natural environment, the presence of a country or country house has become an absolute necessity for any modern city dweller. People today are tired of the bustle, noise, offices, huge shops, in a word, of urbanization. They dream of getting out at least for a weekend closer to nature, admiring the colorful flowering vegetation, listening to songbirds. The best warrant for this is your own dacha. If the budget for the realization of your dream is modest - it does not matter, today building a country house with your own hands is not at all a problem. The arrangement of terraces, various flower beds, alpine slides, verandas and other country attributes next to housing will bring you closer to the surrounding landscape, returning you to nature, the natural and organic environment for humans.
The procedure and stages of construction of a country house
- Do-it-yourself construction of a country house, even if it is quite small, at first glance it may seem like a very simple matter, not requiring close attention and lengthy preparation. But if you want to create a small, but durable and cozy family nest, you should take it seriously.
Before the start of all purchases and construction work, you need to decide at the family council what the purpose of your house is: whether you want to garden, or just equip a recreation area and come for the weekend, whether you will be in the country during the cold season, and whether you will you receive guests.

Country house project 10×8

Country houses, projects and photos of which are presented in the article, will differ from a country house only in that they primarily provide for a single connection with a garden, garden or flower garden, even if the latter is completely small.


Building Basics
- First of all, it is worthwhile to think carefully about the entire layout of the available space, very often summer residents count every piece of land, so it should be used wisely and efficiently.
- It is very important that the minimum allowable distances to your neighbors in the area and to the roadway are observed. To the neighbor's site - three meters, and to the street - five meters.
- Places where there are recesses are not suitable for building a house, as water will accumulate there after rains. The ideal option is the highest available location on the north or northwest side of the site allocated to you.
- Next, you should decide in general terms what you are going to build a house from. Possible options are listed below, but ground conditions, weather conditions, budget, transportation costs and labor availability must be taken into account.
On a note! After the construction site is determined, the desired design of the country house is selected, under which it is being developed, or a ready-made beautiful project is selected.

Choosing a turnkey country house project (photo)
The first thing to think about after discussing the issues listed above is the project. Very often, future gardeners who want to quickly build a country house on their site go to private construction companies, in which managers often offer them expensive projects"luxury". However, in order to build a small garden house with your own hands, you can limit yourself to much less.
An inexpensive and quite decent garden (or country) house can also be built according to a standard standard project. Individuality and originality can be given to it with the help of exterior decoration and plants surrounding it.


Nowadays, a ready-made project for a turnkey country house is easy to find on the Internet. But when sorting through such proposals, some very significant aspects should also be taken into account, for example:
- the total estimated cost of the house box;
- duration and quality of construction;
- the complexity of earthworks;
- complex of services for the construction of the foundation.
On a note! Even small garden houses should have utility rooms for storing garden tools, take such things into account as well.


Foundation options for a country house
Concrete base (foundation) - performs the role of a kind of support for any home. It must withstand the loads that are created by the house, both during construction and after its commissioning.
Important! good foundation must be durable, frost-resistant, waterproof, as the structure is affected by groundwater and active elements.

The foundation of a garden house is designed to ensure the complete stability of the structure under construction, as well as the reliability of its future operation. The most correct in a particular case (country house) will be the types of foundations listed below.
- Tape type foundation - This is a structure made of a monolithic concrete strip, which is formed along the entire perimeter of the future house. This design is very often used in the construction of two-story houses, it is stable and wear-resistant, also suitable for brick houses. It should be taken into account that such a foundation will not be cheap, and it is not so fast to do it.
- Column Foundation- more economical, it consists of pillars that are buried and installed at all corners of the future building, at the junctions of all walls, as well as inside, at the site of the planned partitions. It's good for little ones one-story houses, which will weigh a little, for example, frame or panel dachas.
- pile foundation- consists of groups of piles that are sunk directly into the ground and joined together with reinforced concrete. If your cottage is located in a place prone to swamping, then you will have to make just such a foundation. By the way, it is piles that are used in the construction of foundations for small cottages, brick buildings, large frame-type houses and classic wooden log cabins.
- Monolithic slab foundation- is a monolithic slab, which is made of reinforced concrete, it also serves as the floor in the house, insulation, boards, and other coatings are placed on it. Such a foundation should be chosen if your site is located in a place of stable soil, it can be the basis for both a one-story house and a two-story one.


Budget country house - a matter of the future
Modern traditional houses for summer cottages are so diverse, sometimes interesting in their design, that it is not easy to make a worthy choice of the ideal option for your family. Nevertheless, try to discard emotions, and soberly weigh all the pros and cons.


modular house
The most affordable, simplest, most quick methods building a small house - assembling a building from a ready-made panel kit. This group also includes houses made of structural, externally insulated panels.
This can also be included various options modules, as well as small country houses made from container blocks. Their clear advantage is lightness. installation work, because in fact you only need to properly prepare the base (foundation) and then install the finished structure on it.

Of the obvious disadvantages of this "building" method, one can clearly distinguish both the high prices for the modules and the small number of possible variations. However, the acquisition of the so-called building constructor makes it possible to independently build a country house with their own hands, even for beginners without prior experience in this area.
In addition, in such a house, as a rule, manufacturers have already arranged all the communications necessary for life. Due to this, it is possible to bypass traditional mistakes, they are quite often made due to inexperience.


Country houses-huts
Obvious flaws in a small house in the form of a hut, which is vaguely similar to a real "chalet". It fits perfectly into the natural environment, looks very elegant and organic.
The hut house usually retains all its advantages when it is made no larger than 6 × 9 meters in size, after which it automatically becomes somewhat difficult to perform. In addition, the construction of a large hut will require a lot of building materials.

In a small house in the form of a hut, one sleeping place will have to be arranged in the attic. There you will need to climb the usual vertical ladder, but this is quite within the power of the younger generation.
In the American states and in the forest part of Canada, such single houses are ubiquitous. Not only hunters, fishermen and beekeepers find shelter in them, but also seasonal tenants who want to live in the warm season in the natural environment.

For a small family of two or three people, a 3 × 3 meter hut house may well become a summer cottage for seasonal residence. It will be possible to come to the house in spring, summer, late autumn, as there will be little heating costs, and it heats up much faster.
On a note! If you are going to come to the dacha all year round, but you don’t want to spend a lot of money on the construction, then such a hut house will be the best choice.

Real bungalow
In the traditional sense, a bungalow is a one-room summer house without heating. As a rule, he settles down with a large open one, which is structurally connected with the house.
For traditional dacha, to which a family living in a relatively warm climate plans to come only on weekends, such a bungalow-type house is optimal because it is spacious, well ventilated, and does not get too hot from the sun.

There are few materials for the construction of such a house; it is made of wood. The bungalow house is very durable, it can be built on a not very deep foundation, on soils that are not very stable, including in areas prone to waterlogging.
Moreover, in damp areas, houses that are built in the form of a bungalow are very durable, due to the fact that all the upper ends of the boards are usually covered with overhangs traditional for such a construction.
Frame country house
Frame houses are becoming more and more popular, although wood is the traditional construction material for our region. The ecological cleanliness of such a structure is obvious, while the house, if it is properly built, perfectly retains heat.
A frame-type country house should be built in the traditional style of wooden housing construction, approximately the way our ancestors did. It is desirable that it be one-story, in extreme cases, have an attic. It will be cozy and comfortable to live in such a house all year round, and its construction will not scare you with its scale and costs.


Which country house is better: one-story or two-story
A one-story garden house is a certain philosophy, worldview. Such a dwelling is much more comfortable, because it does not have a leading to the second floor. Of course, for young people to quickly run upstairs is not a problem, however, in mature years, this option will definitely be less convenient.
A one-story house is also safe for children. Many summer residents who have chosen housing on two floors leave reviews that after a few years running up the stairs is very annoying, and the statistics of people's injuries on the stairs speaks for itself.

Perhaps you have decided to build a house of aerated concrete at your dacha, and are going to do it yourself. This is a great idea if you have some building experience.
The same applies to a country house made of bricks. Masonry is not an easy process, and it requires experience. But the clear advantage of such a dacha is that it will serve its owners long years and will be passed down to the children.


Most residents of megacities have been dreaming for many years of a small beautiful house entwined with climbing roses in a picturesque area, where you can always hide from the sweltering heat and take a break from the hustle and bustle. Make your dream come true, because a country house with your own hands is quite real!