Tricks when installing a toilet that will make installation much easier. Do-it-yourself toilet installation: installation video, step-by-step instructions What is the best place to install a toilet
Installation and connection of toilet bowls of almost all modifications is carried out according to one scheme. Usually, an instruction is attached to the product, after studying which you can install it yourself. For your convenience, we suggest watching a video tutorial on how to accurately install a toilet bowl.
Choosing a new toilet
Before going to the store for a new toilet, you need to decide on the size of the device and how to connect to. This will depend on the outlet of the device. It can be of three types.
- Vertical.
- Horizontal.
- oblique.

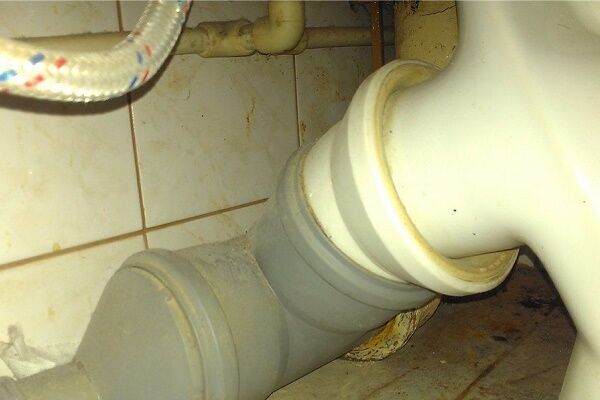
Vertical sewer pipe
After that, you can choose a device from those models whose outlet drain design is suitable for connecting to your sewer system. No adapter will help connect a toilet with a vertical drain to a horizontal sewer pipe. So this choice parameter is the most important, everything else is a matter of taste and wishes.
The shape of the toilet bowl can be:
- plate-shaped;
- funnel-shaped;
- visor.

Types of toilet bowls in the shape of a bowl
The visor design prevents the formation of splashes of water when flushing. Water flushing can occur in a circular manner or in a continuous stream.
Toilets themselves can be different designs. It can be a monoblock, a corner toilet, a compact toilet or a separate one, when the bowl and the toilet are located separately.

Toilet bowls by mounting method
According to the method of fastening, toilet bowls differ in attached and standing separately. The attached toilet looks like a hanging toilet. Available for sale with or without tank. fasten different ways. Most often, this is an option with two or four mounting ears for an anchor or screw, but there are models that are attached to special corners fixed to the floor.
Connecting elements
Connecting the toilet to the sewer pipe will require connecting elements. You just need to choose the right one.

All elements are connected hermetically due to rubber seals. The exception is connecting the cuff to an old cast-iron sewer pipe. In this case, the joints are coated with a sanitary sealant.
Dismantling the old device
Before starting work, prepare a bucket and rags. First of all, turn off the water supply valve to the drain tank. Drain the water and unscrew the water pipe from the tank. Now we disconnect the tank from the bowl, most likely the fastening bolts are rusted and oxidized or stuck with deposits. Use hex ring spanner If you can't unscrew it, try tightening the bolt slightly. With translational movements back and forth, the nut should turn. Do not be too zealous so as not to split the tank. If this does not help, then spray the nut with WD-40, kerosene or turpentine. After a day, try to unscrew it again by rocking it.

Disconnecting the cistern of an old toilet
Now you can move on to unscrewing the toilet. Fasteners can be an anchor bolt with a nut or a dowel. If the toilet was installed many years ago, then it is most likely that it was installed on cement mortar. In this case, it is unlikely that it will be possible to keep it whole, especially if the drain is fixed oil paint with rags or cement coating. The easiest way to start is with the drain neck. Hit the neck with a short hard blow, it will split and detach from sewer pipe. You can not hit the sewer, cast iron is a very brittle metal, it can crack or split, adding additional problems.

Toilet demolition work
Use a chisel and hammer to beat off the cement mortar at the base of the toilet. Try to swing the device, then tilt the toilet back, drain the water from it into the sewer. Make sure that the fragments do not fall into the sewer pipe. Now, using a screwdriver, carefully clean the neck of the sewer pipe from a solution of other dirt and insert the adapter eccentric collar previously well lubricated with sanitary sealant. We plug the hole with a rag so that the dangerous and unpleasant smell of sewer gases does not spoil your mood and health.
Installation: anchors or dowels
Mounting on dowels involves installing the product on the bathroom floor without laying any taffeta-type lining under its base. Modern toilet bowls are produced with mounting holes in the base, therefore this method installation is the most practical and most commonly used. After leveling the floor or laying tiles, you must perform the following steps:
- using plumbing grease, we put on an eccentric cuff to release the toilet bowl, push the toilet bowl to the intended place, while inserting the cuff into the adapter. Turn the cuff to set the toilet straight. With a marker or pencil inserted into the mounting hole, mark the attachment points and the contour of the bowl;

Stages of installing a toilet bowl on dowels
- disconnect the toilet from the adapter and move it away. We drill holes for the dowel with a drill. Please note, if the holes in the fixing ears of the toilet bowl are oblique, then we drill a hole for the dowel also at an angle. We hammer dowels;
- install the toilet according to the marks, connect it to the sewer. We put a plastic sleeve (or rubber washer) on the screws and bait a little on the dowels;
- we set the bowl according to the level, if the base is not even, then place pieces of rubber or sheet plastic, and then tighten the screws to the end. Do not be too zealous so as not to split the ceramics. We put a plastic plug on top of the bolt. Cover the gap with silicone sealant, remove excess silicone with wet fingers.
Advice. It is better to try on a toilet with a cistern installed on it, and installation without a cistern.
Installation on taffeta
Installing a toilet on taffeta was previously considered the accepted method of installation. We will not recommend it, since the toilet bowl installed in this way loosens over time. The reason for this is the moisture that gets on wooden surface. The board is laid in the floor on a level with the surface and fixed with anchors. The remaining space is filled cement mortar and after complete hardening of the mixture proceed to installation. The installation process is the same as the installation with dowels, only the toilet mounting ears are screwed to the board with self-tapping screws, having previously placed rubber washers under the heads.

Installing a toilet bowl on taffeta
Epoxy installation
If there are no mounting ears at the base of the toilet model, then such a device is attached to the adhesive joint. This option is suitable for devices in which the cistern is mounted on the wall without resting on the toilet bowl or a faucet is used instead of the cistern. After trying on and applying a contour mark, the surfaces to be glued are lightly treated with sandpaper or corundum stone to roughen them, and then degreased with a solvent. Then, epoxy adhesive is applied to the dry surface of the floor with a layer of 4-5 mm and the toilet is pressed with force. After the adhesive has completely cured, you can use the device.

Epoxy installation
Advice. Use gloves to protect your hands when handling epoxy.
Suspension installation system
To install a wall-hung toilet, you will need a special frame with a flush tank, which is equipped with a drain mechanism and sheathed with insulating material to absorb noise and prevent condensation. Usually this design is bought separately from the toilet. The frame is attached to the wall with anchors, and a toilet bowl is hung on it. Communications are hidden inside the frame, which is subsequently sheathed with moisture-resistant drywall and lined. The drain button is mounted in the wall on the front panel of the tank.

Suspension installation system
Connecting the cistern to the toilet bowl and plumbing
After the toilet is installed, it is necessary to hoist a drain tank on it. We collect the internal filling according to the instructions. We put a gasket on the bowl (it can have a different shape) and fix the tank to the bowl so that it does not move relative to its place. You can glue it to the bowl with silicone. The screws are tightened evenly. We connect a flexible hose from the tank to the water supply. On the threaded connections we wind the FUM tape for sealing. It will not be superfluous to install a shut-off valve on the water pipe.

Connecting the toilet bowl
If it is necessary to repair the product, the tap will allow you to locally shut off the water supply. It remains to test the tightness and quality of the system. Shifting the float up or down allows you to adjust the level of filling with water drain tank. We fill the tank with water several times and drain it. The absence of leaks and trouble-free operation of the device indicates that the installation was successful. The finishing touch will be the installation of a toilet seat, which after all the work done will be a mere trifle for you.
Toilet Installation Lesson: Video
How to install a toilet: photo


To properly install the toilet on the tile, follow our step-by-step instructions, provided with photos and videos.
Working time: ~ 1 hour.
Total time: ~ 24 hours.
Preparing a room for a toilet
It is better to install the toilet bowl in a completely renovated room so as not to damage the plumbing. You should have a hole ready for the outgoing sewer pipe, as well as a water outlet for the drain tank.

Tools and materials required for proper installation
To install the toilet, we need the following tools and materials:
- Adjustable wrench
- flexible hose
- fum tape
- Pencil or marker
- Yardstick
- Hammer
- Dowels and bolts (should come with the toilet)
- Sanitary lubricant
- liquid silicone
- rubber spatula

How to properly install a toilet bowl with your own hands
Step 1. Eyeliner to the drain tank
Shut off water access to the system. Unscrew the plug on the water outlet using an adjustable wrench. A crane must be connected here. An angled or straight faucet of your choice can be used. Seal the threads on the faucet with fum tape and screw the faucet into a water outlet. If using a corner tap, screw it in so that it points down. Shut off the faucet valve.

Screw the flexible hose to the faucet outlet. It is not necessary to use a fum-tape, since a sealing gum is provided in the design of the flexible hose.
Step 2. Marking the toilet installation guide
To install the toilet exactly in the middle of the toilet, measure the width of the room against the wall and mark the middle with a pencil. Do the same in the middle of the room and draw a line along the two marks. This line will be our guideline that determines the direction correct installation toilet.

Step 3. Assembling the sewer drain
If necessary, supplement the sewer drain with an angled pipe (45-90 degrees) so that its opening looks towards the outlet pipe of the toilet at a smoother angle.

Advice: To make it easier to connect two pipes, use plumbing grease. Apply it to the inside of the drain hole (lubricate the rubber o-ring) and to the outside of the elbow pipe that will fit into the hole.
The sewer drain can be connected to the outlet of the toilet in two ways:
- hard plastic adapter;
- flexible corrugation.

In both cases, when inserting the connector, use plumbing grease as above.
Step 4. Preparing the base of the toilet and marking it on the tiled floor
Advice: Do not pre-connect the tank to the toilet. When and how to connect the tank to the toilet, you will learn later in the article.
Take the base of the toilet and turn it upside down. The edge of the supporting part of the toilet must be smooth, without defects. Clean it up if necessary with a sharp knife.
Place the toilet base on the floor at the installation location. Follow the line you drew earlier (see step 2) to position the toilet correctly and exactly in the center of the toilet. Additionally, check the correct installation by measuring the distance from the toilet to the left and right walls with a tape measure.
Connect the toilet pipe to the drain system adapter and outline the perimeter of the toilet base with a pencil or felt-tip pen - this will help you install it in the future without additional measurements. Also, on both sides, mark the locations of the holes for fasteners.

Step 5. Fixing the toilet to the tile floor
Set the toilet aside and drill holes in the tile for fasteners. Use a special tile drill. The depth of the holes should be equal to the length of the dowels that come with the toilet. Hammer plastic dowels into the holes drilled in the tile.

Put the toilet back in place along the drawn lines and connect it to sewer drain. Screw the metal screws with washers that come with the toilet into both mounting holes, but only halfway.
Step 6. Additional fixing of the toilet bowl with liquid silicone
Raise the toilet bowl by 0.5-1 cm, place any supports in two or three places (use what you have at hand - plastic, pieces of tiles, etc.). In the gap between the base of the toilet bowl and floor tiles Very gently inject the white liquid silicone. Do this around the entire perimeter of the base of the toilet. Raise the sides of the toilet bowl with your hands and, taking out the stands, add silicone. Silicone should be evenly distributed around the entire perimeter of the base of the toilet and create a plentiful "cushion".


Lower the toilet and tighten the fixing screws all the way by hand (without excessive force). Remove excess silicone that is outside with a plastic spatula moistened with soapy water. Form a beautiful edging around the entire perimeter of the base.

It is necessary to wait a few hours (see the curing time of the silicone on the packaging), and only then proceed with the installation of the toilet.
How to install a toilet flush mechanism
Put a gasket on the threads of the main drain and insert it into the process hole of the drain tank. On the reverse side, tighten the wide nut with your own hands - do not use tools to avoid splitting the tank.


Advice: We recommend installing a locking device that controls the flow of water into the flush tank after installing the flush tank on the toilet bowl. This will make tightening the mounting screws more convenient - you will not be disturbed by an extra mechanism inside the tank.
When installing the locking device, check for burrs on the bottom of the device where the hose is put on. Remove bumps so that the further connection is tight. Insert the locking device into the hole in the tank intended for it and tighten it from the back with a plastic nut. Again, do not use any tools, tighten the nut by hand.
How to install a cistern on a toilet
After the silicone has completely hardened and the cistern drain mechanism is assembled, you can proceed to install it on the toilet.
Between the drain tank and the base of the toilet bowl, it is necessary to lay a soft gasket in the form of a ring (comes with the toilet bowl). Then slide the cistern onto the toilet so that the holes for the tie screws on the toilet align with the holes on the cistern. The connecting screws must have a plastic flat washer and a rubber cone. Insert the fixing screws into the holes of the drain tank and twist them on the other side with plastic nuts (horns). When tightening the screws, make sure that the tank is horizontal.

Screw the flexible hose that supplies water to the fitting at the drain tank. This connection does not require the use of a fum tape, since the connection will occur through a rubber gasket.
The installation of the cistern on the toilet is completed, you can open the faucet and check the flow of water, as well as see and eliminate possible leaks in the system.
Put the lid on the drain tank so that all the elements enter the hole trigger. Screw the release button into the hole. Check the functionality of the button. At this stage, the installation of the toilet cistern is completed.
How to install a seat and lid on a toilet
The simplest remains. Attach the seat to the toilet and thread the mounting screws through the holes. Without much effort, tighten the screws on the back of the toilet with nuts. Toilet seat installed.

Video lesson: How to properly install the toilet on the tiled floor in the toilet
Work completed. You installed the toilet with your own hands and, rest assured, you did it right!
Work on the installation of new plumbing for many novice craftsmen causes concern. A variety of design solutions for plumbing fixtures and how to connect them requires the contractor to know the intricacies of the process.
We will try to uncover and analyze the main ones of them, how to properly install the toilet bowl with your own hands without the help of plumbers.
The range of sanitary ware on the market is diverse. Any owner has the opportunity to choose presentable and functional equipment to his own taste and budget.
In addition to traditional floor models, manufacturers offer a wide selection of suspended and built-in devices. The drain tank in them can be attached to the wall or connected to the base of the plumbing.
The version of the bowl of floor and hanging models can be any, for example, dish-shaped, funnel-shaped or even a visor modification
The latest models of toilet bowls also differ in the design of key components.
The output drain happens:
- horizontal;
- vertical;
- oblique.
The type of outlet drain should be considered when choosing a model. If your plans do not include alteration of the sewer pipe supply, then in the installed model the drain should be arranged according to the same principle as in the dismantled one.
Drains and plumbing supplies that do not match each other, provided that this is not a toilet bowl with a release, it is almost impossible to combine it as tightly and efficiently as possible.
Fixing plumbing to the floor is carried out by means of specially made two or four attachment points. But you can also find models in which the corners that come with the product are used for fastening to the floor.
A new plumbing fixture can be put in place of the old one, or you can choose another “corner” for it by making a small redevelopment in the bathroom.
Preparation of tools and materials
To connect the tank to the water supply you will need a flexible hose. It usually comes with a kit. For connection to the sewerage - a rigid or bending corrugated cuff.

It is impossible to qualitatively install a toilet bowl with your own hands without a minimum set necessary tools that are in the house of any owner
To assemble the structure and connect to communications, you will need:
- perforator or impact drill;
- a set of screwdrivers with a flat and cross-shaped "sting";
- set of wrenches;
- building level;
- a simple pencil or marker;
- stationery knife;
- roulette;
- chisel;
- hammer.
If the installation of plumbing will be carried out on a tile, then it is also necessary to prepare a “ballerina” or a spear-shaped drill for tiling. To make holes for the installation of fasteners, you will also need an 8 or 10 mm drill.

From the auxiliary materials you will also need:
- metallized tape;
- silicone sealant;
- FUM tape;
- polyethylene film;
- moisture-absorbing piece of fabric;
- container for collecting liquid.
Depending on the type of model connected and the method of installation, grout may also be required.
Removing an old toilet
Removing an old toilet is one of the most time-consuming operations.
The work is carried out in several stages:
- Shut off the faucet.
- Disconnect the hose going to the tank from the water supply, drain the water from it.
- The empty tank is removed from the mounts.
- Unscrew the nuts located on the back of the toilet and disconnect it from the sewer. To loosen the drain, the toilet must be shaken from side to side.
- Drain the remaining water from the toilet by tilting the bowl forward.
- The sewer hole closer to paradise is cleaned of dirt and temporarily clogged with a rag gag or a wooden plug of a suitable diameter.
The easiest way to break the bolts is to hold the head with an open-end wrench and unscrew the nut with an adjustable wrench. If threaded connections are heavily slagged with salt deposits or rusted.
To facilitate the task will help the use of universal grease "WD-40", which in a matter of minutes is able to loosen deposits. In the absence of such, you can use vinegar or kerosene.

The sewer hole must be closed without fail so that toxic hot gases do not spread outside the pipeline
If rotten taffeta or any other support is found under the dismantled toilet, it must be removed. This can be done with a puncher, a nail puller or a chisel.
In houses old building drains on sewer pipes are often fixed with cement coating. It is easiest to knock down the dried solution with a chisel, puncturing it in several places. Read detailed instructions for dismantling the old toilet.
Image gallery
Option #2 - with horizontal outlet
Plumbing fixtures with horizontal outlet have become one of the most popular in our country. The relevance of the installation of such equipment is explained by the specifics of the wiring in Russian apartments of the sewerage system.

The main feature of toilet bowls with a straight horizontal outlet is that a strictly fixed point of connection to communications is required for proper installation.
The horizontal outlet is located at the back of the bowl or base and points back. Models with this design are installed end-to-end with the wall, connecting to any type of sewer riser location.
The connection is made using fittings of the appropriate size. The joint is sealed by placing a sealing gum inside the pipe.
Direct connection is performed only if the sewer system is made of plastic. To connect to cast iron pipes, whose circumference rarely has perfect shape, use cuffs and eccentrics.
Option # 3 - with an oblique outlet
The flare in models with an oblique outlet is located at an angle of 45 ° relative to the floor surface. Models with an inclined outlet benefit from their counterparts in that they are less likely to become clogged, since this design allows you to create less resistance when moving solid impurities.

Vulnerable points of devices with oblique outlet are the articulation points of the product with the sewer pipe, which, if not properly installed, can be covered with cracks
Connecting a device with an oblique outlet to the sewer system can be done in one of three ways:
- By direct connection through the socket of the sewer branch. They choose when there is no need to move the plumbing fixture, and the direction of all elements clearly coincides. The outlet of the toilet bowl is treated with soapy water and deepened into a socket equipped with a cuff.
- Accession by means of an eccentric. A socket with a 5 cm offset center, equipped with a sealing gasket, is mounted in the sewer outlet and, by rotation, the toilet bowl is shifted to the right or left side.
- By installing a corrugated outlet. The use of corrugations makes it possible to deploy the device for a relative oblique sewer outlet even at an angle of 90 °.
Flexible outlet - although convenient, but far from the best remedy for connecting toilet bowls with an oblique outlet. It should be used only in extreme cases, when it is not possible to use other methods.
To find out in more detail how to install a toilet with an oblique outlet, go to.
Image gallery
by the most simple option connecting a toilet with an oblique outlet is the use of corrugations, which ensures perfect tightness
If with the help of corrugations not a temporary, but a long-term connection is made, then you need to use a reinforced version of the corrugated pipe
Using the corrugation, the slanted outlet toilet can be connected to a floor or wall drain
If it is possible to reduce the distance between the toilet bowl and the sewer system, instead of corrugations, it is recommended to use a sealed cuff and a plastic outlet
The use of corrugations in connecting to the sewer
Reinforced corrugation for reliable performance
Side outlet toilet connection
Cuff in the sewer connection
Features of mounting compact models
The technology for the correct installation of floor-standing toilet bowls of compact models includes seven main steps:
- The toilet is pushed as tightly as possible to the drain hole and check whether the outlet coincides with the sewer socket.
- In the presence of small displacements, the device is connected to the sewerage outlet using a corrugated pipe.
- A plumbing fixture with a connected corrugated pipe is moved to the wall, making sure that strong creases and bends do not form on the pipe.
- The ends of the connecting element are covered with a thin layer of silicone sealant.
- Having adjusted the position of the device, with a pencil outline the contour of the borders of the sole of the device and the points where it is planned to drill holes for deepening the dowels.
- The toilet is pushed aside. At the marked points, holes are made with a diamond drill with a diameter equal to the size of the dowels used.
- Plastic plugs are inserted into the holes. The toilet is "hoisted" to its original place. Bolts are screwed into the prepared holes.
Tip: to facilitate putting on the corrugated pipe to the outlet, its end must be smeared on the inner walls with liquid soap.
If holes have to be made in tiles, to minimize damage to the surface, first manually slowly drill the top layer, and only then turn on the hammer drill with an impact drill
In order to ensure the closest possible fit of the toilet sole to the floor covering, silicone is applied according to the intended counter of the installation of the device. The toilet itself is then put in its original place, guided by the intended contour.
To fix the plumbing fixture, the washers and screws threaded through the holes in the heel are twisted extremely carefully. Under no circumstances should they be killed!
Photo guide for assembly and installation of the compact
Consider the process of installing a toilet bowl using the example of assembling and fixing Chinese PORTA plumbing. An excellent product with a 25-year manufacturer's warranty and a very attractive price.
Image gallery
Before installing a new toilet bowl, we dismantle the old plumbing, clean the floor under it, repair it and fill it with a semi-dry cement mortar
We install a new plastic adapter in the sewer outlet, to which we will connect either a corrugation or a rigid plastic elbow
If necessary, we change the cold water supply pipes in the area behind the toilet. Most often this has to be done so as not to change the pipeline a year or two after the installation of new plumbing
According to the completed connection from the toilet to the sewer, we expose the plumbing for fitting in order to mark the attachment points and outline the leg
Step 1: Preparing the floor for the new toilet
Step 2: Replacing pipes and fittings connecting to the sewer
With "straight" hands, most of the housework can be done independently. This category of work includes the installation of a toilet bowl. Knowing the sequence of actions, installation or replacement can be done by hand.
Do-it-yourself toilet installation - a task of medium complexity
Types of toilets
In this article, we will consider not the features of the flush or the shape of the bowl, but those design features that determine the list installation work.
According to the installation method
The toilet itself consists of a sanitary bowl and a drain tank. The bowl can be floor mounted or suspended. If the bowl is hanging, then the tank goes concealed installation- built into the wall. In the case of a floor bowl, there are three options for fixing the tank: on a special shelf on the bowl (compact), separate, connected with a flexible hose, in the installation (hidden in the frame wall).

The advantage of a floor-standing toilet with a conventional flush cistern is ease of installation. It can be installed without starting repairs. The disadvantage is that compared to the hanging one, it takes up more space, looks more heavy. Accordingly, the installation of suspended models is complicated - it is necessary to fix the supporting structure - installation - in the wall. Perhaps it is only during the repair.
Release to the sewer
The choice of toilet for release into the sewer depends on the location of the sewer pipe. They happen:

If the pipe is in the floor, a vertical outlet is optimal. If the exit is in the floor, but is close to the wall, the oblique toilet is most convenient. The horizontal version is universal. Using a corrugated pipe, it can be connected both to the wall and to the floor.
Installing a toilet bowl with a compact cistern (floor version)
A toilet bowl, a tank, a drain device and a float are usually brought from the store separately. Before installing the toilet, everything except the float must be assembled.

What does a floor-standing toilet with a "compact" cistern consist of?
Assembly
The process begins with the installation of a drain device. It comes assembled, you only need to install it in a hole in the bottom of the tank. A rubber gasket is placed between the drain device and the tank.

On the reverse side, the supplied plastic washer is screwed onto the pipe. It is tightened by hand, then - using a key, but very carefully, since it is easy to break the plastic. To prevent the drain device from spinning, it must be held by hand.

The next step is to install the mounting screws on the tank. They are also included in the standard package. These are long thin screws made of galvanized or stainless steel. They are inserted into two small holes at the bottom of the tank, rubber gaskets are put on, then washers, and only then nuts are screwed on.

Before installing the tank on the toilet bowl, a gasket (included) is placed under the tank. To prevent odors from leaking out of the sewer, it must be “planted” on a sealant. First we coat it on one side, put it on the toilet bowl, coat it on the other, put the tank.


We install the tank on the shelf of the bowl, passing the screws into the corresponding holes. We put washers, nuts on the screws from below, tighten them. At the same time, make sure that the tank is level.

Next, we put a float - a device for controlling the water level in the tank. There are two holes in the top of the tank. Here we insert the device into one of them. It is mounted on the side from which the water supply will be connected.

We wind a little flax on the outlet pipe, coat it with sanitary paste, install a corner (brass or stainless). Do not tighten the connection strongly, do not clog that the pipe is made of plastic.

Installing a tee
Floor mounting
The toilet is almost assembled, you can put it in place. The toilet bowl is connected to the sewerage by means of a corrugated adapter. At the ends, it has rubber seals that fit snugly into the pipes and onto the toilet outlet.

If the sewer pipe is plastic, the corrugation is simply inserted all the way. If the riser is cast iron, and not yet new, so that the smell does not seep through the microcracks, the pipe is cleaned to metal, washed and dried. A layer of sealant is applied around the circumference on a dry, clean metal (a little more in the lower part), then a corrugation is inserted. For greater certainty, you can go through the sealant on the outside of the joint.

In any case, we insert a corrugation into the sewer pipe.

The second end of the corrugation is put on the outlet of the toilet bowl. This is the connection of the toilet to the sewer. Everything is so simple. There is only one caveat. So that it can be removed later, the corrugation outlet and the outlet of the toilet bowl are lubricated with soap moistened with water, only then the bell is put on. If this is not done, it will be problematic to remove the toilet without damaging the corrugation. But you still have to drill holes for fasteners. It will be much more convenient to remove, rather than trying to move a partially fixed device.
Putting the corrugation on the outlet, we expose the toilet as it will stand. Having installed the lid on the tank, we check that there is a place for it. Next, you need to sit down, check the comfort of use, if necessary, correct the position. Then they take a pencil or marker, inserting it into the holes in the sole, mark the places for installing fasteners.

Having removed the toilet bowl, holes for the dowels are drilled in the marked places. If the kit comes with plastic fasteners, do not use it - it will break in a few days. It is necessary to immediately put powerful dowels.
If the toilet is installed on a tile so that it does not crack, it is better to pierce the glazed surface. They take a self-tapping screw, mark it, hit it with a hammer several times. This is what is called "pinching". Then they take a drill or a puncher and drill a tile, turning off the shock mode. After the tile is passed, you can turn on the perforation mode.

Put in holes plastic stoppers from dowels. They must be in the same plane with the floor. If there is a thicker edge, cut it off with a sharp knife.
We sweep the floor, removing dust at the installation site of the toilet. We put it in place, insert the dowels into the holes, twist them with the appropriate key. It is necessary to tighten the bolts alternately on one side, then on the other. Tighten until the toilet becomes firmly, without play.

The final touch is the connection to the water supply. Connect outlet water pipe with a tap installed on it with a corner on the tank, which was connected earlier. This requires a flexible hose. At its ends there are union nuts (American), so there will be no problems with fastening. Tighten well, but without fanaticism.

How to install a wall hung toilet with installation
For installation wall hung toilets the outlet of the sewer pipe should be located near the wall. The specific distance from the wall is indicated by the manufacturer, but it should be small - from the far edge of the order of 13-15 cm. If the exit from the floor, there is a solution - a special overlay with which the drain is transferred closer to the wall.
The installation of a wall-hung toilet begins with fixing the stops to the wall to the installation frame. They are attached two at the top and at the bottom. With their help, the distance to the wall is adjusted, the frame rises and starts.

The upper stops are in the form of rods, adjustable with a socket wrench and a screwdriver. The bottom stops are more like plates, they are also adjusted with a socket wrench but with a side head.

The assembled frame is attached to the wall, its center is exposed above the middle of the sewer outlet. The mark on the frame rises or falls to the height required by the manufacturer (there is a mark on the frame, also indicated in the passport, usually 1 meter).

With help bubble level the horizontal and vertical installation of the installation for the wall-mounted toilet bowl is checked.

Checking the horizontal
By adjusting the height of the stops, an equal distance from the wall, set by the manufacturer, is set. How convenient it is to do, look at the photo.

The exposed frame must be fixed to the wall. In appropriate places put marks with a pencil or marker, drill holes. They are equipped with plastic housing dowels. Most of the hanging toilets are imported, and they recommend planting the dowel bodies on the sealant. Some of the sealant is squeezed into the drilled hole, a dowel is inserted. Then, before installing the fastener itself, the sealant is applied to the plastic case.
In a fixed installation, you can put connecting elements - branch pipes, couplings. They are all included and simply snap into place.


Next, metal rods are installed on which the toilet bowl will be held. They are screwed into the corresponding sockets, silicone seals are put on top (in the lower photo these are two rods above the sewer outlet).

The sewer pipe extends to the desired distance, is fixed in a predetermined position with a bracket. It covers the pipe from above, is inserted into the groove until it clicks.
Next, water is connected to the tank. Open the tank lid (it is latched), the plug on the side surface is removed. Right or left - depends on where you have water. A corrugated pipe is inserted into the opened hole, the counterpart is inserted from the inside, everything is connected with a union nut. It is necessary to tighten without applying excessive force - it is plastic.

A tee is installed inside the tank, a pipe (usually plastic) is connected to the desired outlet. They do this with the help of an adapter and an American.

A hose from the tank is connected to a special tee inlet. It is flexible, in a metal braid. Tightened with a cap nut.

Install the cover in place. In principle, the installation for the toilet is installed. Now we need to close it. To do this, make a false wall of moisture-resistant drywall. It is recommended to put two sheets, but you can use one. Drywall is attached to the installation frame and to the mounted profiles.


The toilet bowl is put on the pins, its outlet goes into the plastic socket. The connection is tight, no additional measures are required. This completes the installation of the toilet with the installation.

Comfortable living in any home is impossible to imagine without a convenient bathroom. In it, the main element is the toilet. However, if it does not function too well, then there will be inconvenience. To ensure comfortable use of this plumbing device, it is necessary to assemble it correctly. The most difficult part is its tank. To a person who did not collect it with his own hands, it may seem complicated. But it's not. Let's look at how to install a tank on the toilet, assemble its mechanism and put it into operation.
Device and principle of operation
In the current level of competition, manufacturers are trying to offer the consumer the maximum choice. This also applies to tanks. The differences will be in the material used, the quality of implementation, the price. In order to understand how to adjust the toilet bowl or install a new one, you first need to understand its device.
The basis of work will be the same for everyone. The differences will be in the design of the tank. They may be as follows:
- One mode of operation - one button;
- Equipped with a dual-mode mechanism - two buttons.
A tank with one button means the release of the entire volume of water at once. The presence of two buttons and 2 modes of operation provides significant water savings. They allow you to drain only half the volume when draining. With this design, there are two buttons. A large one will drain all the water, and a small one - partially.
The process of water discharge can also be performed in different ways. Here, the methods of transferring force to the valve that closes the drain hole are distinguished.
The fluid flush scheme may be different.
- Direct flush. Water from the tank drains directly into the toilet. Doesn't change direction.
- Reverse flush. During flushing, the fluid changes direction. It is more efficient but noisier.
If you know the cistern device, then you can easily figure out how to fix the toilet cistern. Let's now look at the principle of operation and structural elements. There are two phases of work:
- recruitment process required amount water;
- Flush directly.
The device of the drain tank will be similar to a conventional hydraulic seal. The main elements are the locking element, the float and the lever system. By pressing the button, we act on the levers. They lift the constipation that closes the drain hole. As a result, water is supplied to the toilet sink.
FROM outdoor structure everything is simple. It has only 3 elements - a tank, a lid, a drain button. It's harder to deal with inside. It includes the following:
- Float valve. Controls the presence and level of water. It includes a float, its lever. The faucet body has gaskets, a piston, a union nut for connecting a water supply hose.
- Pear. Rubber element covering the drain hole.
- Drain valve. Transfers force from the button to the pear.

In order to understand how to assemble a tank, you need to understand the principle of operation drain mechanism. He's next. When the button is pressed, the lever system transmits the movement to the rubber valve (pear). It rises, freeing the passage of water down. The water level is dropping. At the same time, the float lowers, opening the water supply valve. The container is filled to a certain level. The float is understood and closes the valve.
For smooth and smooth operation during installation, it is necessary to adjust and fix the float in a suitable position. Finding the right position is easy.
- Water is supplied more than required. Lower the float.
- The lack of water indicates the need to raise the float.
Types of installation of drain tanks
If you need to figure out how to fix a toilet cistern, this is one activity. If you intend to install new equipment, then you should definitely know that there are 3 types of installation of drain tanks.
- Tank on the shelf. Behind the drain bowl is a shelf designed for installation. It is on it that the container is mounted. The process of descent of the liquid is carried out by the button.
- Separate. It is located on top of the wall. Connected with a pipe. Draining occurs after exposure to a rope or chain.
- built-in. The entire structure is called an installation. Combined with suspended plumbing. The toilet bowl is attached to the wall surface. The drain container is hidden behind it in the wall. The descent of the liquid is carried out by a button that is displayed on the wall.

Tank installation on a shelf
Now this is the most common layout option. Here the container is installed on the toilet itself through a special gasket.
The process should begin with the lining of the rubber cuff. This gasket must be selected as best as possible. The service life depends on its quality. When using low-quality rubber, after some time it will dry out and water will penetrate.

Pay attention! The gasket must be made of elastic rubber or similar material. If it is purchased separately, then check the correctness of the form.
The surface of the shelf must not have any defects. The cuff after laying should fit as tightly as possible to the opening of the shelf and the tank. In order to exclude the possibility of leakage, it is desirable to treat the cuffs with a layer of sealant. This will also help secure the elastic during installation.
Then pay attention to the side openings of the tank. Check the correctness of their coincidence with those that are on the shelf. They are needed to install the mounting bolts. They must also have seals.
Holes must be aligned and bolts inserted. Using a suitable open-end wrench, carefully tighten them. Don't forget to install gaskets on both sides. If you miss their installation, you can get a split or leak.
After fixing the container, you can proceed with the installation of drain fittings. The whole process is shown in the image. detailed instructions for assembly should also be in the attached instructions.

Pay attention! The connected water supply hose must also have a rubber gasket. In its absence, leaks will be observed.
After fixing all the elements of the drain mechanism, water can be supplied. Check the water supply immediately. If in doubt, adjust the float valve.
Installation of a separate tank
First you need to measure the height of the tank mount. Here it is necessary to correlate the height of the fastening to the fastening of the lower end of the pipe. The pipe can be metal or plastic. Diameter - 32 mm. It connects to the cistern and toilet.
After marking the height with a suitable power tool, prepare the holes. If there are no special fasteners in the kit, then fix with dowels. However, it will be more convenient to use special brackets. They can be purchased separately.
Before installing on the wall, assemble the drain fittings. The sequence is the same as in the previous case. Be sure to follow the factory instructions.
Next, fix the container at the required height. Connect the pipe using rubber seals. You supply water to the tank. Check the system for leaks. If there are no leaks and the water level is correct, you can start using it.

Built-in tank - installation
This option has recently become very popular. This is due to the ability to reduce the space occupied in the bathroom.
The design of this option is seriously different from the traditional ones described above. High quality polymeric materials are used in production. For installation, special metal frames. It is installed on the wall and will subsequently be covered with finishing materials. There is also a drain toilet bowl attached.
In this option, all the elements will be included in the kit. Therefore, you do not have to worry about the selection of suitable parts. However, such a construct will differ significantly in price. It is worth considering the need to spend extra money.

The installation procedure must be carried out in accordance with the factory instructions. However, the basic principles of installation can be distinguished. They can be divided into several stages. They are performed sequentially.
- Frame fastening. The main condition will be to ensure accurate verticality. Everything needs to be level checked. The requirement is explained by the best functionality.
- The frame is fixed to the floor and wall with dowels. There is a method of installation without a frame. However, in such a case, it will be necessary to build a brick base. It's too labor intensive.
- Before starting work, it is necessary to bring sewer and water pipes.
- If the model has a metered water supply mechanism, it must be installed near the tank.
- You can insulate the tank to prevent condensation. Use the right materials.
- Upon completion of the mounting of the elements of the tank, mechanisms and communications, a drywall sheet is attached. He will close everything. Outward you should have two bolts. They will be required to hang the toilet bowl. There should also be holes for draining water into the sewer and draining liquid from the tank.
- Also, a drain button will be displayed outside. It can be stand-alone or with a decorative panel.
- During operation, each connection should be checked for tightness.
Note that the button will have two keys. This is a dual mode of operation. Adjustment of the volume of the drained liquid. One will drain 6 liters. The second - 9. Helps to significantly save water.
As you can see, the assembly process is not difficult. If you need to figure out how to disassemble the toilet bowl, you can simply do everything in reverse order. Everyone can do the job and you don't need to call a plumber.