The valve for drain tanks with a ceramic lock. Toilet flush mechanism: varieties, installation and maintenance
Installing plumbing is half the battle, it is necessary that it works properly. For example, for a toilet bowl, the most important thing is that water is used sparingly and is regularly supplied to the tank. Namely, there are all the mechanisms that regulate the flow of water. The shut-off valve for the toilet bowl is used to release water into the tank. With the help of special levers, the water supply is regulated.
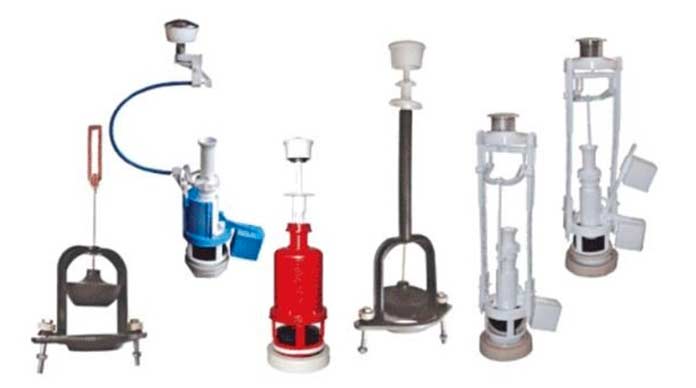
Valves come in different modifications, and you should decide which one to choose, focusing on the design of your toilet. There are models that connect to the side, and there are models that connect to the bottom. Based on the variety of tanks, the locking mechanisms are also different.
Check valve types
The classification of valves can be approached from different angles. Valves differ from each other in the material from which they are made. Most often it can be found from alloys, for example, bronze, brass. They are distinguished by their strength and resistance to corrosion, which is important, as they are constantly surrounded by an aggressive environment.
The designs of such valves can be very different, both very simple and complex. If you decide to buy an expensive drain system, then in it the entire mechanism with levers is made of metal. In cheaper models, the shut-off and filling valves are made of different materials, which allows in the event of a breakdown to change each node separately. It's much more convenient.
Other materials that go into making a check valve are polymers. In this case, the efficiency of work will directly depend on the quality of the plastic. This will also affect the cost of this node.
Now it has become not uncommon when it can happen that expensive fittings will work much worse than cheap ones. Here, probably, it all depends on the quality of manufacture of these parts.
Check valve design
According to their design, shut-off valves can be of two varieties:
- Separate.
- Prefabricated blocks.

In the first version, the shut-off valve is mounted separately from the drain valve. Only water connects them together. The filling mechanism most often has any shape with a float, which, while filling the tank with water, rises along with the level and, thus, shuts off the water supply valve. The drain structure is mounted completely separately and can be of various configurations with keys, pedals, and so on. The main advantage of such a separate design is that it is possible to repair or replace each valve individually.
The prefabricated model is installed immediately and all valves are interconnected. This is a much better guarantee of quality work if everything is well adjusted. The disadvantage of this design is the impossibility of do-it-yourself repair. These models can be seen in modern designs of toilet bowls. If you decide to install such a mechanism on your old tank, then most likely you will not succeed.
The locking mechanism of the toilet bowl also differs in the way it is connected to the water supply. The shut-off valve can have: top, bottom, right, left connections. This must be taken into account when you decide to replace the internal contents of the tank with new components, because the diameter of the drain neck and fitting may differ.
Most of all, the mechanisms with the upper and lower connections differ from each other. In both cases, the valve closes from the effect of thrust on it, which is associated with the float. When installing such a system, it is necessary to make a good balancing of the float, the efficiency of work will depend on its quality.
In Russian toilets, most often water is supplied from above. The big disadvantage of this approach is loud noise while filling the tank. In imported tanks, the bottom connection is mainly used. Water flows silently, and such models look more stylish.

If you have a tank with a top water supply, then the connection should be made only after installing the tank itself. It is possible to connect the bottom reinforcement even before its installation.
Valve installation process
It is best if you install the fittings that you purchased with the toilet. In this case, there is no doubt that all the details will match each other. If your tank has a separate shut-off and drain mechanism, then you can, of course, purchase them separately.
In order to install a shut-off valve, you will need:
- Wrench.
- Pliers.
- Water faucet.
- Open-end wrenches.
- Gaskets.
- Hose.
It is not so difficult to install the locking mechanism with your own hands. First you need to equip a drain unit in the tank, while Special attention pay attention to the tight connection. A gasket must be used between the base and bottom of the tank. You should put the tank on the toilet bowl, between them there must be a rubber ring to eliminate friction. Now you can screw on the tank.

If water is supplied from below, then it can be brought even before the tank is installed in its place. It is necessary to follow the good fastening of the gaskets, they are able to prevent leakage. There are no such difficulties for the top water supply, since everything is located above the water. Next, you need to push the tube and tighten the nuts well on both sides.
At the next stage of work, you need to connect the hose to the water supply fitting, install a faucet. In case of necessary repairs the water supply can be shut off. After the water is supplied, it is necessary to adjust the float. At the same time, it should be taken into account that water should not reach the edges of the tank, from them it should be 15 centimeters lower.
At the last stage, the water drain is mounted, for this it is necessary to insert the structure into the opening of the tank lid and fix it. For this, decorative elements are often used. The instructions for completing all the stages of work are simple, so everyone can handle it.
Shut-off valve malfunction
Before proceeding with troubleshooting drain tank, it is necessary to find out the mechanism for attaching the cover. If you accidentally break it during removal, you will have to change the entire tank.
The most common cause of inefficient operation is the float. There are such shortcomings:
- Float tilt.
- Membrane wear.
- The shut-off valve allows water to pass through.
- A hole in the float.
In order to adjust the float, you must carefully consider its mount. Often it is enough to change the bend of the float or its fixation and the problems are solved.
If it's all about the shut-off valve, then you have to change it. This must be done in a certain sequence:
- Release all water from the tank.
- Disconnect the valve from the water supply.
- Remove lever.
- Take out the old valve.
- Put in a new one and screw it on.
- Fill the tank with water.
- Adjust float.
Check valve selection
If you find any malfunctions in the operation of the drain tank, then you must approach with all responsibility the purchase of replacement parts. The efficiency of the entire mechanism will depend on the selected fittings.
At right choice installing such equipment will be quite easy. Arriving at the hardware store, do not rush to purchase the first kit that caught your eye. You have to make sure it fits 100%.
When purchasing a new locking mechanism, you should pay attention to a number of subtleties:
- You need to buy a valve of a similar design and principle of operation.
- All components of the valve must move freely; if the slightest sticking is detected, another option must be selected.
- All gaskets supplied must be elastic and flexible and free of any cracks. For reliability and confidence, it is better to immediately purchase a spare set.
- Even in the store, you need to carefully examine everything for the presence of distortions, deformations, cracks and other defects. Here, even the slightest discrepancy will then affect the operation of the mechanism.
In addition to these nuances, we must also take into account that in order to replace the shut-off valve, you will definitely need a set of tools and materials. The shut-off valves must necessarily match your tank and water outlets, only in this case the installation will be successful.
The fittings of the toilet bowl are a kind of “stuffing that provides work on the collection, retention and discharge of water. The material for the manufacture of fittings can be plastic or metal (brass, steel).
In this article, we will get acquainted with how to adjust the fittings in the toilet cistern, as well as with its types and features.
Mostly modern models toilet bowls are equipped with plastic fittings. It is quite durable, not subject to corrosion processes and the negative impact chemical substances present in the water.
 The operation of the toilet is directly dependent on the proper operation of the valves, which are responsible for draining and supplying water. Today in the market of sanitary products you can see a lot of different models of this device. Moreover, there are not many types, since the valves are of the same type, suitable for different modifications.
Shut-off valves by design can be separate and combined.
 Previously, only a separate configuration was used for the toilet device. In it, the installation of the filler and drain valve takes place separately, and they work autonomously. The operation of the filling valve is controlled by a float.
When the water in the tank rises and is blocked by a float under the action of thrust.
The drain assembly is a neck with a valve.
The valve is of two types - air and mechanical. Operated by pedal, button or key.
 The advantage of shutoff valves is that in the event of a breakdown, only the damaged unit can be replaced or repaired, rather than changing the entire system.
This affects family budget and facilitates assembly and disassembly work. Therefore, the use of such systems is relevant at the present time.
 The elite class represents the latest product models that use stop valves in a new design. In her general system connects the drain and fill valves.
Setting up this type of fitting is quite complicated. But at correct installation ensures safe and trouble-free operation of the unit.
The disadvantage of this system is the need for complete replacement in case of breakdown and difficult repairs.
Shutoff valves are also distinguished by the material of manufacture.
 Basically, polymeric materials are used for its production. The quality of the materials that make up the plastic determines the quality of work and durability.
Metal fittings are distinguished as the most durable and durable. These materials are characterized by moisture resistance and resistance to mechanical stress.
Usage single shut-off metal fittings provided by manufacturers only for elite models. Separate systems can be installed in any toilet bowl.
Top and bottom shut-off valves for the toilet
 Shut-off valves are divided according to such criteria as the installation site and the method of water supply.
The design of the system will depend on which side of the barrel it is built in, which will definitely be taken into account when replacing damaged elements.
 Differences in the installation have fittings with upper and lower water supply. Both systems involve the closing of the valve by the action of a control rod, which is connected to a float, which is a container made of plastic or foam.
When installing fittings, careful balancing must be carried out. This is necessary for the productive operation of the system, which is dependent on the water level of the drain barrel.
 In domestic toilets, fittings with an upper water supply are installed.
This system is placed in the side of the tank.
The disadvantage of this design is the noise that the system creates when supplying water.
Toilets of foreign manufacturers are equipped mainly with shutoff valves with bottom water supply. This design is silent, more comfortable and gives the model a stylish look.
The upper system is installed after installation work in the tank, and the bottom reinforcement is arranged before its location on the structure.
 The drain valve is much simpler than the water supply unit.
There are no locking mechanisms, as this design does not need it. The drain valve is controlled by traction.
It is a chain or bar.
Previously, when installing a toilet bowl, a lever located on the side or at the top of the cistern was widely used.
 Now most models are equipped with a button.
Such a mechanism provides for two modes of draining water. With different intensity of pressing the button, either a complete drain of the tank or half can be performed.
By pressing the lever or button, the damper opens, which closes the upper fitting and the water is drained into the toilet. Then, under the weight of the damper, it returns to its place and the valve closes.
The process of installing a toilet shut-off valve
You can use separate fittings, but it will be better and easier to use branded systems that come with toilets. In this case, exactly all the elements will match.
Materials that will be required to complete the work on the installation of the tank:

 Start work on the installation of the tank should be from the base of the drain device. A rubber gasket is laid between the bottom and the base of the tank. After the tanks are directly placed on the toilet, installing a rubber ring between them, preventing their surfaces from touching each other.
The cistern is screwed to the toilet with bolts.
The most important thing here is the good fixing of the rubber gasket to prevent leaks.
 For the upper reinforcement, these elements are not needed, since it is above the water. These nodes are mounted after the installation of the tank.
Installation for one and the other type is basically the same. The tube is pushed through the hole in the tank and twisted on both sides with nuts.
The next step is to connect the flexible hose to the water supply riser, namely to the fitting, and install a tap that allows you to shut off the water in the toilet during repair work.
The modern hose is equipped with a nut-grommet clamp, which ensures a secure connection. But plumbers usually play it safe and use fuma.
 Having brought the tank to the water supply, it will be necessary to adjust the float. The water level should be about fifteen centimeters lower than the edge of the tank.
It consists of installing a water drain mechanism with equipment. The top element is inserted through the hole in the lid and secured with a decorative element covering the hole.
Service cost
Several factors affect the price of toilet cistern replacement services.
Such as:
- the nature of the work and the level of complexity;
- additional work.
The cost of dismantling and installing new fittings is from five hundred to eight hundred rubles, and about two thousand rubles will have to be paid for replacing the drain tank.
 For the establishment of expensive plumbing, many companies use an additional coefficient. In general, high-quality work on replacing the drain tank and the price are in no way connected. There are a lot of companies and they all work in different price categories.
During the operation of the cistern, problems such as leakage or constant flow of water may occur. The reason may be in the thrust or in the membrane, and they will need to be replaced.
 If filling the tank is difficult, then first of all check the connections and the supply hose.
If you do not understand this, then in order to avoid trouble, it is better to seek help from qualified specialists.
Plumbing in the house is difficult to repair. And the bathroom with all accessories is no exception. But there will be no problems if you know the device and the causes of problems with the toilet. Knowing is almost half the battle on the road to skill.
Toilet design
Structurally, a standard toilet bowl consists of two main parts: a drain (flush) tank and a bowl. These parts are containers, the first of which serves to accumulate water, store it and drain it into the bowl, and the second is connected to the sewer riser, where the contents are flushed from the bowl.
IN modern types bowls contain the following elements:
- the bowl itself with mounting ebbs;
- release device;
- plastic seat with cover included.


Bowls for installation in apartments are cast from porcelain or faience. Plastic and metal products are installed in non-residential buildings. Cast iron toilets are still found in old houses, but they are unlikely to be found on sale.
The outlet from the bowl is designed with an upward bend in the outlet so that there is always water at the beginning of the bend. A water seal is formed that prevents penetration into the toilet room unpleasant odors from the sewer line of the house.


There are two groups of toilet bowls according to the design of the outlet pipe:
- with a horizontal outlet, when the direction of the nozzle is parallel or at a slight angle downwards to the floor surface;
- with a vertical outlet, in which the nozzle is directed vertically downwards.
The second option did not receive distribution in Russia due to standard designs of sewerage devices in residential apartment buildings, which do not make it possible to install toilet bowls of this group. It is suitable for private homeowners who build their homes according to their own projects.


The drain tank is a reservoir for flush water and is always located above the location of the bowl. The higher the tank is installed, the more powerful the flushing water flow and the cleaner the bowl.
The tank in modern plumbing is attached:
- directly on the mounting shelf on the back of the toilet bowl (“compact”, the most popular option);
- to the wall at a certain height from the installation of the bowl (suspended structure);
- hidden in the wall (built-in tank).


Inside the tank there are only two devices: a system for accumulating water and a system for draining it. These devices have shut-off and drain fittings, including a shut-off valve and a valve for filling and adjusting the water level. This also includes a float and a water drain lever.
Inlet valve device
There are two types of tanks for water inlet:
- side water inlet, when the inlet of the tank is located on its side in the upper part;
- lower inlet, assuming the location of the water inlet from the bottom of the tank.


In drain tanks with a lateral water supply, a liquid inlet valve is located at the inlet. The device of its overlap is connected to the valve, consisting of a horizontally located float on a curved brass lever (rocker arm). In tanks with a lower water supply, the inlet valve is also located at the inlet below, but the float is not horizontal in the tank, but vertical. In any intake design, the main part of the intake valve is the diaphragm. Occasionally, a piston valve is used instead of a diaphragm valve.
There is nothing complicated in the mechanism for draining water, although there are many of its modifications related to saving water. The mechanism drains the existing supply of water into the toilet. Part of the drain is an overflow from the tank, which prevents the container from overflowing in case of a malfunction of the water inlet valve. The drain system includes a release valve, a release lever (or button), an exhaust valve seat, a stem, and a stem guide.


The work of the mechanism
The principle of operation of the entire flushing device is no different from the long-used sample. Drain from tank to modern versions toilet bowl is absolutely identical to the drain in the corresponding devices of the Soviet era. A set of liquid in the tank comes from the water supply of the apartment. To turn off the water supply to the toilet, there must be a shut-off valve. Malfunctions with the toilet happen no less than with plumbing, and most importantly - they do not coincide in time. Here, in order to troubleshoot the toilet, it is necessary to block the line from the water supply.

If water is drained from the tank, then the float is in the lower position of the tank, opening the water inlet path through the inlet valve. As the fluid level in the tank rises, the float rises, gradually closing the inlet valve. Reaching a certain level of liquid in the tank, the pop-up float through the rocker connected to the valve membrane completely blocks the flow of water into the tank. At the same time, the membrane valve of the bleeder, located on the stem of the bleeder, is pressed against its seat by the pressure of the liquid level. With serviceable fittings, the descent system does not let fluid out of the tank.


To activate the flush, you need to pull the lever or press the release button on the tank. The release valve opens. Water rushes into the toilet bowl. The dual-mode cistern has two release buttons: low volume per flush and full flush. After emptying the tank, the inlet float is in the lower position and opens the inlet valve. The cycle of the system is repeated.

Assembly
To assemble and use the toilet with all devices, you need to follow the algorithm (using the popular "compact" type with a horizontal outlet as an example):
- turn off the water on the old toilet;
- dismantle the old toilet and tank;
- install the bowl and mark the attachment points if they do not match the old ones;
- drill holes and insert dowels into them;
- put the bowl in place, insert the fasteners and lightly fasten them;
- check the horizontalness of the installed bowl by level;


- install the toilet lid and seat;
- carry out the work of connecting the bowl outlet to sewer pipe by means of a sealing cuff, while sealing the ends of the joints;
- seal the joint of the bowl with the floor and finally tighten its fasteners;
- install the tank (usually all the elements of the tank are ready-made);
- lubricate the ring that fits the tank hole to the toilet mounting shelf with sealant and install the container at the attachment point;


- tighten the bolts connecting the tank with the toilet bowl and install the lid on the tank;
- connect a flexible hose from the water supply to the tank;
- check the operation of toilet devices;
- in the event of malfunctions, all systems must be adjusted and troubleshooted.


If everything is in order, then you can start using the device.
Causes and Troubleshooting
The most common problems are leaks through the drain system from the tank.
Remedy depends on the cause.
- The adjustment of the float of the water inlet system to the tank is broken and therefore excess water flows through the overflow. It is necessary to open the tank and by bending the float lever to achieve the desired adjustment of the water level in the tank. Bending the float changes the water level.
- The tightness of the seat or pear on the drain of the tank is broken, so they do not hold the desired liquid level. On the pear and saddle plaque may be deposited, they may also be deformed. The bulb and seat gasket should be cleaned or replaced.


- Water is not drawn into the tank. If the intake valve is clean, then possible reasons in a supply pipe, hose or faucet. You can disconnect the hose and check the water pressure in the system. If the cause is confirmed in the supply connections, it is necessary to clean or replace the hose, water supply filter or faucet.
- Inlet valve leaking after leveling up. Sometimes it's all about the wrong level adjustment, as a result of which the float rests against the reservoir lid. You can adjust the level (reduce it) by bending the brass float lever.
- Leaking at the water inlet to the tank. Adjust the level below the inlet and replace the rubber seals on this hole.
- The button (lever) for draining water does not work due to mechanical reasons or the displacement of parts of the flush mechanism that has occurred. Parts can be replaced and adjusted if required.

(1 votes, average: 4,00 out of 5)
In this article, we will talk about solving a common plumbing problem - a toilet cistern leak. After reviewing the information below, you can easily fix this problem yourself.

A few words about the device fittings of the tank
Before I tell you why a toilet cistern can leak, I will introduce you to the fittings so that you understand how it works.
Of course, there are a great many options for mechanisms at present.
However, the principle of operation of the tank always remains the same, since any valve includes three main elements:
- locking mechanism - is a faucet that automatically shuts off water as it enters the tank. The float is responsible for the water level at which the shut-off valve operates;

- dump system - is a valve that closes the drain hole. The valve is controlled by a button or lever;
- overflow system - prevents flooding of the apartment in case of failure of the locking mechanism. If the water in the tank is collected above a certain level, the overflow system ensures that it is drained into the toilet.
Trouble-shooting
So, your toilet tank is leaking - what to do in such a situation? First of all, you need to find out the reason why the leak occurs. There may be several options:

Wrong setting
Most often, the cause of constantly murmuring water in the toilet is banal - the float of the locking mechanism is incorrectly adjusted or its setting has gone astray. As a result, the valve does not shut off the water before it enters the overflow system.
How to understand that in a particular situation it was an overflow that was detected? At first glance, there are no external manifestations of the problem, on initial stage after each drain, water gradually begins to accumulate in the tank vessel. Based on the performance characteristics that the design provides, after it reaches a specific level, filling should stop. But this does not happen, and the liquid slowly seeps into the toilet. Such an unpleasant moment manifested itself as a result of a breakdown of the filling valve or float. Raise the lever with the float yourself. If the valve works - main occasion in a float.

In this case, lower the float lower in level with the shut-off valve completely closed.
The setting process largely depends on the design of the locking mechanism:
- old-style - in this case, the shut-off valve and the float connects the metal lever. To change the water level at which the valve will operate, you just need to slightly bend the lever with your own hands.

For some models of Soviet-style fittings, the lever is plastic, and consists of two halves connected by a plastic bolt. In this case, you need to loosen the bolt, change the angle between the levers, and then tighten the bolt to fix them in this position;

- modern sample - the position of the float changes relative to the lever by moving it. To do this, you need to apply some force or even press the spring locking mechanism.

As a rule, setting the float takes only a few seconds. The only difficulty may arise with the dismantling of the tank cover.

Usually, to remove it, you need to unscrew the ring framing the button. Old plastic tanks have clips on the sides.

Depressurized float
After adjusting the float, make sure it floats on the surface of the water and the locking mechanism works properly. If it turns out that the float is “submerged” or even submerged in water, it is useless to regulate it, since it has depressurized.
In this case, this part must be replaced. As a rule, it changes along with the shut-off valves.
Therefore, the dismantling instruction looks like this:
- shut off the water supply;
- flush the available water into the toilet;

- unscrew the flexible hose nut;

- then unscrew the nut that secures the stop valve.
A depressurized float can be soldered. To do this, melt an ordinary cellophane bag and seal a hole or crack with it. However, keep in mind that such repairs can only temporarily solve the problem.
After that, you need to take the valves, and go with it to the nearest plumbing store to purchase a similar mechanism. Install the new part in reverse order.

Locking mechanism failure
If it turned out that the float is working and adjusted, but the toilet bowl is still flowing - what should I do? In this case, make sure that the stop valve shuts off the water.
To do this, follow these steps:
- drain the water from the tank;
- raise the lever with your hands until it stops;
- see if water is flowing through the valve.
If water continues to flow after lifting the lever, then the shut-off valve is defective. In this case, it must be dismantled according to the scheme described above.

In principle, you can try to disassemble the valve and replace the rubber bands. But finding a repair kit for sale is not easy. Therefore, as a rule, best option is to buy a new valve.
The price of a valve with a float ranges from 100-500 rubles, depending on the type of design and the manufacturer of the fittings.

Water discharge system malfunction
All the malfunctions described above lead to the fact that water flows into the toilet through the overflow system. But, often the cause of the leak is the drain system. To check this, just turn off the water.

If water enters the toilet through the overflow, it will soon stop draining. If the drain system is faulty, then the leak will continue until the container is completely empty.

In the photo - an old-style plum pear
Often, the drain system leaks water due to a loose fit of the sealing membrane or pear. A similar situation can arise if any debris has fallen under the gum.
In this case, it is necessary to dismantle the drain mechanism, then rinse it, and also wipe the exhaust valve seat (the place where the pear fits to the outlet). The dismantling process depends on the type of mechanism.

For example, if a toilet bowl with a button leaks, i.e. fittings are modern, then just grab it with your hand and turn it counterclockwise. As a result, the body will come out of the hooks, and you can pull it out.

In old cisterns, to gain access to the pear and drain hole, it is enough to remove the lid. The drain mechanism is not fixed in any way.
The cause of a malfunctioning drain mechanism may be the float lever or drain tube, due to which the valve deviates to the side and allows water to pass through. The situation can be corrected by slightly moving the lever or tube to the side so that it does not touch the valve actuator.

If after that the toilet bowl with the button still flows, then the reason lies in the membrane itself, which has lost its elasticity. In this case, you just need to replace it or completely change the drain mechanism.

Drain mechanisms with pears are more durable, so their replacement is very rarely required. However, keep in mind that in principle they can also cause leakage.
If the rubber seal or rubber bulb has lost elasticity, dip it in hot water(not boiling water), and hold for a while. This will temporarily restore the drain system to working capacity.

That, in fact, is all that I wanted to tell you about fixing a toilet cistern leak.
Output
As you can see, tank leaks are fixed very simply and quickly, regardless of their cause. Additionally, you can verify this by watching the video in this article. If in the process of work you encounter any difficulties, or you have any questions, unsubscribe in the comments, and I will definitely answer you.
No matter how high-quality the toilet bowl and fittings are, problems arise from time to time: either water is not collected, or vice versa, it constantly flows from the drain. All these problems are associated with fittings (drain and inlet valves), which are placed in the drain tank. Next, we’ll talk about how to install it, change, adjust and repair it yourself, with your own hands.
Internal organization
The toilet cistern consists of two simple systems: a set of water and its discharge. To troubleshoot possible problems, you need to understand how everything works and works. First, consider what parts the old-style toilet bowl consists of. Their system is more understandable and visual, and the operation of more modern devices will be clear by analogy.
The internal fittings of a tank of this type are very simple. The water supply system is an inlet valve with a float mechanism. The drain system is a lever and a pear with a drain valve inside. There is also an overflow pipe - through it excess water leaves the tank, bypassing the drain hole.

The main thing in this design is the correct operation of the water supply system. More detailed diagram its devices are shown below. The inlet valve is connected to the float using a curved lever. This lever presses on the piston, which opens / closes the water supply.
When filling the tank, the float is in the lower position. Its lever does not put pressure on the piston and it is squeezed out by water pressure, opening the outlet to the pipe. Water is gradually drawn in. As the water level rises, the float rises. Gradually, he presses the piston, blocking the water supply.

The system is simple and effective, the filling level of the tank can be changed by slightly bending the lever. The disadvantage of this system is a noticeable noise when filling.
Now let's look at how the drain of water in the tank works. In the variant shown in the figure above, the drain hole is blocked by a bleed valve pear. A chain is attached to the pear, which is connected to the drain lever. We press the lever, lift the pear, the water drains into the hole. When the level drops, the float goes down, opening the water supply. This is how this type of cistern works.
Modern models with lever drain
They make less noise when filling the cistern for toilet bowls with a lower water supply. This is a more modern version of the device described above. Here the tap / inlet valve is hidden inside the tank - in a tube (in the photo - a gray tube to which the float is connected).

Drain tank with water supply from below
The mechanism of operation is the same - the float is lowered - the valve is open, water flows. The tank was filled, the float rose, the valve turned off the water. The drain system remained almost unchanged in this version. The same valve that rises when you press the lever. The water overflow system has not changed much either. This is also a tube, but it is brought out into the same drain.
You can clearly see the operation of the drain tank of such a system in the video.
With button
Models of toilet bowls with a button have similar water inlet fittings (there are with a side water supply, there are with a bottom one). Their drain fittings are of a different type.

The system shown in the photo is most often found in toilet bowls of domestic production. It is inexpensive and reliable. The device of imported units is different. They basically have a bottom water supply and another drain-overflow device (pictured below).

There are different types of systems:
- with one button
- water drains as long as the button is pressed;
- draining starts when pressed, stops when pressed again;
- with two buttons that release different amounts of water.
The mechanism of work here is slightly different, although the principle remains the same. In this fitting, when you press the button, a glass rises, blocking the drain. The stand remains stationary. In short, this is the difference. The drain is adjusted using a swivel nut or a special lever.
Installation and replacement of cistern fittings
A significant part of toilet problems are solved by adjusting or replacing the cistern fittings. In any case, you need to know how to disassemble and assemble the inside of the tank. This skill will definitely help you. When replacing, you must first dismantle the old device, and then install a new one. We will describe in detail the whole process, including the installation of new fittings.
How to remove the lid from the tank
If a drain tank with a button is being repaired, it is not always immediately clear how to remove the lid. This is easy to do: press the button, turn the ring.

If it doesn’t work with your fingers, pressing the button, consider its inner rim. There are two special slots. You can take a screwdriver with a narrow end, turn the ring a little with it. Then you can already twist it with your fingers.
After that, remove the button by pulling it up. Everything, the lid can be lifted.
Tank dismantling
To replace the old fittings of the flush tank, it must be removed from the toilet bowl. First of all, turn off the water supply, then drain the water from the tank. Then, using the keys, remove the water supply hose (it is attached to the side or bottom).

Next, you need to disconnect the tank from the toilet bowl. If you look under it from below, you can see the bolts that are tightened with nuts. So we unscrew them using a set of open-end wrenches or an adjustable wrench. Before that, place a container near the toilet or lay a rag - a certain amount of water always remains in the tank, when the nuts are unscrewed, it will drain.
Having unscrewed two nuts - on the right and on the left, we remove the tank. There is usually a gasket on the bowl. If it is deformed or dried out, it is also desirable to replace it.

The tank is placed on a flat surface. There is a large plastic nut at the bottom of it. It holds the drain mechanism, we unscrew it. Sometimes the first turns have to be done with an adjustable wrench, but do not overtighten it - the plastic can be brittle.

Now the water drain mechanism can be easily removed.

We remove the water supply mechanism in the same way. With bottom feed, the fastening nut is also at the bottom (right or left of center).


After that, we look inside the drain tank. Usually, rusty sediment, small metal particles, sand, etc. accumulate at the bottom. All this must be removed, if possible, washed. The inside must be clean - trash that has fallen under the gaskets can cause a leak. After that, we begin the installation of new fittings.
Installation of drain tank fittings
Everything happens in reverse order. First, we install a new rack of the drain mechanism. We unscrew the plastic nut from it, put a rubber gasket on the pipe. It can be white (as pictured) or black.

We start the device inside the container, with outer side screw on the plastic nut. We twist it, as long as possible, with our fingers, then tighten it a little with a key. You can not overtighten - it will burst.

Sealing
Now on the toilet bowl we replace the o-ring sealing its connection with the drain tank. Dirt and rust often accumulate in this place - we wipe it first, the seat must be dry and clean.

Inside the tank we install the fixing bolts, not forgetting to put the gaskets. We put the drain tank in place until it can be leveled. The main thing is to get the screws and the outlet part into the seats. We take a washer, a nut and screw them onto the screws.

When both nuts are installed, but not yet tightened, we level the container. Then, using the key, we begin to tighten the mount. We twist a few turns, then to the right, then to the left.
Installing the exhaust valve
Lastly, install the inlet valve for the drain tank. It could have been installed earlier, but then it is inconvenient to install the mounting bolts - there is too little space. We also put a gasket on the outlet pipe, then install it inside, fix it with a nut.

The next step is to connect water to the same pipe. Before connecting the flexible hose for water, we open the water for a while, making it possible to remove the scale that accumulates every time after closing the tap, even for a short time. Having lowered a certain amount of water (substitute a bucket so as not to wet the floor), we connect the hose to the fitting (we turn off the water again).

Although the fitting is metal, it is also not necessary to tighten this connection strongly - first with your fingers, then one turn with a key. If drops are found when the water is turned on, you can tighten it another half turn. After that, we check if the system works correctly. If everything is correct, install the cover, fasten the button. You can test again. This completes the installation of the fittings of the drain tank. As you can see, everything can be done by hand.
Adjustment and repair
During the operation of the toilet, problems periodically arise - either it flows, or, on the contrary, no water is drawn into it. Sometimes, tired of the inconvenience, people buy new toilets. But in vain. Most of the faults are fixed in 10-20 minutes. Moreover, everything is so simple that everyone can handle it. You don't have to call a plumber. You can do everything with your own hands.
Water level adjustment
We are talking about devices with a lower water supply. After installation, the toilet cistern must be adjusted. By default, they come from the factory exposed to maximum amount water in the container. This amount is often excessive. With a simple adjustment, we can reduce the volume of water in the tank. For this:

The same procedure is necessary if water constantly leaks from the tank. One reason is that the float is too high. Because of this, water flows through the overflow system.
With a side water supply and a float mechanism, the adjustment is even easier - we change the position of the float by bending its lever. On the one hand, it is easier, but on the other hand, it is more difficult. You have to bend it many times to achieve the required level.

Toilet cistern leaking
If the water in the toilet is constantly leaking, and its level is normal, we move on. There are several reasons for this leak. And if so, then the methods of elimination will be different.
- The sealing gum under the drain valve in the tank silted up, dirt got under it, a groove (or several) appeared on its surface. The method of treatment is to clean the existing gasket or replace it with a new one. To reanimate the old one, you need:
- turn off the water, flush it,
- remove the trigger mechanism by unscrewing the plastic nut from the bottom;
- pull out the drain valve, remove and examine the gasket, clean it of settled particles, if necessary (there are grooves), grind it with very fine sandpaper until smooth;
- reinstall, connect everything and check the operation.

Water is not drawn
Another problem that you can fix with your own hands is that water is not drawn into the drain tank. Most likely it's a blockage - a filter or tubes are clogged. Long talk, better watch the video.