6-faced gazebo with your own hands. Hexagonal gazebo: drawings and manufacturing procedure
Drawings of a hexagonal gazebo are very in demand for the owners of their plots. Such structures have a classical form and are the best place recreation.
A hexagonal gazebo, made by hand, harmoniously fits into any yard, even a small one. How to choose a drawing of a hexagonal gazebo, this article will tell you.
When planning the construction of not just a seasonal canopy for protection from the sun or precipitation, but a comfortable stay for the whole family, it is simply necessary to make a drawing for a hexagonal gazebo. This makes it possible to carefully plan the project, which will ensure the durability of the structure and help to withstand all the necessary geometric dimensions, as shown in the photo.

If a decision is made to build, then drawings for hexagonal gazebos will help:
- Pre-plan the individual style of the building.
- Facilitate the calculation of the amount of materials (see) needed for construction.
- Simplify the selection of the site where the gazebo will be placed.
- Select best option location of openings for windows and doors, decorative elements.
- Determine and purchase the necessary construction tools in advance.
- Select the optimal dimensions of the structure and all its elements.
After determining all the parameters of what the hexagonal gazebo will be, we use the drawings for its construction.
How to make a foundation
Without a reliable foundation, even a well-built gazebo cannot be used for several years.
This is due to such natural phenomena as:
- Seasonal subsidence of the soil.
- Rain.
- Snowfall.
- Uneven subsidence of the soil.
All this can adversely affect the structure.
When erecting a gazebo, its foundation can be:
- Solid. This is the most best type grounds, but the price of it is the most. It is used in the construction of small buildings and serves as a floor for them. It is a reinforced solid or lattice slab, mounted under the entire plane of the gazebo.
- Tape. Its construction is quite expensive, but the design is reliable. It is best erected for the construction of gazebos made of bricks, concrete blocks or natural stone. The base can be made monolithic or consist of several elements.
- columnar(cm. ). This is the easiest and most affordable type of foundation for a gazebo. It is most stable on clay soils, in wetlands in places with high humidity.

- Support-columnar. This type of foundation is the cheapest. During its construction, sand bedding is used. The first blocks are dug directly into the ground, the next ones are fixed from above until they reach the desired height.
Whatever hexagonal gazebo is built with your own hands, drawings for the foundation are necessary, as well as for the entire structure. Its exact dimensions will make it possible to mark the future structure on a pre-selected piece of land.
This is especially important when constructing a strip or column type of foundation, where all supporting structures or beams must be placed clearly on the foundation.
How to choose a frame for a gazebo
The design of the gazebo frame can be from:
- tree. The advantages of such buildings are:
- aesthetic appeal;
- environmental Safety;
- long service life;
- easily updated;
- economic benefit.
- Metal.
The advantages of metal arbors are:
- long service life;
- high reliability of the design;
- ease of assembly and disassembly;
- the construction process is facilitated by commercially available ready-made frames;
- resistance to fire;
- the ability to place on any surface;
- can be easily repainted in any color, which depends on the composition of the entire area;
- a wide range of prices allows you to install such a design for land owners with different financial capabilities.
- brick. These gazebos:
- have high reliability;
- fire safety;
- do-it-yourself brick hexagonal arbors, the drawings developed for their construction, help to reproduce a variety of shapes and sizes of the structure, it all depends on the owner's fantasies.
Whatever the hexagonal gazebo is erected, the drawing makes it possible to determine in advance its positive and negative sides. Will it be closed or open, glazed or lattice - all this can be seen in the drawing.
How to choose a roof for a gazebo
The most difficult stage in the construction of a hexagonal structure is the creation of a roof. Whatever hexagonal gazebo is built, a roof drawing is necessary. It indicates the precise geometric dimensions, the material for its manufacture.

For the roof of the gazebo, you can use various roofing materials (see).
For example:
- Metal tile. It looks beautiful and elegant, but in the manufacture of a hexagonal roof, waste makes up a fairly large percentage, up to 50%.
- Asbestos-cement slate. Its main advantages are:
- high resistance to moisture, which allows materials not to rot, not to grow mold;
- repels radioactive rays;
- does not pass cold;
- frost-resistant;
- long service life;
- resistant to corrosion;
- simply mounted;
- fireproof.
- Bituminous tiles. The material has:
- low cost;
- durability;
- small weight;
- increased impact strength;
- a large number of color options;
- easy and simple installation.
- Polycarbonate. The most popular material for gazebos. It has an attractive appearance, can be used from a variety of shades. Perfectly protects from wind and drafts.
- Straw or reeds. When using them, the roof acquires:
- strength and durability;
- special impregnation protects against fire, mold and rot;
- resistance to the appearance of rodents and bird nests in it;
- beauty;
- ecological cleanliness.
- Metal profile. This is a lightweight material that is easy to work with, well protects the structure from leaks during the heaviest rains.
The choice of material is influenced by:
- Its mass. It should be light. In this case, it is necessary to take into account the possible load from wind and snow.
- Despite the fact that a sloping roof is more reliable, depending on the above factors, the angle of inclination of the roof is selected.
Tip: In the presence of an artificial or other reservoir, materials should be chosen moisture resistant. All wooden elements of the roof must be treated with special antiseptics.
Construction instructions wooden roof the hexagonal arbor indicates that it consists of six identical triangles or six scalene triangles, the faces of which converge in the center at one point, which resembles in appearance the classical oriental structure of antiquity.

The video in this article will tell you how a 6-sided gazebo is being built. The drawing is the basis for its construction.
Having a project, it is possible to get the optimal supply electrical wiring, make the glazing correctly, decorate the structure with its forged or carved elements, arrange the furniture correctly in advance.
Assembly of the structure
The main stages of construction include:
- Create your own project or use a ready-made drawing.
- Determination of a place to install a gazebo, preparation for construction and marking the area.
- Foundation creation.
- Installation of support pillars and installation of the gazebo frame.
- Roof installation and laying roofing material.
For your information. If you are building a gazebo with your own hands, then you need to prepare the entire essential tool, since the quality of the final result and the speed of work performance largely depend on the quality of the tool.
From the tools you will need:
- Circular saw, in extreme cases, a hacksaw for wood.
- Electric drill.
- Screwdriver with a nozzle for used screws.
- Electric jigsaw.
- Wood screws.
- Building level and tape measure.
- Shovel and bayonet shovel.
With the help of an electric tool, the speed of work is significantly increased and the quality is improved, but safety precautions must be observed and eyes and hands should be protected during work.
Before you build a hexagonal gazebo, purchase the right amount of wood, make sure that the material is not wet. It is desirable that the boards and bars are already sanded. The price of sanded boards will be more expensive, but this saves processing time.
You will also need to purchase special impregnations for wood, which will protect it from moisture, prevent the formation of mold and increase the life of the material. Before use, the tree must be treated with impregnations and allowed to dry well.
Surface preparation and foundation

The place for the future building is important, because it should provide a comfortable stay. It is advisable to build a gazebo in the shade of large trees or surrounded by shrubs. The place should provide the creation of a separate path to the gazebo and the possibility of installing a barbecue.
The future construction site must be cleared of vegetation, bushes, trees, large stones. If the base has irregularities, then it is advisable to remove the upper part of the soil by 8-10 cm and level it in a plane.
Next, the type of foundation is selected depending on the quality of the soil and the weight of the future structure. Usually, a columnar foundation is made for small arbors made of wood, but if there is a hexagonal arbor made of bricks, then a massive tape or monolithic foundation is required.
- First of all, a circle is marked with an impromptu compass. One rod is installed in the center, a rope of the required length is tied to it with a second rod at the end and a circle is drawn.
- Then the circle is marked into six parts and the location of the foundation pillars is marked. Six poles around the circumference and one pole in the center that will support the flooring.
- In the places of future pillars, pits are dug 50 deep and 40 cm wide.
- A layer of crushed stone of 10 cm is laid at the bottom and carefully rammed, after which a pillar is erected with bricks and cement mortar.
Important. Support pillars should rise 15-20 cm above the surface of the site to provide ventilation under the gazebo. Also, when creating a pillar, a metal bar is immured inside to fix the lower harness of the gazebo, which should protrude 50 cm above the pillar and not less than 100 cm deep into the pillar. The rod must be painted or treated with bituminous mastic before installation.

When creating hexagonal gazebos on a columnar foundation, instead of pillars, you can use asbestos-cement pipes or install a formwork in the pit 20 cm above the ground, which is poured with concrete mortar. After creating the pillars, the remaining space is covered with gravel and tamped, then a layer of gravel is covered over the entire area of the removed soil under the gazebo.
A wooden hexagonal gazebo should not come into contact with a stone, so several layers of roofing material are laid on the pillars. You can coat the top of the support post with bituminous mastic. This completes the creation of the foundation and you can begin to build the frame of the gazebo.
Creating a gazebo frame

The construction of the frame begins with the laying of a hexagonal base of square bars, which is also called the bottom trim. The bars form a hexagon and are connected on the supporting pillars with a lock to the floor of the tree, as shown in the figure.
First of all, a lock is cut out at the ends of the bars, treated with protective impregnations. After careful fitting, through holes are cut out in the locks and put on a rod, as shown in the photo.

Next, stiffeners are installed for floor covering. Each rib is made from a flat board, one end of which is fixed to the central support post, the other end to the outer support post. All connections are made using metal corners.

The hexagonal gazebo design has six supporting pillars at each corner that support the roof. The pillars must be of the same length, and before installing them, a hole is drilled in the end for a metal rod.
After that, the pillars are put on top of the rod and additionally fixed with metal corners, strictly controlling the vertical position with the help of a level. After installing the pillars, the floor covering is installed in the form of boards.
For your information. Usually hexagonal gazebos have a ventilated plank floor, but if desired, it can be laid out with a decorative ceramic tiles. To lay tiles or linoleum, it is necessary to sew up the floor OSB boards or fiberboard, having previously treated them with protective solutions. The lower part of the plates is treated with bituminous mastic, and tiles or linoleum are laid on the upper part.
Installing the roof of the gazebo

For a beautiful appearance, a 6 coal gazebo should have the same hexagonal roof. The option of creating a roof is chosen based on the size of the gazebo and the weight of the roofing material.
We will consider the option of a large gazebo, where the roof will turn out to be quite massive. In this case, it is necessary to install an additional upper trim on the support poles. It is installed from the same square bars as the lower trim, exactly repeating it.
The bars are connected with a lock to the floor of a tree and fixed with metal corners. For greater reliability, a hole can be drilled in the upper end of the support beam and a painted metal bar inserted, on which to put on the upper harness.
Further, the 6 coal gazebo is equipped with upper stiffeners, as shown in the photo above. At the intersection of the ribs, a vertical bar is installed, which is called the "headstock" and serves as an additional support for the frame. Then the rafters are installed at an angle.
It is recommended to bring the lower part of the rafters 20-25 cm outside the structure to drain flowing water from the foundation. The lower part of the rafters is fixed to the upper trim, and the upper part is fixed to the top of the headstock, as shown in the photo. With lighter structures, the roof frame is assembled on the ground, after which it is installed on the top trim in assembled form.
For your information. The roof is sheathed with sheets of fiberboard, plywood, OSB or a crate is made of boards, depending on the type of roofing material and the method of its installation. If the project provides for a hexagonal gazebo with a barbecue or a barbecue grill, then a barbecue is installed against the wall opposite the entrance. Under the roof above the barbecue, a hood is installed.
Installing the walls of the gazebo

The final step is the installation of the walls of the gazebo. Here you already need to give free rein to your imagination and use an electric jigsaw. Installation of walls begins with the installation of railings, which are usually placed at a height of 80-100 cm from the floor.
Instead of walls, you can use boards in which, using a jigsaw, cut out decorative figures, as shown in the photo above. You can purchase ready-made curly racks. The completion of the work will be the coating of the entire structure with a protective varnish in several layers, which will give the tree a depth of color.
Finishing work
In order for the operation of the finished gazebo to be comfortable, and the service life of the structure to be long, it will be necessary to carry out a number of finishing works.
First of all, using a grinder, we process all surfaces, eliminating large, medium, and then small irregularities. The smoother the surface of the wooden elements, the easier it will be to apply a paint coating on them.
After the walls and beams as part of the gazebo are polished, we cover them with a layer of drying oil. As the drying oil dries, we cover the gazebo with several layers of varnish with the obligatory drying of each of them.
The area around the cottage or country house very favorable for relaxation. However, spending time in the sun or in the rain is not entirely comfortable. A comfortable gazebo will save you from bad weather. There are many various types structures, but one of the most interesting is the hexagonal structure. It is not easy to build it, so the services for the construction of such a structure are not cheap. Do-it-yourself hexagonal gazebo - great way create a unique building and save on the services of builders.
Advantages of an unusual shape
Rectangular gazebos are more practical during the construction phase. However, hexagonal ones surpass them in other indicators:
- Appearance. Arbors with a base in the form of a polyhedron look really impressive. This applies not only to walls and foundations, but also to the roof. The multi-sided roof of the hexagonal arbor stands out from the usual two and four-sided roofs.
- Strength. The more planes the gazebo has, the less pressure it has on precipitation and other external conditions. The shape of the hexagon has been tested for millions of years - what is the cost of a honeycomb that can withstand strong pressure.
- Spaciousness. Arbors in the form of polygons look very compact, but at the same time they are much more spacious than rectangular buildings of equal area.

However, before building such an object, one should not forget that the process can be difficult.
Construction types
Traditionally, steel and wood are used as building materials for gazebos. Metal products are less practical, and their construction requires welding skills and a lot of money. Wooden gazebos are more comfortable. No special skills are required to work with this material. A person who owns simple carpentry tools can make a hexagonal gazebo out of wood.

There are only two types of wooden gazebo designs: frame-based and timber-based. The first option is usually used in areas with architecture made in the same style. The second type is more general. On its basis, you can design a building in absolutely any style. In addition, wood for frame arbors does not require specialized processing, which cannot be said about the material for the log house. It is extremely problematic for a non-professional to cut down a tree for crowns. To do this, it is better to use the services of companies that manufacture ready-made log cabins, which you only need to assemble and then lay the roof.

gazebo design
After you have decided on the type of frame, it's time to decide in what style your gazebo will be made. Buildings with loaches look extremely advantageous on the site. The basis for them are lattices in the openings of the walls of the gazebo. Plants wrap around the lining and create a pleasant shadow inside the gazebo.
When creating a drawing of a hexagonal gazebo, determine in advance the type of roofing. There are some of the most popular materials:

Advice! When choosing a roof for a hexagonal gazebo, do not forget to calculate its weight.
Interesting design ideas for gazebos
Any owner wants to have on his site not only a comfortable, but also an interesting gazebo. In small architectural objects it is much easier to embody bold design ideas.

carved elements
Simple rectangular supports look very ordinary. Much nicer carved pillars. It is not necessary to own chisels in order to have such decorations on the site. Many firms sell ready-made carved supports for gazebos at affordable prices.

closed structures
For those who like to relax all year round - a closed gazebo is suitable. Such buildings look very original, especially in combination with unusual finishing materials. special charm closed gazebos give ornate window frames and stained glass. For the winter season, they are removed and the doors are opened (to avoid condensation and rotting). This is done if the gazebo is not used.

Arbors with a hearth
If you want to enjoy hot dishes cooked on fire even in winter, then you should look at gazebos with barbecue or barbecue. You can arrange an authentic hearth with stones and coals right in the center of the gazebo, or you can purchase an ordinary ready-made barbecue oven. First of all, you need to decide on the size of the gazebo and the budget that you have.
Important! In buildings with a hearth, an exhaust hood and metal protection around an open fire are required.

Thatched roofs
Country style is very simple in execution, but at the same time it looks impressive. The key element of the gazebo in this style is thatched roof. For the roof of a country bungalow, reed or wooden shingles are used. So that the frame of the gazebo does not stand out from the overall picture, round polished logs are used for supports.

Making a drawing metal structure, you can adhere to the principle of "nothing more", or you can create a real masterpiece of blacksmithing art.

glass walls
On the small areas glass buildings are relevant. Hexagonal arbors for summer cottages using glass look very light and visually save space. A building in this style is suitable for areas with modern architecture and houses with large windows.

Modern materials in design
Polycarbonate is a relatively young material. But due to its urban appearance and low cost, it is very successful in the design of buildings with unusual shapes. Both walls and roofs are made of polycarbonate. The material will perfectly protect the gazebo from rain and wind, without weighing down the design.

Step by step assembly
How to build a gazebo? Before starting work on the construction of a hexagonal gazebo, it is worth doing everything preparatory work. First, an accurate drawing is made. The dimensions of the structure, as well as the docking points, are entered into the gazebo scheme. In addition, the drawing should indicate the methods of fastening the elements. The materials of the floor, frame and roof of the gazebo are also entered into it. Such detailed description will allow you to get the most accurate idea of \u200b\u200bthe future design. It will also save time and money.
Before determining the area and placement of the gazebo, it is necessary to calculate its capacity. You should also draw the location of the table and benches. After all the preparation steps have been completed, you can start pouring the base. To ensure that the construction process does not cause difficulties, you should use a simple instruction with photographs.

The phased work on collecting a gazebo with 6 corners looks like this:
- Prepare a twine, the length of which will be equal to the radius of the arbor circle. It is necessary to tie a peg to its ends.
- One of them is hammered into the center of the circle, and with the help of the other, a circle is drawn on the soil.
- After that, at any point on the circle, you must install two pegs. The first one is removed from the center of the soil and transferred to the nearest point on the circle (as in the figure). After that, with the help of a rope and two pegs, 6 points are outlined around the entire circumference, into which the supports will be placed.

Now that the contour of the gazebo is defined, you can begin to build the foundation. The simplest type of base is columnar. It is quite simple to erect it, and the minimum amount of materials is used. Typically, such a foundation is built for wooden or frame arbors. It is usually made of masonry concrete blocks. Under each of them it is necessary to dig a shallow hole. The foundation is 1 block high.

In order for the frame of the beams of the wooden gazebo to be as connected as possible with concrete blocks, it is necessary to install a reinforcing bar in them. The joints of the beams are overlapped, and then mounted on the rods.

About 15-20 cm of the rod remains above the bars. The appropriate holes must be drilled in the racks. For the log on which the floor will rest, you must install 4 concrete blocks. They must be cut in pairs into the foundation beam.
After that, you need to install wooden columns. They must be fixed strictly vertically. For this, cutting boards are used. As soon as the racks are installed, it is necessary to equip them with a strapping beam.
In the middle of the racks, it is better to make a railing. A fence is attached to them. A board is attached to the top harness. In its middle part, a hexagonal column is installed in a vertical position. It is he who will serve as a support for the rafters.

Rafter legs are laid on the central post at an angle. They must be securely fixed with screws both to the pole and to the harness. If necessary, cover the roof with tiles, OSB boards are laid on the rafters. Before that, a crate is mounted on the rafters.
Plates are cut on the ground. It is screwed to the roof with self-tapping screws. Each overhang is recommended to be sheathed with a metal bar.

It is impossible to imagine a summer cottage without a beautiful hexagonal gazebo - it decorates the space, allows you to relax in the summer heat. Would you like to build one, but are not sure of your building skills and capabilities? We propose to talk about how to build a hexagonal gazebo with your own hands. Drawings and dimensions, a step-by-step project with a photo later in the article.
DIY hexagonal gazebo
Hexagonal gazebo: features
The hexagonal gazebo is popular with summer residents - it is easy to install. Why is she so attractive? Let's try to figure it out.
Garden 6-faced gazebo - a reliable design. Its creation (even if we take closed and glazed models) is associated with fewer technical difficulties than that of . It is inferior to the latter in terms of spaciousness and number of seats, but with proper planning you can significantly increase the area for vacationers.
A hexagonal gazebo for a summer residence looks elegant and attractive - this is a classic model that does not lose its relevance over the years. With proper selection of materials will last a long time.
Varieties
You can build a gazebo from the following materials:
- forged from metal;
- professional pipe;
- brick;
- wood.
Forged from metal
A metal forged gazebo will be chosen by those who would like to see something openwork, light and weightless on their site. They look elegant, from you as a craftsman it will be required not so much the ability to build, but the ability to handle welding machine.

From a professional pipe

It is characterized by quick installation - it is assembled in a few days if you know how to use the welding machine. For supporting pillars, a professional pipe 80x80 mm is used, but other sizes are also allowed.
pros:
- high stability;
- install faster and easier than a brick counterpart;
- the opportunity to show imagination when experimenting with the form.
Main disadvantage considered limited in the creation of winter models. It is not recommended to construct 6-coal arbors from a professional pipe closed type A: Metal does not retain heat.
from brick

Brick buildings look like small houses. The designs are popular with those summer residents who have already built a brick house and want to add landscape design similar buildings.
Wooden hexagonal arbors

The most common construction option for novice builders is hexagonal arbors made of wood. Appreciated for its unprecedented ease of use wooden panels and bars.
We build a hexagonal gazebo with our own hands (from a professional pipe)
After analyzing the materials, we will discuss how a hexagonal gazebo is made with our own hands. Drawings and dimensions with step-by-step photographs will allow you to see how the construction from the corrugated pipe is installed.

Preparatory stage
As part of preparatory phase determine where it should be on your site. Preparation for construction includes:
- selection of tools and materials;
- selection of a place on the site for the installation of the structure;
- drafting a project;
- blueprints.
Tools and materials
List tools for the construction of a hexagonal gazebo:
Bulgarian
Pliers

Welding machine
Gloves

Rope and pegs
From material will need:
To work with profile pipes, the ability to handle a welding machine and a grinder is required.
Choosing a place on the site
To install a gazebo, you will need to pick up a site with a flat surface without closely lying ground water. Clean up the debris and clean the surface, later you will need to make a column foundation. Marking is done with pegs and rope, according to the drawing and project plan.
Hexagonal gazebo project
You will either need to draw up a project yourself, or use a ready-made one from the Internet, or order it from a specialized company involved in project documentation. A well-designed project reflects the size and location of the structure on the site (more on this below). If you choose a professional pipe, please note that winter options for gazebos with heating are not appropriate (it is better to create them from wood).

Do-it-yourself hexagonal gazebo - drawings and dimensions
The drawing of the gazebo with dimensions should contain:
- site plan (minimum);
- scale;
- overall height of the structure;
- height to the handrails (if any);
- height from handrails to the roof;
- the height of the roof of the gazebo;
- the width of one face inside the structure;
- width in the section between the faces;
- the width of one edge on the roof;
- width in section on the roof;
- diameter from the center to one of the corners inside the structure;
- roof diameter from the center to one of the corners;
- floor area of the gazebo;
- roof area;
- Pipe diameter;
- All dimensions in the truss system.

In order to correctly measure the area of \u200b\u200bthe gazebo, do not forget about the comfort of people - ordinary person 2x2 m of free space is required.
Foundation and frame
After drawing up a project on which a hexagonal gazebo will be built with your own hands, the drawings and dimensions of which are shown in the diagram, take the installation directly. The next important step is laying the foundation and installing the frame.
Foundation and base assembly
For correct installation gazebos you will need to pour a columnar foundation. Non-professional builders can ignore the installation of the base, but then the gazebo will settle over time and you will have to redo everything from the beginning.

Make sure that the racks stand exactly in the pits, otherwise the gazebo will squint. Use to check the level.

The base depends on your project, and its quality - on the skills of working with a welding machine. Profile pipes with the following parameters should be used as racks:
- wall thickness - no more than 2.7 mm.
- section preferably - 80 x 80 mm (other options are also allowed).
flooring
For a hexagonal gazebo from a professional pipe, the floor is created both wooden and concrete, brick and stone. It is permissible to make it without a floor, seating the surface with lawn grass.
If you want to make a flooring for a wooden floor, you will need to install logs, and then lay the surface with boards. When installing brick floors, you will first need to make a sand cushion (dig a small hole around the perimeter of the base area, then fill it with rubble and sand, and then fill it with concrete mortar and lay it with either brick or stone until it dries out). We recommend working with stone only by professionals - the material is difficult to process and lay.
Installation of a hexagonal gazebo roof
You will have to choose not so much with the form as with the materials: you can lay the roof with both slate and tiles or metal profiles.

The first step is the installation of a rafter system for a hexagonal gazebo. Use the remnants of the pipe. You can use bolts for fastening, but it will not look so neat, we recommend welding. The rafters will protrude beyond the racks (optimally - by 15-20 cm).
- Lay a layer of plywood no more than 20 mm (it is allowed to fix it to the rafters with self-tapping screws every 15 cm).
- Lay down waterproofing material(roofing felt) for moisture insulation of the roof: we will ensure reliability and prevent the flow of rainwater.
- After laying, we cover the surface with slate or tiles.

It is permissible to make a truss frame for a 6-coal gazebo from wooden planks, but in this case you will have to take care of the tree - cover it with special antiseptics against decay and insects.
The final stage of construction: decoration and operation
Construction work is completed - start decorating a 6-coal gazebo. This kind of open gazebos are successfully combined with climbing plants that can be put on the body - it looks beautiful, and does not require strong additional expenses.
Engage in the creation of decorative furniture from the remnants of the pipe - tables and chairs will fit perfectly into the interior, but they easily absorb heat and cold, so throw pillows on the chairs to make it more comfortable to sit.
A hexagonal gazebo from a professional pipe does not require special skills in operation - all you need is to periodically tint the details of the building and do not forget to treat them with an anti-corrosion agent. In winter, it is problematic to use it, therefore we recommend covering it with a film to prevent contact with moisture.
Video review of a hexagonal gazebo
Hexagonal gazebo with barbecue
We will offer several options for placing the barbecue in the gazebo.


Arbor - indispensable attribute personal plot. The Internet is replete with offers to buy ready-made drawings of gazebos for self-construction, or entrust the construction of a small architectural form to professionals. But often, for some reason, existing proposals do not meet the needs of land owners, either the size does not fit, the shape and design do not suit, or it is simply expensive. And in itself, the construction of a gazebo is not a complicated process and is quite feasible with your own hands.
This article is devoted to how to draw up a plan, drawing and diagrams of gazebo nodes, how to determine the size depending on the purpose of the building, how to properly place a brazier, a place to relax, a kitchen, etc. And of course, we have selected for you ready-made schemes and drawings of gazebos.
In the photo, the layout of the space with a barbecue, corner structures save space
Layout
The first thing to decide is where the building will stand. To do this, you will need a site plan on a scale convenient for you, which indicates: the main building (house), outbuildings (bathhouse, sheds), schemes garden paths, trees.
Advice: It is better not to cut down perennials, they will still serve for shade and landscape design.
Drawings of a do-it-yourself garden gazebo, in the diagram there is a rectangular building made of timber

Do-it-yourself gazebos with drawings, a photo of a canopy made of logs of a non-standard simple shape with a corner barbecue
Carefully study the plan of the infield, taking into account the totality of circumstances, and mark on the diagram where, in your opinion, the gazebo will be most appropriate. It is better to place it in the depths of the garden, at the end of the path, between the trees. The distance from the main house is 3-5 m. If the building is planned with a barbecue, fireplace or stove, then it is desirable to move it away from the main residential building by more than 8 m.

Plan of a gazebo for a summer residence, independent drawing with dimensions
When drawing up a drawing, do not forget about the foundation. For country arbors, it is optimal to arrange a columnar base. The distance between the posts is 1500-2000 mm, for each vertical support. Post section 300*300, 400*400 mm. When marking the foundation scheme on the ground, add 100 mm on each side so that the base is larger than the dimensions of the building.

Approximate layout of furniture in an 8-corner building
Functionality and dimensions - what you need to know
Pavilions, first of all, are built for a comfortable stay on outdoors, which means that they should be comfortable, durable, reliable, everything should be at hand, nothing should interfere, annoy. And for this you should know some rules of ergonomics.

Typical drawing of a rectangular structure

As a rule, rectangular buildings have a two- (as in the diagram above) or a hipped roof.

Wooden gazebos, drawings of a square building with a hipped roof
Standard table width 600-800 mm, length 800 mm - for 4 people, 1200 mm - for 6 people. The convenient size of the seat of a chair or bench is 400-450 mm. Thus, the minimum width of the gazebo is 1500 (600+450+450) mm, length 1500-2000 mm.

Do-it-yourself country gazebos, drawings of a mini log construction
Note: If necessary, the dimensions of the gazebo can be reduced, in which case it is better to opt for a small, frame canopy building, see an example in the diagram below.
Arbor scheme for a small area

The product is on a metal frame, the dimensions are schematic, the length and width of the gazebo can be changed to suit your needs
For comfortable accommodation of one person, an area on the floor is required - 2 m 2, therefore, optimal size gazebos for a company of 4-8 people - 3 * 4 m, 4 * 4 m (12-16 m 2).

Do-it-yourself hexagonal gazebos, drawings of a standard wooden structure
If not only a place for gatherings is planned, but also a recreation area, with chairs and sun loungers, then the area of \u200b\u200bthe gazebo is calculated at the rate of 4 m 2 per 1 person.
In order to correctly draw a drawing of a gazebo with a barbecue or a fireplace, when calculating the area, it is necessary to take into account the dimensions of the furnace. The optimal depth of a brick barbecue is 750-1000 mm (3-4 brick lengths), width - 1200 mm (10 brick widths).

Drawing of a standard brazier
In addition to the brazier or barbecue, on the side of it, for convenience, a desktop 600-800 mm wide should be provided, to it, preferably, a sink - a width of 600-800 mm, and on the other side a place to store firewood, for symmetry the same distance. Based on this, the minimum length of the kitchen, including the oven, is 2400-3400 mm.

Scheme of a brazier with a working area
Before the barbecue, it is necessary to provide free place 1000-1200 mm, so that you can move freely while cooking, and the heat does not interfere with those sitting at the table. Thus, when drawing up a drawing of a gazebo, in addition to a place for gatherings of 8-12 m 2, an additional area should be allocated for the barbecue: at least - 2400 * 1750 mm, with comfort - 3400 * 2200 mm.

Gazebo with barbecue, drawing of furniture placement

Scheme of construction with barbecue, wooden structures must be treated with fire retardant
To save space, the stove can be installed in the corner of the gazebo, or make a separate canopy on the site near the building.

Drawings of gazebos with barbecue, this form of construction contributes to convenient zoning of the kitchen and dining area
Shape and design features
In addition to the fact that gazebos are open and closed, they also differ in shape: rectangular, multifaceted, round, combined, etc.

Assembly diagram of a closed square garden summer house under a pitched roof

Scheme of a large gazebo made of wood under hip roof, on the foundation 4*6 m
The easiest way is to make a drawing of a rectangular gazebo, but pitfalls lie in wait here too: when transferring the diagram to the site, make sure that the angles are strictly 90 o, the diagonals are the same, or use the rule of the Egyptian triangle.

Marking the area for the gazebo
Measure 3.0 m on one side, 4.0 m on the other, connect the points in a straight line, check the geometry, if the connecting line is 5.0 m, then the angle is 90 °
Simple rules for building circuits
Drawings of multi-organ structures during independent design cause some difficulties. But let us remind you of just a few rules from the school course. So, for example, a hexagon with equal sides always consists of 6 equilateral (all sides are equal, and angles = 60 o) triangles. Or from two equal trapezoids.

A diagram of how to simply draw the base of a hexagonal gazebo
If you want to change the shape of the gazebo, for example, to enlarge some sides, then first a rectangle is drawn (in the diagram below, with a green line), then its diagonals are drawn, and the middle is found. From the point of intersection of the diagonals, perpendicular to the long sides of the rectangle, I set aside the same segments (yellow line in the diagram), then the points are connected. Or you can still draw 2 equal trapezoids with a common base, the height of the trapezoid should be equal to half the side of the gazebo.

Do-it-yourself hexagonal gazebo drawings, if you want to change the length of the sides
To draw an octagonal gazebo, its base must also be decomposed into simple shapes, as shown in the diagram below.

2 perpendicular intersecting lines are drawn, equal to the length and width of the structure, a rectangle is built, one side of which is equal to the side of the building, the other is the width


The drawing of the gazebo is 8-sided, in the diagram it is marked in yellow how to connect the sides of the polygon

To increase the number of sides in a polygon, just draw another rectangle and connect the vertices along the path, as shown in the diagram.
Projects of gazebos - we build with our own hands

Drawing of a gazebo made of wood, 6-sided design

Scheme of the base and roof of 6 coal buildings

Drawings 8 coal elongated structure
Garden structures in the form of a polygon are a little more difficult to build compared to simple rectangular buildings, but they look more original and spectacular. To make the gazebo not only functional, but also become a decoration of the garden plot, decorate it with a beautiful wooden lattice or elegant forging, plants, choose a lighting scenario.

Diagram of how to build a gazebo in the Japanese style

Scheme of assembling a wooden house grill

Arbor do-it-yourself drawings, photo metal constructions

Arbor metal from a profile pipe, decorated with decorative forging elements, frame scheme

Drawing how to make a gazebo in the country with your own hands
Please note that in many drawings and diagrams there is no floor in the usual form, instead of it a flat platform is laid out. paving slabs or cast-in-situ concrete slab.

Drawing of a gazebo made of metal, photo of a simple design with forging elements
When making a polycarbonate structure, try to fit the size of the gazebo to a standard sheet of 2100 * 6000 mm.

Hexagonal metal structure
In order to accommodate more people, benches are installed around the perimeter, it is advisable to provide a round table in such a building.

Drawing of a welded portable structure with a polycarbonate roof

Large square canopy made of rolled metal and polycarbonate, frame diagram with dimensions
Even large buildings made of metal and polycarbonate look light and airy. To protect against side rain and wind, the sides can be covered with transparent monolithic polycarbonate, screens made of special durable polyethylene or curtains made of waterproof fabric.

Drawing of a wooden gazebo, cross section of an octagonal structure

Summer construction made of polycarbonate, a diagram of how to weld a metal frame

Drawing of a wooden building made of timber, decorated with a wooden lattice

Closed Structure with Lattice, Hexagon Building Project

Scheme of a log building in the Russian style
We have presented to your attention the most popular gazebo projects. If you didn't find suitable option, then use our tips on how to complete the drawing of the building yourself.

Drawing of a shed building from a bar

Drawing of a combined summer building with a barbecue, placement of the main zones
If you do not have professional builder skills, try to choose simple designs, without complex lines and architectural excesses.

Summer room for a large company with a barbecue and a bathroom, space zoning drawing
The interesting shape of the hexagonal arbor causes surprise and admiration. Everyone is already tired of the classic “squares” and “rectangles”, I want something new and aesthetic. It is the building with six faces in this situation that is in the spotlight.

The idea of a wooden hexagonal gazebo
You can find more photos in the publication about.
In this article, we will focus on the intricacies of construction, and also give detailed instructions of 13 steps
There is absolutely nothing difficult in the construction of a hexagonal shape. Even the installation of the roof is not particularly difficult, although some features are present.
In this article, we will step by step show the process of building a hexagonal gazebo.
The choice of building material
At this stage, you need to decide on the building material. Most popular options are wood and metal profile pipe). In the case of wood, you can use a bar 100 by 100 mm, and metal - a pipe with a cross section of 60 by 40 mm.
 from wood
  metal
metal
If you prefer a reliable brick, then the whole erection technology will be noticeably different. It will be necessary to fill (tape or monolithic type), and then deal with brickwork. There are no special constructive features here, it will be enough to lay out the walls in six faces.

Of brick and stone
Drawings with dimensions and explanations
If you do not fully understand the design of a hexagonal gazebo, then I suggest studying the drawings below. They clearly show the dimensions of potential buildings, the area, the dimensions of the truss system, the joints at the joints, the names of the components.
The above projects are enough for you to have a definite opinion about such a form. The drawings, perhaps, do not show the roof sheathing, which is done for laying soft tiles, we will talk about this later.


Do-it-yourself construction
Marking the hexagonal shape of the base

Gazebo with an area of 6 sq / m. The length of one strapping bar is 1.5 m.
The first task that will need to be solved is to determine the size of the gazebo and mark the correct hexagon (hexagon). To do this, we need a tape measure, pegs and six identical bars of the lower trim.
- We make 6 bars of exactly the same size.
- We spread them on a surface previously cleared of debris in the shape of a hexagon (picture below).
- At the joints we hammer in pegs.
- We remove the bars and prepare for laying the foundation.

Foundation
For the base, it is cheapest to use foundation blocks, which you can buy in a store or make yourself. If you really work “in good faith” at all, then there is a more expensive, but very reliable version of the foundation with bored piles.
The main task is to create a flat (in terms of level) plane, on top of which the lower harness will go.

Connections in the bottom harness
There are two ways to attach the bottom trim:
- In half of the tree (at the end of each beam we cut off half the section and put it on top of each other).
- With metal corners.
Corners in most cases are enough to tightly fix the timber. But if you want to do everything "for ages", then you can do sawing and add an additional mount. In the photo above, which shows the base of the blocks, this connection is presented in all its glory.

Pole installation
It is necessary to install six vertical posts and fix them at an angle of 90 degrees. It is most convenient to work with a partner who will hold the post while you attach it to the bottom harness.
By analogy with the strapping, we use metal corners and self-tapping screws. In the photo below you can clearly see the finished result.
If metal corners are not enough for you, then for additional reliability you can use a connection with a spike and socket. work will increase noticeably, but the stability of the column will increase significantly.
 spike connection
Floor
For the floor, you can use any kind of boards that will withstand people and furniture inside. The classic option is the fortieth edged pine board. A more expensive option is larch. there are several:
- Solid, parallel to one of the faces.
- In each of the six sections of the floor separately.
 Completely
 With a beautiful floor
Roof erection
Just a little secret: truss system best collected on the ground. It's much easier and more reliable. Then it will need to be lifted onto vertical poles and fixed. This technique is used everywhere, so I recommend it to you too.
The rafter system consists of six bars (the most commonly used bar is 150 by 50 mm), which are fastened in the center to each other with a wooden spire and a metal apron, as well as in each corner separately to the upper harness.
 Roof assembled on the ground (without lathing)

Roof selection and installation
When you need to proceed from whether you are ready to deal with OSB roof sheathing with slabs.
Having installed the rafter system and the crate, you can lay, for example, or metal tiles. If you want to lay soft tiles (like Shinglas), then you need to additionally sheathe the roof with slabs, on top of which the roof will already be laid.
 soft tiles
  Ondulin
 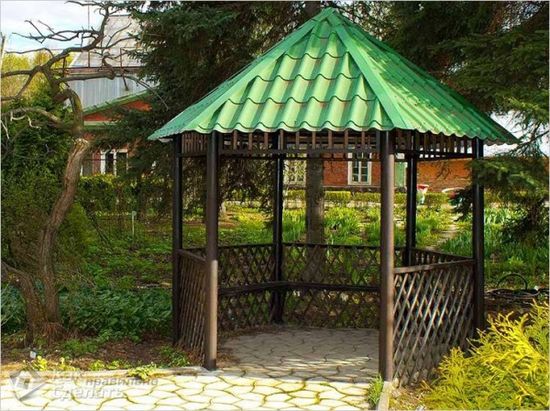 Shestiskatnaya
Step by step instructions with photo
Below is the construction of a six-sided gazebo in 13 steps. Each photo is signed and describes the process that took place. In the next paragraph, a video will be shown in which this process is shown even more clearly.


Step 2. Removing the block formworkStep 5. Finished bottom trim and railingsStep 8. Wall sheathingStep 12. Making a drainage system

Video instruction
An interesting video on construction was presented by a Youtube channel called " All our life!". With the help of photographs, the authors of the video show their steps from the moment the foundation was erected to the laying of soft tiles on the roof.