Do-it-yourself wall puttying: from A to Z. The right choice of tools needed for wall and ceiling puttying Tools for wall puttying: spatula
To perform surface puttying, a simple set of tools is most often used: a spatula, buckets, grout bars and primer rollers. However, today this set has been replenished with new devices, such as a putty grinder, a putty gun, a mixer and special devices for preparing, transporting and applying mortar to the wall. We will talk about these and other tools in more detail.
Instruments
Standard set

Most often, puttying is done by hand, so the set of tools and accessories in this case is minimal.
This set must include the following items:
- . Designed for applying and smoothing the mortar on the surface of walls and ceilings, it has a stainless steel blade and a body with a handle made of plastic, wood or metal. Width - 45 cm, but each master selects the size for himself;
- Auxiliary spatula. It is used in those places where it is inconvenient to work with a wide spatula, as well as for smoothing seams between GKL or reinforced concrete slabs. Width - 20 - 30 cm;
- Spatula. It is used to collect a solution from a bucket and apply it to the blade of a working tool, as well as to fill cracks, seams and joints. Also, with the help of a spatula, you can level the corners;
- Angled spatulas. There are two types: external and internal. Needed to form right angles between surfaces;
- Putty putty. It is a long narrow trowel, which can smooth out a large surface area like a rule, working with one or two hands;
- Bar, grater or grinder for putty. Needed for sanding and grinding;
- Container for mixing solution. It is better to use a plastic bucket with a capacity of 10 - 15 liters;
- Putty mixer. You can use a special mixer for mixing solutions or a conventional drill with a whisk;
- Roller or construction brush for applying a primer to the walls;
- Rule for quality control of works;
- Spotlight or lamp. It is necessary to create side light, in which flaws and irregularities are better visible, we recommend using halogen lamps;
- Construction knife, stapler and other auxiliary tools for mounting reinforcing tapes and corners.

Important! In the very simple version the set can be reduced to two spatulas - a wide one and a spatula, a bucket and a grater. You can also knead the solution manually, although this is long and unproductive, and all work on applying the solution is done with a working spatula and spatula.
Any piece can be used as a grater wooden block with a smooth edge, which should be wrapped with sandpaper and used for grinding. Instead of a brush or roller, you can use any sponge or rag with which you can treat the walls with a liquid primer.

It makes sense to buy electric graters only if you are professionally puttying, or you have a large amount of work to do. For the repair of one apartment, such a purchase does not make much sense, since the price of a good grinder is quite high, and you will not notice the effect of its use on small volumes.

Advice! You can rent a grinder, and in this case it is better to choose a model with a dust collector, as it will significantly reduce the amount of small debris and dirt in the room. This is true when repairs are underway in a residential area and excess dust causes problems for neighbors or for you personally.
Professional Devices

Professional teams that deal with large areas of finishing often use various mechanisms and devices to facilitate and increase productivity. In addition, the machine method allows you to create a better and more monolithic layer.

Sometimes a putty station is used for work, which is a whole complex of devices that allow you to prepare, apply and apply a solution to the surface. It has a hopper for preparing a dry mix, a mixing chamber where the powder is mixed with water, a screw pair that transports the mortar and a putty gun that sprays the mortar and applies it to the wall.

Instructions for using such stations are usually simple and do not require special skills, however, after manual labor, you will have to get used to the intricacies of using the machine. The main thing is to fill your hand and feel the distance at which the application is normal and the surface quality is satisfactory.

It is also important to control the pressure in the supply system, otherwise the spray will be uneven and an even layer will not work. The amount of solution must be such that you are guaranteed to have time to work out, otherwise the putty will thicken and the machine will not be able to pump it.
Important! The use of machines and automatic stations is justified only with a constant load and large amounts of work, otherwise it will not pay off.
Output
A set of tools for puttying can be minimal, or it can have several dozen items, including various mechanisms and devices for machine application of the mortar ().
For manual work, a simple kit is enough, which we have described in detail, but you can watch the video in this article to see everything for yourself.
Anyone who has ever encountered, knows perfectly well what "ideal" walls are in our homes. These are solid pits, tubercles and cracks. If the defects are very large, then you can’t do without it, and to correct minor surface flaws, you can use a special putty. In today's article, we will look at what kind of composition it is, its types, in what cases it is used and how to properly putty walls and ceilings.
Read in the article
What is putty, and why is it needed
Putty or, more correctly, putty (from the name of the tool "trowel") is a fairly plastic finishing material that is used to eliminate surface defects, as well as create a durable and strong base under or. The preparation of walls or ceilings consists of several stages, and each of them requires its own type of this building and finishing composition.

Dry or ready-made putty mixture, which can be starting, finishing and universal, consists of the following main ingredients:
- gypsum;
- various fillers;
- plasticizers;
- thickeners and hardeners.
Types of putty
As we have already mentioned, Finishing work with the help of puttying, they are carried out in several stages, and each of them needs its own type of special mixture, namely:
- starting putty designed to eliminate surface defects and is the basis for decorative finishes walls and ceilings;
- finishing mix used to create the final decorative layer;
- universal putty Can be used as a starter and finisher at the same time.

Putty Perfekta Start Glide

Putty Weber KR

Putty Perfekta Ecocraft
What spatulas are needed for puttying walls and leveling corners
Spatulas are used in many types of construction and finishing works, and each needs its own tool. They differ in size and shape. The table shows the main types of spatulas with an indication of their purpose.
| Spatula type | Work in progress | Type and features of the tool |
|
|
|
| The spatula is used to perform interior decoration as an auxiliary tool. |
|
| The tool is used for puttying external and internal corners. | It is a metal plate bent at a right angle and equipped with a handle. |


What wall putty is best to use when leveling surfaces
In addition to the fact that putty is starting, finishing and universal, it also differs in composition. So, putty mixtures are:
- acrylic - used for interior finishing work. This type of putty is highly moisture resistant and versatile, protects walls from dampness, and is also used to create a decorative finish layer and is suitable for working with wooden surfaces;
- water-dispersion - has high elasticity, good adhesion, resistance to cracks and shrinkage, and is also durable;
- oil-glue mixture. The putty composition is made on the basis of drying oil and is ideal for creating a finishing layer before painting the surface with oil paints;
- cement putty great for working with, stone and surfaces in rooms with high;
- gypsum mixture used for work in rooms with a low level of humidity .

Why putty is needed - different for each layer
It is inefficient to apply any putty in several thin or one thick layers, since the material is expensive, and drying will take a lot of working time. Therefore, to eliminate significant defects and level the surface, they are used, after puttying, a starting (1–3 mm) and finishing (up to 0.5 mm) layer is applied. To create a high-quality and more durable finish, it is necessary to use materials from one manufacturer.
 Starting putty (plaster) helps to create a solid base for subsequent finishing
Plaster KNAUF Rotband
It is possible to apply only one finishing layer only on a quality surface. Before puttying a wall or ceiling, it is necessary to use the starting putty composition. After drying, it is sanded, dust is removed and covered with a finishing layer.

Putty DANOGIPS Dano Top 5
The surface that will be subsequently painted must be brought to a perfectly even and smooth state. If the wall is finished for subsequent pasting, then it is enough to use the starting putty.
Wall and ceiling plastering technology
Puttying - the process is not as complicated as it might seem at first glance. To perform the work qualitatively, you need a certain experience, which can be acquired over time. In order to independently learn how to putty walls and ceilings, you must follow the instructions that will be presented below.
Surface preparation and priming
Before proceeding with the finishing of walls and ceilings with putty, you need to clean the surface of the old coating, greasy spots, dirt and dust. After that, the surface must be treated with a special primer, which will create a good adhesion of the finishing material and the wall. Priming is carried out with a roller, avoiding gaps, and the wall is left to dry for at least 24 hours.


How to cook putty
To get a high-quality finished putty, you must follow the instructions that are indicated on the packaging by the manufacturer of the finishing material. To prepare the solution, you need a clean plastic container the corresponding volume. You will also need an electric drill with a special metal whisk for high-quality mixing of the dry mixture with water.

The putty solution is prepared in the following sequence:
- Pour ¼ part into the container clean water room temperature.
- Gradually pour required amount dry mix.
- Using an electric mixer, stir the putty until a homogeneous mass.
- Leave the finished composition for 10 minutes for proofing.
- Mix the solution thoroughly again.
- The consistency of the finished putty should be similar to thick sour cream. If the solution is thicker, then it will adhere worse to the surface, and the liquid composition flows off the spatula and forms sagging on the treated surface.

A comment
Ask a Question“At one time you need to prepare the amount of solution that the master can use up in about 40 minutes.”
Primary leveling of walls with putty
Before leveling the walls with putty, you need to check them using a rule that will allow you to identify bumps and depressions. Having identified significant defects in the form of protrusions, you can cut them down with an ax or a puncher with a chisel. Next, you need to prime the walls and only after that prepare the putty composition.
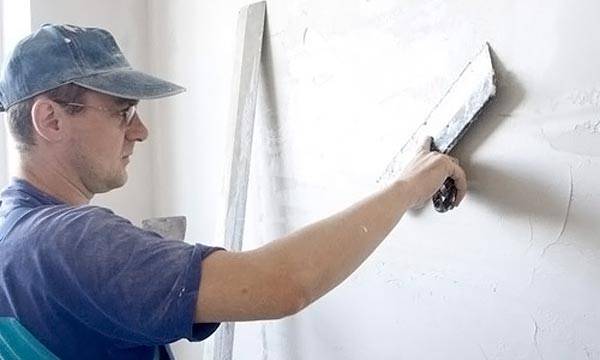
First you need to make a small amount of putty in order to determine the speed of work. Using a narrow spatula, evenly apply the prepared mortar to a wider one, which is applied to the wall at an angle of approximately 60˚, and stretch it over the surface to be treated. The tool must be held firmly, but without excessive force. Over time, you can learn to control the pressure on the spatula.
A comment
Head of the team of the repair and construction company "Dom Premium"
Ask a Question“Putting walls should start from the corner of the room. For this, a special angle spatula is used.
After the walls are plastered, you need to let them dry for 2 days. After drying, the quality of the work will be visible and where additional finishing is required. Irregularities are detected by the same rule. After that, the elimination of defects is performed in two ways:
- If there are depressions on the surface, then they are filled with another layer of putty.
- If there are bumps, they can be removed with a special grater with an abrasive and a perfectly flat surface can be achieved.

After the surface has dried and the imperfections have been eliminated, the walls are primed, and you can start applying finishing putty or gluing.
Puttying the surface with beacons
The better the base, the less finishing putty will go away and, accordingly, the repair will cost less. To obtain the perfect surface, special perforated profiles are used - “beacons”, which allow you to quickly and accurately align the walls, which is perfect for beginners.
The metal profile is installed on a sand-cement mortar, focusing on a plumb line or building level and achieving the perfect vertical. The distance between the beacons should be 100-150 mm less than the length of the building rule used. After installing the beacons, you need to let the solution dry so that they do not go astray during the subsequent finishing with putty.

Prepare putty (described above) and fill the gap between the beacons with it, and the maximum layer thickness does not matter. Relying on the profiles, stretch from the bottom up, cutting off the excess solution and, if necessary, filling the cavities with it. The operation is performed several times until the desired result is obtained. Depending on the temperature, humidity in the room and the thickness of the layer, it sometimes takes more than a week for the putty to dry.

How to putty on the wall for the finishing layer
After the walls are prepared accordingly, you can proceed to finishing the surface with finishing putty. To do this, use compositions, dry or ready-made, which, after processing, acquire a flat and perfectly smooth surface. The finishing putty is applied in a thin layer, and the smoother the base, the less the consumption of the solution will be. The technology of puttying and sanding is practically the same as working with starting mixtures.

We bring to your attention a video on how to apply finishing putty on the wall:
Drying, sanding and sanding plastered walls
The final stage of finishing work with putty requires serious attitude and consists of several steps. One of them is sanding, which is often overlooked by inexperienced finishers, but first things first. So, after applying the finishing layer of putty, you need to let it dry well, because it is after this that the smallest defects become noticeable, namely cracks, which, if they occur, must be repaired.
Advice! To detect defects during puttying, it is necessary to use lighting devices with a powerful bright lamp and directed at a slight angle to the wall to be treated.
After the putty has dried, you need to sand the surface to remove small bumps and sagging, and also to make the wall perfectly flat. If it is supposed to paste over the wall, then it will be enough to sand it well, and in case of painting, additional grinding will be required. To bring the surface to a perfectly smooth state, you can use sandpaper with a fine (almost zero) fraction or an abrasive mesh.

You need to start grinding from any upper corner and, making circular movements, process the wall, highlighting with a powerful bright one. It is undesirable to exert strong pressure on the grater so as not to damage the finish layer.
A comment
Head of the team of the repair and construction company "Dom Premium"
Ask a Question“Since sanding and sanding are very dirty and dusty stages of finishing work, it is worth using a respirator, goggles and gloves, and the room is well ventilated. In addition, these protective measures are required by the safety instructions.
How to do-it-yourself wall putty under wallpaper

The technology of puttying walls under practically does not differ from surface finishing under:
- The solution is prepared in accordance with the instructions on the package.
- The work is carried out with two spatulas - one with a width of 150 mm and the second - at least 300 mm.
- One section is processed, after the second, with an overlap of about 50 mm, etc.
- After the wall is completely puttied, it is allowed to dry, and only then they begin to level the wall by sanding.
- Clean the surface of dust, reapply putty, and then everything is repeated from the beginning until a perfectly flat surface is achieved.
When the wall is completely plastered, it is primed and pasted over. The application of a primer prevents the occurrence of fungus, mold and dampness, and also improves adhesion between various finishing materials. The video shows how to properly putty the walls under the wallpaper:
Do-it-yourself wall putty for painting
| A photo | Process description |
 | First of all, with a wide spatula, like a scraper, we remove minor defects in the form of tubercles and sagging from the wall. |
 | The rule is to check the evenness of the wall. |
 | We pay special attention to the corners. |
 | If there are bumps, we remove them with a puncher with a chisel. |
 | We prime the wall with a roller or spray gun. |
 | Apply cement-sand mortar in the corners along the entire vertical. |
 | Draw the solution as a rule. |
 | We get such an almost perfect and even angle. |
 | For puttying, we will use a polymer dry putty and a ready-made paste-like solution. |
 | We glue an angle-forming tape on the putty, which will help to avoid the formation of cracks. |
 | We remove excess putty on perforations. |
 | Putty removes the minimum differences between the flight and the wall. |
 | The result should be such a perfectly even angle. |
 | Now we are preparing a putty mortar from a dry polymer mixture. |
 | We apply putty on the wall. |
 | Putty is applied in a thin layer. |
 | After the first layer has dried, with a spatula we scrape off the slightest tubercles and sagging. |
 | We apply the second layer of putty by installing a spotlight on the side, which helps to identify surface defects. |
 | After the second layer has dried, sand the wall with a grater and a portable lamp. |
 | After sanding and removing dust, we apply glue for fiberglass with a spray gun, adding gray pigment to it. By the way, on a gray surface, when applying a white putty, it will be clearly visible where the solution is applied in insufficient quantities. |
 | We stick fiberglass on the wall and smooth it with a spatula. |
 | We apply a thin layer of the finished superfinish putty mixture on the fiberglass with a thin layer. |
 | After the putty has dried, we grind the wall, primer and apply |
When planning overhaul in an apartment or house, as well as at the entrance to new housing, which does not have finishing, you will definitely have to decide on putting the walls in order. Of course, you can invite a team of builders and “unfasten” them a decent amount, sometimes without even having a guarantee that the work was done with high quality. However, in order to be sure that all the finishing layers applied to the walls will not fall off in a couple of weeks, it is better to carry out all the construction processes on your own, of course, having studied their technology in advance.
- not such a simple task as it seems at first glance. It is possible to align the walls to the ideal only after the skill appears in the process of applying the compositions to the surface. Therefore, before starting such work, after reading the instructions, it is recommended to practice on small sections of the wall that are not visible, for example, in places that are guaranteed to be covered by large furniture
What putty to buy?
Wall puttying should not be considered a secondary process that can be skipped. If it is not carried out qualitatively, then all surface irregularities will show through any finishing coating, whether it be wallpaper, decorative plaster or coloring.
Puttying is usually the final process in preparing walls for any decorative coating. The main task is to achieve an almost perfectly even and smooth plane due to a thin layer of putty on the surface of the walls, which fills in the existing flaws and eliminates irregularities. To obtain the desired result, two types are used - this is the starting and finishing.
The composition of the starting putty includes a mixture of dry materials of coarse grinding. Such a solution is used to pre-treat the wall, leveling the most serious flaws and at the same time creating good foundation to apply the final layer.

The finishing, finishing mixture is made on the basis of a fine powder, most often gypsum. Subject to technology preparation of, the timing and correctness of its application, it is possible to make the surface of the walls of the room perfectly smooth.
Sometimes, to tidy up the walls, universal mixtures are used, which are suitable for both primary, rough leveling and finishing, that is, one composition is applied in several layers.

Putty can be purchased dry or ready-to-use. Ready-made formulations, of course, are easy to use - they are produced on oil-glue, drying oil, latex, polymer and other bases. But they did not gain much popularity among private masters because of the rather high cost, which is far from accessible to everyone.
But dry putty mixtures are on sale in a wide variety, so that you can even get confused at first. Some parameters of putties are summarized in the table presented to the reader's attention. In more detail, you should get acquainted with each composition directly when choosing, reading the instructions attached to each package.
| Name indicator | Established standards for brands | ||||||
|---|---|---|---|---|---|---|---|
| LS 10/90 | HP 35/65 | HP 50/50 | LS 65/35 | Fine Coat 50/50 | termonite | For blocks | |
| Recommended thickness in mm | 3÷5 | 5÷15 | 5÷15 | 5÷15 | 3÷10 | 2÷10 | 3÷10 |
| Recommended water consumption in l/25 kg | 3.5÷4 | 3.5÷4 | 3.5÷4 | 3.5÷4 | 4÷5 | 5.5÷6 | 6÷7 |
| Ultimate compressive strength, MPa, not less than | 16 | 8 | 4 | 2 | 4 | 6 | 20 |
| Ultimate bending strength, MPa, not less than | 2 | 2 | 1 | 1 | 1 | 3 | 3 |
| Adhesion (adhesion) with the base, MPa, not less than | 0.5 | 0.4 | 0.3 | 0.3 | 0.3 | 1 | 0.5 |
| Average density. solution kg/m3 | 1900 | 1900 | 1900 | 1900 | 1900 | 1900 | 1900 |
| RN | 12÷13 | 12÷13 | 12÷13 | 12÷13 | 12÷13 | 12÷13 | 12÷13 |
| Notes: | |||||||
| LS 10/90 belongs to the category of adhesive compounds; | |||||||
| HP 35/65, 50/50, 65/35 and putty for blocks - leveling compounds; | |||||||
| "Fine Coat 50/50" and "Termonit" - finishing compositions | |||||||
When purchasing putty, you need to consider and study its packaging, paying attention not only to its characteristics, but also to the expiration date. If the material is overdue, then it should not be taken, since in this case the money will be thrown away. You should not buy putty mixture stored in conditions high humidity even if it has not yet expired . Wet or damp-spotted packaging is a sure sign of a spoiled mixture.
It is recommended to purchase putty compositions for the starting and finishing layers, made by the same company, as they provide good mutual adhesion and compatibility, which will allow you to get a better result.
Prices for popular types of putty
Putties
Materials and tools
It is very important to prepare well for work so that in the process you are not distracted due to the lack of any material or the necessary tool.

So, for work you will need:
- Starting and finishing putty mixes.
- Primer composition.
- A plastic container for mixing putty, if it is purchased dry.
- A special paint bath for working with a primer.
- Construction roller and two brushes - wide and narrow. They are necessary for applying a primer in hard-to-reach places, such as in corners or behind radiators.
- Spatulas:
- wide in 500 ÷ 600 mm or even 700 ÷ 800 mm - for applying the finishing layer of putty;
- narrow 100 ÷ 150 mm - for taking putty from a container and applying it to a large spatula, as well as for leveling the composition in the corners.
- angular - to align the corners when they are putty.
- Rule for controlling the evenness of the wall.
- Drill and nozzle-mixer for mixing the mass.
- Electric grinder (vibratory or eccentric) or hand grater for troweling and sanding the applied putty.
- A spotlight or portable light bulb to reveal poorly aligned areas on the wall.
- Construction knife.
Preparing walls for plastering

- Before applying putty, the wall must be carefully prepared. If old plaster or pieces of wallpaper remain on it, they must be removed. You will also have to clean the wall of oil or water-based paint.

- After removing the old coating, cracks or bumps may appear on the wall. In order for the putty to lay flat and not crack after drying along the cracks, it is necessary to seal them.
- Before filling the detected cracks, they must be expanded as deep as possible into the wall so that they do not repeat their direction after applying the putty.

- After expansion, the crack is cleaned of dust and pieces of plaster - this process can be carried out with a small brush.
- A starting putty or sealant is applied to the dried crack. The repair mixture must be pressed as deep as possible into the crack, and leveled from above with the level of the wall surface.

- After the putty or sealant has dried, you need to walk along the top of the repaired crack with a grater to finally level it with the wall.
- If the wall, then all its joints should be glued with a fiberglass mesh, on top of which a thin layer of putty is applied. Holes from recessed heads of self-tapping screws, which drywall fixed to a wall or crate must also be filled with putty mixture, otherwise rust from them will appear through any decorative finish.

- After the sealing joints have dried, they proceed to applying a primer with antiseptic properties to the walls. This layer will give additional surface strength, increase the adhesion of materials and extend the operational period of the finish.

It is poured into a special tray, from which it is easy to draw it onto a roller (brush) for application to the wall surface. It is very important to treat all hard-to-reach places well, otherwise it is from there that the putty may subsequently peel off.
The primer applied to the walls should dry well.
Prices for different types of primer
Primer
Putty preparation
If a dry mixture is purchased, then it must be properly prepared, as it must be uniform in consistency and resemble thick sour cream.
- For mixing the mixture, an ordinary plastic bucket is suitable, into which water at room temperature is poured. Usually, a bag of putty weighing 25 kg requires 9.5 ÷ 10 liters of water, but to find out for sure, you must read the instructions before opening the bag with the mixture.

- If the selected mixture is made on a gypsum basis, you should not knead it too much, since its "life" is very limited. The time of use of the mixed solution can also be found in the instructions for its preparation.
- After pouring the powder into the water, the mixture is kneaded using a mixer attachment fixed in the drill chuck.

- After the first portion of the mixed solution has been used, the bucket and mixer must be thoroughly rinsed, otherwise the next solution may turn out with solid inclusions left over from the first batch. It is clear that such an operation is repeated constantly throughout the work.
Applying the starting putty

- On the primed surface, the starting putty is applied with a wide spatula, on which the mixture is applied for convenience and evenly distributed with a small spatula.

- from the corner and upwards smooth movements without strong pressing on the spatula, which should be held at an angle of approximately 45 degrees. It is this position that will help to apply the putty evenly, without leaving marks on it from the corners of the tool.
Putty strips are applied to the surface overlap, that is, the strokes should overlap each other by 70 ÷ 80 mm.
- After applying putty to a certain area, using the rule, its evenness is checked. The rule is carefully, without pressure, carried out along the putty surface. The plane of the tool with its even edge should collect the excess putty mixture and reveal obvious cavities. The flaws will be especially visible if the wall is illuminated with a light bulb in such a way as to create a moving shadow.
If differences are found, then you should once again walk along the surface of the wall with a wide spatula to level them. This can be done while the putty on the wall is still wet.
- When applying the starting layer, you need to pay special attention to the corners, since they are constantly the “weak point” when leveling the walls. Therefore, very often a special spatula in the form of a right angle is used to level these difficult places for plastering.
 One of the trickiest tricks is leveling the corners.
 - After applying the starting layer, the walls are rarely perfectly even, although this should be strived for. Small errors are allowed, which can cover the finish layer.
- Upon completion of the application of the starting layer on all the walls of the room, it is necessary to wait for it to dry - only then proceed to the first grout. Using an electric grinder or a manual grater with sandpaper or an abrasive mesh fixed on it, all irregularities from the coarse-grained starting mixture are removed from the surface of the walls. In addition, the grout will be able to even out small flaws left from the corners of the working surface of the spatula.

Grouting is carried out by movements along the trajectory of the spiral. You must be careful and try not to miss a single centimeter of the putty surface.

- If, after grouting, irregularities deeper than 2.5 ÷ 3 mm are found on the illuminated wall, then a second layer of the same mixture is applied to the first starting layer. It can be applied to the entire surface or only to certain areas where defects were found.
Finishing layer of putty
- The final layer of putty is applied after the starting one has completely dried, according to the same principle - that is, from the corners and upwards.
The mixture is also applied with a small spatula to a large one, distributed along its edge, and applied to the wall with clear movements with a little pressure. The layer of the finishing mixture should not be thicker than two millimeters, and the remaining excess putty and lines from the edges of the spatula are gently stretched and smoothed by passing over them again.

- In order to see all the defects at once, it is recommended to create combined lighting coming from several light sources in the process of work, or use a mobile light bulb on a wire so that you can bring it to the wall to be leveled from different sides. When creating such lighting, cast dynamic shadows will immediately reveal under-aligned areas of the wall.
- Finishing putty is applied in two layers. The second is applied after the first has completely dried.
- When the second layer dries, it is rubbed in the same way as the starting one, using a grater or a special power tool with the installation of fine-grained sandpaper or abrasive (start with a grain of 200 and usually end with 400). If surface defects are found, it is permissible to apply another finishing layer to its individual sections.
- The corners of the room must be repaired and sanded very carefully, as flaws will be especially noticeable on them. To remove them, two spatulas are used - angular and rubber. The first one immediately forms an angle, and the second one gently smooths out the excess putty.

- After completion of puttying and grouting, the walls are covered with one or two more layers of primer, and only after that can a decorative finish be applied.
If the walls are planned after leveling, then the process of applying putty must be approached with particular care, since the surface must be leveled to the ideal. If the room is decorated with wallpaper, then they are to some extent able to hide small defects, but when painting, on the contrary, flaws will appear - this must be foreseen and the choice of decorative coating must be decided in advance.

After completing all the work on leveling the walls with putty, all the tools that were used for the process must be well cleaned, rinsed and dried, as it will definitely be needed to tidy up the other rooms of the apartment.
To achieve the desired result when leveling the surface of the walls with putty, it is recommended to follow some rules and recommendations. Some have already been mentioned in the article, but it makes sense to take them out separately in the form of a final summary:
- If there is not enough experience in this type of work, you should not buy a large amount of materials. To try whether it will be possible to carry out these works on your own, you can purchase a small amount of putty by weight, learn how to prepare a solution and try small plot walls.
Having made such an experiment, it will be possible to immediately understand whether it will be possible to perform puttying large surfaces, or still it is worth entrusting the work to professionals.
- The work on applying and leveling the putty should be carried out under lighting from several lighting fixtures installed at different ends of the room.
- The starting putty is applied with a thickness of no more than 4 ÷ 5 mm, since layers that are thicker can peel off, and there is also a high risk of cracks appearing on them.
- Before applying each subsequent layer, you need to make sure that the previous one is completely dry. The drying period of the putty directly depends on the thickness of the applied layer, the level of humidity and the temperature in the room.
- It is forbidden to accelerate the drying of putty walls by installing heaters or creating a draft in the room, as these influences can lead to delamination of the applied composition from the walls.
- After applying each of the layers, it is imperative to check all surfaces using the rule, making marks of places that require additional adjustment.
- Getting perfectly even corners is possible only if a special spatula is used to align them.
And finally, a few words about precautions when carrying out such construction and finishing works:
- To carry out the filling of walls and ceilings, it is necessary to prepare not only tools and material, but also suitable clothing and equipment. So, when working with putties, plasters, primers, paints, it is necessary to protect hair and skin.
A headscarf is usually tied on the head, and as a working uniform, you can use old clothes that cover the body as much as possible, which you don’t mind getting dirty. Hands are recommended to be protected with thick rubber gloves.

- When carrying out grouting work, it is imperative to protect the respiratory tract and eyes, since a lot of fine dust will fly. To do this, you need to purchase a respirator and special glasses at the hardware store.
- If the walls in the room are high, you need to take care of a reliable stable staircase or build a goat for this. The latter are preferable to have, since they allow you to immediately cover a large finishing area, and they do not have to be rearranged often.
And in conclusion, according to the tradition of our portal - a visual video lesson on leveling the walls with putty:
Video: the first steps in working with putty mixtures
It should be noted that the alignment of the walls is to some extent even a creative process, but quite laborious. Therefore, if there is no predisposition to such events, then it is better not to take it on, but to entrust the execution to professional plasterers. But if there is a great desire to try your hand and at the same time even save money, then you should take a chance and do everything yourself.
We will send the material to you by e-mail
W Patel is the most commonly used tool for organizing repairs. The spatula for puttying walls is used at all stages of finishing work. It is important to choose the right tools for all jobs. A wide variety of shapes and sizes are designed to perform specific operations. Usually it is metal plastic with a comfortable handle. Be sure to have a sharp enough blade. It is used for finishing and painting works.
The working process
The main property is sufficient blade rigidity. If this criterion is not met, then the work will be of poor quality. Professional devices are equipped with a comfortable rubberized handle. To organize any work, they acquire three types - narrow, wide and medium. Specialized models are designed for processing corners and applying certain conditions to surfaces.
How to hold a spatula when puttying walls
Reliable tools are made of durable steel. High-quality devices are not deformed and are easy to clean. Choose products with perfectly smooth surfaces and blade sharpening. A professional tool should not bend under the pressure of the putty mixture.
Don't buy aluminum tools. They wear out quickly. Aluminum surfaces must be thoroughly washed and dried to prevent corrosion on the blade.

The technique is as follows - applying putty and leveling it. Hold the tool at a 45 degree angle. Movements can be different best result achieved with uniform equally directed strokes. A small putty device is used to dispense the mixture into a large one. The use of the first is advisable if it is necessary to process small areas.
The width of the blade of the metal part must necessarily be greater than the width of the crack in order to be able to remove the defect qualitatively.
Application
Narrow tools are used to seal the smallest flaws in the walls and level smooth surfaces. Not suitable for rough leveling of walls.
The average spatula for wall putty removes pits, they smooth putty surfaces.
Large-sized tools with thick blades are used for rough primary processing and removal of large cracks.

For quality repair and construction works a spatula is often needed. With the help of this tool, putty is applied, old wallpaper is removed, gaps in walls and openings are eliminated, and many works related to decorating rooms are performed, giving figured forms surfaces. To choose the right working tool, you need to understand its varieties, application features.
Criteria for choosing a repair tool
Right choice You can save a lot of time on repairs. With a simple device, it is enough to simply clean any surface from old plaster, a layer of paint, dried glue. It is much easier to handle potholes on the walls, cracks, especially in small areas, with a comfortable and high-quality design with a handle.
Before you buy a working tool for puttying walls, you should adhere to the basic rules - the criteria for a quality choice. It should be noted the following:

These features will help determine the choice of spatula for puttying walls.
Varieties of spatulas
The choice of finishing tool will depend mainly on the specifics of the work performed.. The range is very large. Types of spatulas:

Some designs are intended primarily for leveling surfaces, repairing cracks, eliminating flaws, while others are used to create a relief texture, imitate figures. Let's take a closer look at the features of use.
Paint spatulas and their application
Finishing designs with a narrow blade and a comfortable handle are very common. Apply a spatula painting in two cases:
- As an aid in working with wide finishing tools. Often they are called a “shovel”, with its help they apply and distribute the composition of the necessary mixtures over wide and large blades.
- For leveling surfaces, grouting, work in hard-to-reach areas. Just with narrow scrapers, they carefully correct the work in difficult places, evenly distribute the putty over small areas.
The most reliable paint spatulas have a trapezoidal shape. Triangular devices are not so strong, they can bend a lot during operation. The most durable is considered a rectangular shape. The thickness of the metal on the blades in amateur tools is approximately 0.5 or 0.6 mm; in professional spatulas, a sheet of 1 mm or more is used.
Handles can be made from either plastic or rubber. The latter option is used in professional models, where the handles are both ergonomic in shape and anti-slip. Such designs, of course, are more expensive in cost. To make the handles comfortable to use, they must be short and wide.
Facade models and their features
 What finishing tools do professionals prefer? facade view- ideal spatula for wall puttying. Using this model, the solution can not only be quickly, but also qualitatively distributed over even surfaces. In the process of work, finishing structures are subjected to heavy loads, and therefore the requirements for them are very high.
Blades should be from 200 to 800 mm. Many professionals more often advise choosing a working part size range from 300 to 450 mm for quality work. With a device equipped with a blade of 600 mm or more, not even all experienced specialists can handle it.
Professional facade models have a thicker blade and a rubberized handle, amateur ones are a little simpler. The cost of products depends on the design and quality of materials. The main criteria for choosing a facade model include:
- blade quality;
- type of working handle;
- attachment of the handle to the blade.
To work with finishing putty, a spatula is chosen not with a flexible, but with a rigid blade. In this case, the composition will be distributed evenly and not repeat surface flaws. It is important to check the plane working area the edge must be even. It is desirable to choose a handle rubberized. For ease of use, it should be tilted.
Originality and indispensability of angle spatulas
Not only for inexperienced builders, but even for professionals, it is the procedure for processing corners that causes particular difficulties in the process of finishing work. With the use of special designs, it will be much faster, easier, and better to connect the surfaces evenly.
There are two types of corner spatulas:
- For inside corners.
- For outdoor.
Each type is very easy to identify by the location of the handle. For the first models, it is inside the structure, and for the second, it is outside. In addition to the handle, such structures have an angle-forming part. The width of the working sides must be at least 70 mm.
When choosing an angle spatula, it is necessary to take into account the nuances:
- The working part must be made of stainless steel and be rigid in order to form ideal angles.
- The handle must have a good fit.
Working with this type of spatula is very simple. The composition is applied with a narrow tool, and leveled with the help of an angular rigid fixture.
Unusual Japanese type of instruments
 This type of design is very different from traditional options. A Japanese spatula is a rectangular plate with a plastic holder attached to one side. The design is very simple but strong.
Tools are usually sold in sets. Each pack contains 4 pieces different size designed to perform a certain type of work. The width of the main part is 60, 80, 100 and 120 mm.
The blade in the Japanese version of the design must be both flexible and resilient.. The model of such a finishing tool is used in the following works:
- Finishing complex structures and arches with convex shapes or concave surfaces. Irreplaceable japanese model in plaster of the relief bases.
- Repair in confined spaces.
- Application of a very thin putty layer. With a compact scraper, the composition is dosed more precisely than with traditional models.
A set of such tools is not very expensive. When buying, you need to check the quality of the metal. It is important that the structure does not deform when bent.
The convenience of rubber spatulas
 This type is indispensable in finishing work with complex planes, great for filling small cracks, repairing minor damage. With a rubber base, you can easily distribute a thick mortar mixture in an even layer.
The sizes of rubber spatulas are different, varying from 2 to 20 cm. The tool is chosen individually, it all depends on the specifics of the work performed. The rubber from which the base is made can also be of different stiffness. For finishing, it is better to choose a less flexible design.
The handle can be standard, rubber models are produced without a holder like Japanese instruments. Such a spatula can also be made in the form of a simple spatula.
Using rubber tools, it is best to apply putty on concave structures, seal corner joints, and correct uneven surfaces.
Notched designs for uniform application of mixtures
 When laying porcelain stoneware, drywall, linoleum, carpet, it is very convenient to use a specially designed type of finishing relief tool. The use of a notched trowel prevents overspending of adhesive mixtures, which is very economical. The width of the brackets must be equal to their height. The thickness of the applied solution directly depends on these parameters.
Devices with large teeth are used for facing plasterboard, porcelain stoneware surfaces. Using tools with medium staples, apply glue to ordinary tiles. But fine-toothed - used for carpet or linoleum flooring.
It is worth noting that for laying tiles choose a tool with a teeth width of 6 mm. Wherein optimal size the thickness of the adhesive or its composition should also be 6 mm, only in this way the tile will not fall off and will adhere well to the surface. Aligning the walls, it is worth choosing structures with different height teeth, which will allow you to easily change the thickness of the adhesive by about 2 times. The width of the serrated structure must be equal to the size of the tile to be laid.
Scrapers and plastic models
 What tools will greatly simplify the finishing work associated with wallpapering? Of course, these are plastic spatulas and scrapers. To remove paint and old wallpaper from the walls, you need a tool with a working base made of durable metal. To do this, use a special scraper. This design is versatile, as it includes a sharp blade, a roller cleaning tool, and a powerful nail puller. The blade of the device should be even, the blade should be sharp, and the handle should be well attached.
Plastic models are used to smooth the wallpaper. The workflow is thus accelerated several times. Such spatulas are called “wall smoothers”. The design should have just an ideal working surface so that no burrs damage the canvas of pasted wallpaper. When choosing a plastic spatula, they pay attention to the absence of chips, a comfortable handle, and a clearly recommended tool width of 20 to 25 cm.
Features of storage and care
 All necessary repair and finishing work will be carried out correctly only with the help of quality tool. It is important to take into account the recommendations for the use, operation, storage of spatulas. For example, after use, finishing fixtures must be washed and dried well.
The blade should not be subjected to heavy mechanical stress, so it is not recommended to apply too heavy mixtures. The working base of the tool should be in contact with abrasive surfaces to a minimum.
It is better to store spatulas vertically, carefully attaching them to a carnation. It is not recommended to keep in toolboxes so that the blades do not bend.
Choosing a tool among a wide range should be practical, based on the specifics necessary work. Proper use of the spatula will be the key to high-quality finishing of the room.