Tiled finish. The technology of wall cladding with ceramic tiles - step by step and in detail
Ceramic tiles have gained wide popularity due to their aesthetic and hygienic qualities. The surface of the walls after such a finish is reliably protected from the effects of fire, chemistry and moisture. In the kitchen, wall cladding technology ceramic tiles allows you to get any decorative effect even after covering only part of the wall in places where the table, stove and sink are located. The same can be done in the toilet and bathroom. It will be enough to veneer the surface 1.5 m-1.6 m in height, and paint the rest of the plane to match the tiles or stick wallpaper.
What is needed for high-quality cladding
Finishing work with tiles is carried out with special tools. Stock up on them in advance. The above list includes those devices that professional tilers use. Although, it is possible that any of the tools will be replaced by another suitable tool.
Would need:

- vessel for water (about 6 l);
- bucket for solution;
- Master OK;
- rubber spatula;
- hard brush;
- measuring instruments (cord, spirit level, plumb line, square, tape measure);
- wooden hammer;
- dowels or steel pin (needed when working with a cord);
- stitching;
- wire cutters;
- tile cutter;
- special hammer.
In addition to tiles for cladding, you will need glue, cement mortar or mastic and joint filler.
Finishing technology includes three stages:
- Alignment of the main surface.
- Application of mortar or other adhesive.
- Facing.

Ceramic tiles are often laid on a cement composition, which is also used to level the base and joints. The composition of the building mixture includes Portland cement, fine sand and water. The ratio of the constituent elements depends on the stage of cladding.
To prepare a mixture for plastering and leveling walls, you will need M400 cement, fine building sand, water, with a mass ratio of 1: 3: 0.5. Mix first bulk materials and then diluted with water.
For cladding, the same components are taken, changing the component:
- cement of the above brand - 1 part;
- fine sand - 2.4 parts;
- water - 0.4 parts.
Back to index
How to check the quality of the solution
A certain amount of the prepared cement-sand mixture must be applied to the wrong side of the tile after it has been pre-wetted. Then it is unfolded and gently shaken. A high-quality mortar will linger on the tile with a layer of about 3 mm. If the entire prepared mixture falls to the floor, then this means that sand and cement must be added to the solution.

The building mix for cladding should be prepared in small doses, as its normal consistency will last one or two hours. Then solidification occurs, and if water is added after that, then the quality of the solution will no longer be the same. Therefore, the cement mixture for cladding must be prepared in a volume of approximately 5 liters. It is best for an inexperienced master to prepare an even smaller amount, because the solution must be used up within an hour and a half.
You may be interested in: Kitchen Design Rules
To prepare a softer composition, take one part of colored cement and one part of ordinary sifted sand. All this is thoroughly mixed and water is added until the density of softened plasticine is obtained.
The reverse side of the tile before facing is moistened with cement milk. It is prepared from water and Portland cement in a ratio of 4: 1.
The cement composition can be replaced with mastic. It consists of synthetic or organic binders and pulverized or mineral fillers.
The most convenient is to use the mastic prepared in the factory workshop. However, sometimes it is prepared immediately before the facing process.
Depending on the presence of certain binders, mastic can be:
- plaster;
- bituminous;
- polymer;
- casein;
- bitumen-polymer.

The advantages of mastic for wall cladding include the fact that it easily acquires the desired density when diluted with water and quickly sets. Therefore, after its application, you can lay the tiles. Among the shortcomings, one can note the rapid hardening, which is why the entire laying process must be completed as quickly and without errors as possible.
For bathroom cladding and areas that are exposed to increased moisture, it is best to use waterproof glue and grout.
Back to index
Preparatory work
Cladding technology requires scrupulous surface preparation before repair.
In order for the tile to hold firmly, the walls must be clean, even and dry.
Deviation from the vertical is allowed within 10 mm. To determine the evenness of the walls, a 2-meter duralumin rail and spirit level are used. The rail is leaned against the surface and leveled with a building level. The gap from the wall to the rail should not be more than 10 mm. Areas that do not correspond to this parameter must be marked and aligned cement-sand mortar. At the same time, it is not necessary to achieve perfect smoothness, roughness contributes to high-quality adhesion of the solution and the surface of the walls.
Elevations greater than 10 mm are removed with a chisel. If necessary, they are primed with polyvinyl acetate dispersion and leveled with mortar.

If the walls have a flat surface but are covered greasy spots, then the solution will not hold in these places. Therefore, degreasing is required. To do this, use a 5% solution of soda ash or a 3% solution of hydrochloric acid. After 2-3 minutes, the surface is washed and left to dry.
On a smoothly plastered surface, notches must be made that contribute to the strong adhesion of the solution. For this purpose, you can use a simple hammer. Then the walls must be cleaned of dust. It is convenient to do this with a brush dipped in water.
You may be interested in: What kind of wallpaper can be glued to the kitchen?
If the lining will occur using mastic, then brick walls covered with gypsum-lime mortar. The ratio of components in it should be as follows:
- lime - 1 part;
- sand - 3 parts;
- gypsum - 0.5 parts.
In this case, it is not necessary to apply a covering layer, which will weaken the adhesion of the mastic and the surface of the walls.
Back to index
Hanging walls and installing beacons

The cladding technology provides for laying square and rectangular tiles in straight rows (in a row or seam to seam), and square tiles also diagonally.
Finishing work starts from the bottom. When the floor has not yet been put in order, it is necessary to find out the level of the finished floor and install slats around the perimeter. Standard tiles for skirting boards are laid out during flooring, and then the height of the skirting boards is taken into account to install the rule rails.
After that, the surface is hung and beacons are placed at the level of the upper row on each side of the wall. First, a pair of upper beacons from the tile is installed, and then a pair of lower ones at the level of the initial row. Beacons for the bottom row are placed exactly in one line under the top beacons horizontally or vertically. In this case, it is necessary to take into account the thickness of the tile, plaster and mortar layer. The solution for fastening beacons is used the same as for the entire tile.
Pins are driven in near the lighthouses and the mooring cord is fixed. Stretch it horizontally between a pair of lower beacons one millimeter from the top edge of the initial row of ceramic tiles. To clarify the vertical arrangement of the seams, you need to stretch the mooring cord vertically. Check the position of the cord with a spirit level.
Back to index
How to properly clad

Before attaching the material to the wall, you need to determine its quantity. For this, the tile is laid out dry. If the lining will be with expanded seams, then for the calculation you need to know the width of the seams. First of all, the tiles are sorted by size and cut pieces of tiles are prepared if the plates do not fit in a row.
For wall cladding, the surface is treated with water, and the reverse side of the tile is immersed in cement milk for a second. This procedure enhances the adhesion of the tile to the mortar and the plane.
The first row begins to be laid from the corner or from the middle of the wall. The latter option is appropriate when symmetrical tiling is required.
The solution is applied to the reverse side of the ceramic tile using a notched trowel. Then it is applied to the wall at an angle and, guided by the mooring, it is brought down to the required level by tapping with the trowel's handle. After laying the initial row, the pins are hammered under the next row. The cord is pulled and the next rows are lined using the same technology. Shaped parts are installed in the course of work.
You may be interested in: Kitchen design and assembly
During the cladding process, care must be taken to ensure that during the precipitation, the space between the wall and the tile is completely filled with mortar. All mortar that has come out from under the tile must be removed with a trowel or trowel.
Each row must be checked for quality using a 2-meter rail. It is applied to the treated plane and viewed for gaps. The tiles laid incorrectly are removed, the adhesive is added and set back, sitting down to the required level.
Wall cladding with ceramic tiles in the bathroom, bathroom and kitchen can be called a traditional finishing option. Ceramics is not afraid of moisture, does not require special care and is quite durable. does not conduct electricity because it is an insulator. It absolutely does not emit harmful substances, which makes it an environmentally friendly facing material.
Facing for walls is represented by a great variety of forms of colors and shades. This may confuse the buyer. However, for the choice of wall there are simple rules:
- If the room is not large, then it is necessary to choose wall light tones and shades. This will visually expand the space.
- Ceramic for walls is thinner than for the floor
- High-quality ceramic facing tiles must have regular geometric shapes

It's important to know! In order to check the quality, take two tiles from the package and attach them to each other sides. There should be no gaps. There should also be no gaps if you attach two ceramic tiles with their faces.
- Demand from the seller a certificate for the purchased batch
- If you take several packages, be sure to check the color in each box (sometimes it may differ if the batches are different)
- Ask the seller what glue is recommended to use for laying the purchased facing material

Preparing the walls of the room for cladding
The quality of the work performed is directly related to how smooth the walls are. It is easy to check this and use a construction plumb line for this - this is a weight on a strong rope. It is applied to each wall along the perimeter and the curvature of the walls is determined.
It's important to know! If you lay ceramic tiles on curved walls, this will lead to an overuse of expensive tile adhesive.
In addition, it is very difficult to glue tiles on a thick layer. This is because the glue solution will float down and you will have to sit over each tile for 15-20 minutes until the glue sets. A thick layer of glue will not give a strong connection between walls and tiles

Wall tiling requires even walls. You can use two to align the walls simple ways:
- Plastering with cement mortars
- Alignment of walls with moisture-resistant drywall
The first option is quite complicated and requires certain skills. In addition, plastering is a long process. Before laying the tiles on the plaster, it is necessary that it is completely dry, and this process takes 3 weeks.

Plaster leveling technique:
- Installation of vertical beacons on the walls and with an interval of no more than 1 m
- Preparation of sand-cement or lime mortar
- Throwing the mixture on the space between the beacons
- Mortar screed by the rule on beacons
The second option is devoid of such shortcomings. You can throw drywall on the walls in one day. The next day, tiles are laid on the walls. Save time on the face. Special skills are not required, so any master can handle it.

Technique for leveling walls with drywall:
- The wall is pre-primed with a composition deep penetration
- To keep the sheet on the wall stronger, tile adhesive is applied to it with slaps around the perimeter and center
- A slab of moisture-resistant drywall (it is covered with greenish paper) is attached to the wall with dowels 6 x 40 mm
- The verticality of drywall is checked by the rule of 1.5 m with a level
- Level adjustment is done with dowels, tightening or releasing them
- Walls leveled with drywall are primed for the best adhesion of tile adhesive and plasterboard sheet

Wall laying
The technology of facing walls with ceramic tiles requires laying them out against the wall in order to determine how many whole tiles will fit in a row. Cut ones are recommended to be placed symmetrically (in the corners).
After that, it is necessary to prepare a solution of tile adhesive. The dry mixture is added to a plastic bucket with water and thoroughly mixed with a drill or perforator with a nozzle for mixing liquid solutions. The proportions for mixing are indicated on the packaging, and they must be strictly observed.

After mixing into the adhesive, it should not contain lumps. Do not make the glue liquid, as the tile can slip. It also cannot be made rigid - in this case there will not be good adhesion to the wall and tiles.
The finished adhesive is applied to the wall with a notched trowel. A whole tile is applied to the wall and pressed tightly with your hands. If tile large sizes, then it can be tapped with a rubber mallet. Verticality and horizontality are checked by a rule with a level.

Plastic crosses are inserted between adjacent tiles. They allow you to make the tile seams the same.
It is possible to level a tile after its laying within 10-15 minutes. If the time is not met, the solution is removed from the wall and tiles, after which the operation is repeated.
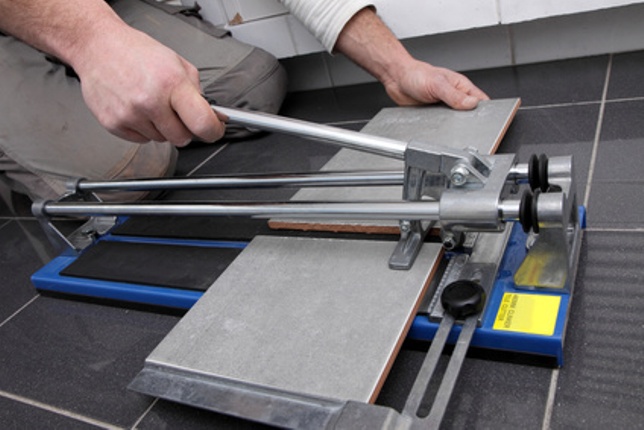
A tile cutter is used to cut tiles. The whole tile is marked with a ruler, pencil and placed in the device. Slightly pressing the lever of the cutting tool, spend on the tile 1-2 times. After that, it will easily break off at the incision site.
In the corners of the room you can lay plastic corners. Cut tiles are inserted into its grooves, which makes the seams in the corners perfectly even. If the wall has water pipes, then they must be bypassed by cutting holes in the tile. To do this, you can use a diamond crown of the required diameter and a drill.
If there are no such tools, then use tongs for ceramic tiles. They bite a rounded segment from the edge of the tile and lead it under the pipe. They complete the bypass of the pipe with a second tile with the same bitten segment.
Grouting or jointing of tile joints
When the ceramic tiling is completed, the adhesive must be allowed to dry for about 24 hours. After that, the crosses are removed, and the seams are cleaned of tile adhesive with a spatula. Gypsum grout is used for walls. It can be produced in different colors, so it should be selected to match the tone of ceramic tiles.
Important! For grout floor tiles use mixtures based on sand and cement.

The solution is diluted with water in a shallow container and applied with a rubber spatula to the tile joints. In this case, the composition must penetrate deeply into the seam for reliable fixation. Excess grout is removed with a damp sponge.
After 2 hours, the lined tile is washed from the remnants of the grout (fugue) with warm water and a rag. If you have any questions, it is recommended to watch the wall cladding with ceramic tiles on the video presented on this page.
Already long years wall cladding with ceramic tiles is a traditional option for interior decoration. In particular, this solution is the most popular for the kitchen, bathroom or bathroom. The tile gained its recognition due to its resistance to moisture, and besides, it is not picky in care. Tiles are fairly easy to clean high level strength and does not conduct electricity. In addition, ceramics is an environmentally friendly material.
The choice of tiles for wall cladding
To date, the variety of tiles is quite large. A large assortment of types, shapes, colors and shades is simply misleading. But let's look at the main criteria for choosing a tile. It is enough to follow a few simple rules:
- If the room is not large, then good option will be the choice of light tiles. Since this will give the effect of increasing the room, and also make it brighter.
- Note that the tiles intended for walls are somewhat thinner than the material for flooring.
- High-quality tiles should be of regular geometric shapes. And the quality in this regard is easy to check. Take several tiles from the same package and place them next to each other. If their size does not match, then you do not have quality material.
- Each seller must have a quality certificate for the products that he sells. Ask him to present.
- If you buy several boxes of tiles, be sure to check the color in each package, it must be completely identical.
- Ask the seller what glue to buy for this type of facing material. Since each tile has a different adhesive, depending on the type of material, size and weight.
Wall cladding with ceramic tiles: surface preparation
The quality of work will depend directly on how smooth the walls are. That is why first you need to check the surface of the walls for irregularities. To perform this task, a plumb line or building level. We apply it to the wall, and all the flaws immediately become visible.
We also note that cladding on curved walls will lead to significant costs of tile adhesive. It will be much cheaper to pre-putty or plaster to level the surface.
In addition, it should be borne in mind that it is quite difficult to equip tiles on a large layer of glue, and this will undoubtedly have pernicious influence on the result of the work. Ultimately, it’s not enough that you have to hold each tile for 10-20 minutes, but in the end, the tile may simply fall off soon.
As already mentioned, tile laying is carried out on a previously leveled surface. Alignment can be done in several ways:
- Surface plastering.
Considering the option of plastering, it should be noted that the work will require some skill. In addition, the process itself takes a long time, and at least three weeks will pass from the moment preparations begin until the laying begins.
Surface plastering technology
The work is carried out in several stages:
- First of all, you need to install beacons.
- After that, the solution for plastering is prepared.
- The third step is the application of the solution.
- And the last stage is alignment using a level or a rule.

GKL installation technology
Considering the second alignment option, it should be noted that it is somewhat simpler, but much faster. You can install drywall sheets in one day. In addition, the very next day you can begin work on wall cladding with ceramic tiles. As you can see, the time savings are enormous. At the same time, we note that special skills for the work will not be required.
The process itself is carried out as follows:
- Initially, the walls are primed. It should be noted that a deep penetration composition is used.
- Next, tile adhesive is applied to the drywall sheet (around the perimeter and in the center).
- The sheet is pressed against the wall and aligned with the rule. Then it is checked by the building level.
- Next, a full fixing with dowels is carried out. If necessary, adjust the position of the sheet.
- After that, the GKL is primed for the best adhesion of the glue and the drywall itself.
Wall cladding technology with ceramic tiles
Preparatory work
Wall cladding with ceramic tiles should be carried out on a flat base, respectively, we figured out the alignment options.
Before starting work, if you do not yet have sufficient experience in their implementation, read the literature on doing wall tiling with your own hands.
As part of preparatory work, it is necessary to check the integrity of the base. If there is damage, they must be repaired. Then calculate the consumption of tiles and purchase the required amount.
How to divide a tile into parts?
When carrying out work, sometimes you may not need a whole tile, but a certain piece of it. Therefore, it is necessary to know how to divide the tile into parts. And this is done as follows:
- It is necessary to measure and mark the line along which you will separate the tiles
- Then attach a ruler in the line and draw a glass cutter along the line, while pressing hard on it
- Then turn the tile on the back side and tap it a little
somewhat more convenient and quick option will use a special cutter. If you have one, then you are lucky, and the work will be somewhat faster and easier. If not, then buying it for the sake of one room is not worth it. Its price is quite decent, and in the absence of the need to constantly cut tiles in large quantities, it will be irrational to purchase such a device.
Also, if you need to do round holes in the rosette tile, you can use the ballerina cutter attachment. In addition, cutouts can be made in the same way as in the case of separation, using a glass cutter.
Laying tiles on cement mortar
The first way of laying tiles, and the oldest, is the arrangement on cement mortar. Technological process as follows:
- To begin with, you need to hang a plumb line on the wall, mark it and install beacons by which we will mark the coverage levels.
- Next, plumb slats up to 2 meters long must be fixed to the edges of the walls, further to these slats there will be a guide thread that will determine the level of the tile. Those. a kind of beacon, on which we will carry out all the work.
- Before starting work, the tile must be moistened, which will lead to a stronger adhesion of the material with the adhesive.
- Then we apply a solution to the tile, and press it against the wall. It should be noted that it is necessary that the tile touches the beacon (i.e. the equipped thread / lace). After that, it is necessary to knock on the tile for its uniform laying. To do this, use a rubber mallet.
- For arranging even seams, special crosses are used. Between each tile, depending on its size, at least two pieces are inserted, not far from the tops of the tile. After the solution dries, the crosses are removed.
- After completion of work, it is necessary to remove the remnants of the mortar from the tile, and also wipe it.
- Further, after drying, grouting is carried out (we will consider its technology a little later).

Thus, the walls are lined with ceramic tiles on cement mortar.
Laying tiles with glue
Also, in addition to using cement mortar, tiles can be equipped with PVA-mastic, or special tile adhesive. The technology of work is very similar to the previous version, but there are some characteristic differences. Let's take a look at them.
- First of all, it is necessary to prime the surface. A primer is applied to the previously cleaned base with a layer of up to three millimeters.
- Before laying the first row, equip the guide rail by leveling it with a level. In the future, you should focus on the first row, while checking each subsequent level for the absence of deviations.
- Using a spatula, apply glue evenly on a flat surface and level it so that the layer is about 3-4 millimeters.
- Next, lean the tiles against the wall. You should also tap it lightly with a rubber mallet or wooden block, which will help to evenly distribute the mastic over the entire area of \u200b\u200bthe tile.
- If the adhesive protrudes beyond the seams, it must be immediately removed with a spatula, because, having dried, it will not provide such an opportunity and somewhat spoil the appearance of the tiled coating. To arrange the seams, crosses are also provided between the tiles.
- After the glue dries, it is necessary to remove the crosses, and then the arrangement, putty and grouting are carried out.
- The last step is to clean the surface from debris, dirt and dust.

Note that when gluing tiles, there is no need to pre-wet it. At the same time, the seams are filled with special tabs for the duration of the work, which will help keep them in the required position and prevent them from slipping. In addition, constantly monitor the level of the tile. The slightest error at the bottom by 1 millimeter, reaching the top, will lead to surface distortion and the creation of a rather large slope, which will subsequently lead to flaking and falling off of the tile.
Grouting and jointing
After completing the tiling of the walls, it is necessary to allow the glue (or mortar, depending on the choice of method) to dry. Drying occurs during the day.
After drying, the crosses are removed and the seams are cleaned from excess mortar. Cleaning work is carried out with a spatula. Next, grouting is carried out, for which a gypsum mortar is used. It should be noted that this gypsum grout is commercially available in several color variations. Therefore, it can be matched directly to the color of the tile.

Note that floor tile grouting compounds are not suitable, since they are based on sand and cement, which does not allow you to choose the desired color.
The grouting solution itself is diluted with water in a shallow container, after which it is applied with a rubber spatula. Then it is pressed against the seam, since it is necessary to ensure the maximum level of penetration, which will determine the reliability of the fixation. Then the excess material is removed with a damp sponge.
Two hours after the lining, or rather its completion, the tiles are washed in order to remove grout residues. It is carried out with the help of warm water and a rag. We also invite you to see how the walls are tiled with ceramic tiles in the video:
Adhesive installation of tiles is the most reliable way seal the surface of the walls, making them more beautiful at the same time. This type of wall decoration does not require any special skills and even allows you to do without assistants.
But when starting to work with your own hands, you need to remember that there are certain rules for tiling with ceramic tiles. If you want to get a high-quality durable coating, they must be observed.
Informative information about ceramic tiles
When it comes to finishing the exterior walls of a house, the remarkable properties of ceramic facing tiles acquire special value, because the service life of load-bearing structures with such a coating increases significantly. Modern production of finishing materials is developing so rapidly that new items appear in a fairly short time, as well as traditional, but somewhat improved products.
- This trend has not bypassed ceramic coatings - well-known materials that have retained their popularity for many decades. In this chapter, we will tell you everything about facing ceramic tiles: the composition of the raw materials used in production, molding methods, front surface coating options. You will also be presented with a video on this topic.
Production methods
Building ceramics are produced in three main ways:
- The first and main way- this is semi-dry pressing from powder raw materials, the moisture content of which does not exceed 7%. Almost all facade tiles are produced in this way, it turns out to be as durable and frost-resistant as possible.
- The second way is casting. It uses slip as a raw material - an aqueous suspension of clay with a moisture content of up to 33%. In this way, tiles for interior decoration are produced.
- The third way to produce tiles is carried out by plastic molding of products from masses, the moisture content of which is in the range of 15-20%. It is used mainly for making imitations of brick and stone.

Clay raw materials contain mineral additives in the form quartz sand, feldspar, vermiculite, perlite, glass or slag. As a result technological processing raw mass: molding, drying and firing - single or double, of varying degrees of sintering, facing ceramic tiles acquire a variety of properties.
Accordingly, they determine the purpose of the tile:
- In order to obtain products of higher quality, the technology for manufacturing building ceramics is constantly being improved. All stages of production are being modernized, from the processing of raw materials to the decoration of finished tiles. Many manufacturers have their own original recipes that both increase strength and improve the quality of the front surface.
- Some introduce ground porcelain into the composition of the raw material, or rather, the waste of its production. Others add enriched coal, others use glass components. The sizes of facing ceramic tiles also vary, but within the standard established for these products.

- GOST 13996-93 regulates the production of 15 sizes facade tiles, the largest of which is 300*150*9mm. In this case, we are talking about tiles intended for adhesive installation. Ceramic cladding can also be carried out according to the system of ventilated facades, where the panels are hung on the frame.
- For this purpose, on the contrary, large modules are more often used, the length of which can reach up to six meters - but today we are not talking about them. Adhesive facing with large format ceramic tiles on vertical surfaces is not welcome.
A lot of weight requires anchoring, otherwise it will not last long. The price of coverage also increases - and this is not beneficial to anyone.
Most often, facade tiles imitate the shape of a brick, and are close in size to it. The photos given as an example are the best proof of this.
Tile decor
The tile acquires its basic properties after applying a decorative layer on it. It is he who makes the shard waterproof and immune to pollution. Well, of course, the aesthetics of the product also depends on it.
- decoration ceramic products carried out by the most different ways. For example, a tile is glazed: after a single firing, a thin layer of an aqueous dispersion of glass powder is applied to it, but an underglaze layer is first applied to the surface.
- This is done to improve the adhesion of the glaze to the shard, as well as to prevent the formation of gas bubbles in the glaze. After that, the products are sent to the furnace for secondary firing. To obtain a colored tile, mineral pigments are added to the raw mixture, and heat-resistant dyes are also applied under the glaze, or on it.

- Thanks to the computerization of production, last years both glaze formulations and methods of its application have undergone significant changes. If earlier it was believed that double-fired tiles have the best quality, today the situation has changed radically.
- Many European manufacturers prefer single firing. The aesthetics of the tiles is also improved due to the repeated introduction of pigments of different colors into the raw mixture with layer-by-layer pressing.
- For getting colors, inherent in natural stone, soluble salts are introduced into the mixture along with mineral pigments. The ceramic base, by analogy with the laminate, can be pressed with a decorating material having a given pattern. This method is often used in the production of porcelain stoneware.
In the production of facade tiles, as well as stove tiles, a relatively new invention is also used, which is called: ceramic mass for cladding. This is a raw mix that includes fusible and refractory clays; porcelain and glass batt; sand of expanded vermiculite and sulfite-yeast mash.
Such masses make it possible to obtain a more durable and lighter tile with excellent thermal properties.
Facing works
Choosing a beautiful and high-quality tile is only half the battle. The main thing is that the technology of ceramic cladding be observed exactly. Only in this case, the result will please, and there will be no extra costs.
The instructions presented in this chapter are to help those who are faced with this work for the first time:
- Cladding the facade of the house is not the same as decorating the walls in the kitchen or decorating the bathroom. First of all, the scope of work differs. Therefore, so that the process of their implementation does not become too time-consuming and does not drag out in time, you need to purchase a tile cutter.
In addition, you will need a drill with drills and a mixer nozzle; tile cutters; rubber mallet; rule with level; marking cord and plumb line; notched trowel; curved stitching and a brush - or even better a spray gun. And, of course, you should take care of scaffolding or scaffolding that allows you to work at height.
The quality of the adhesive is the key to a durable coating
The main consumable material used in the performance of facing works is an adhesive solution. You can make it yourself, or you can buy it.
- The second comes out a little more expensive, but with a small amount of work, this difference is not too significant. If the building is large and it is supposed to be completely lined, it is more profitable to mix the mortar yourself. Let us draw your attention to some significant nuances.
- Cement is the binder for ceramic tile installation mortar. When it comes to outdoor work, the brand of cement used should not be lower than M300 - in any case, when the base for cladding is concrete or brick.
- Relaxation is only allowed for the installation of tiles on plaster, insulation, or when facing asbestos-cement partitions inside buildings. Here is one of the rules adopted in construction, which should be observed: the strength of the adhesive solution should be close to the strength of the base.
- In order to reinforce strength characteristics adhesive layer, modifying additives must be present in its composition - they are also in factory mixtures. In order not to have to self-manufacturing solution to dose certain additives, the easiest way is to buy plasticized Portland cement.

- The necessary additives are used in its production, while the brand of cement rises to M400 or M500. The plasticizing effect is necessary to reduce the proportion of water in the solution, and, consequently, increase its density. In this case, the composition acquires frost resistance and water-repellent properties.
- An obligatory element of tile adhesive is also sand, and it would be a mistake to think that its quality does not affect the quality of the solution. Influences, and how! For the manufacture of facing mortars, sand must have an average or coarse fraction and the content of impurities in it must not exceed 1% of the total mass.
- The ratio of cement and sand in the solution depends on the brand of cement. If it is M500, then the dry ingredients are 1:6. Water is added until a usable consistency is obtained - this is approximately 30% of the total mass of dry aggregate. By the way, ceramic tile cladding can be repaired with the same solution.
The amount of glue made in one batch should be such that it can be worked out before plasticity is lost. It is useless to reanimate the solidifying mixture by adding water to it.
Substrate preparation and cladding
The durability of facade ceramic finishes depends not only on the quality of the tiles and the correct mortar for its installation. An important role is played by the quality of the base, which is to be faced.
So:
- In order for the final result to please, the vertical surface must be thoroughly cleaned, leveled and primed if possible. External corners in ceramic tiling are of paramount importance. They must be even, otherwise it will be difficult to mount corner tile elements.

- The corners are especially sinned by unevenness, as, indeed, the walls brick houses. Therefore, the first thing to do after stripping is hanging. That is, with the help of a plumb line and a rule, deviations of the surface from the vertical should be identified by circling them with chalk. All recesses deeper than 1.5 cm must be plastered - for this you can use the same mortar that will be used for gluing tiles.
- If the irregularities turn out to be more significant, the ceramic tile cladding technology provides for pre-installation plaster mesh. To do this over the entire area or only in those places where there are recesses, you need to navigate according to the situation. To align the corners, it is better to use a plaster corner with a grid.

- In any case, the mesh will improve the adhesion of the mortar to the base base and make the cladding more durable. If the walls are very uneven, in order to bring their surface into a single plane, it is necessary to install beacons before plastering. How to do it right, you can easily understand by watching the video. After the walls are leveled, tiling becomes, as they say, a matter of technique.
- The main thing to pay attention to is the thickness of the adhesive layer. It must be at least 7 mm and must not exceed 15 mm. The minimum and maximum thickness is set by building codes. The fact is that when facing, especially in hot weather, water from the solution is actively absorbed by the heated surface of the walls.

Note! The thinner the layer of glue, the faster it loses moisture, which means that the strength of the screed will decrease. As a result, the tiles will peel off the walls - if not immediately, then in the near future. Therefore, surfaces heated by the sun are not subject to facing.
- Excessive thickness of the adhesive layer also contributes to the loss of tiles. In this case, the reason lies in the shrinkage deformation of the solution. That is why, when facing tiles, they are not mounted closely, but leave horizontal and vertical seams. Their uniformity is ensured by installing crosses between the tiles.
- The permissible width of the joints is also regulated by the norms and depends on the format and thickness of the tile. The horizontality of the seams is ensured by mounting a wooden plank or a metal corner along the lower perimeter of the wall. After all, the facing is carried out from the bottom up, starting from the corners, and the starting bar serves as a support for the first row of tiles.
- If the wall is long, it is quite difficult to ensure the horizontality of the remaining rows by eye. For reference, experts use a mooring cord. The verticality of the rows is controlled by a plumb line.

It is not necessary to wet the tile before sticking. A solution is applied to it with a notched trowel, leveled and pressed to the base. The position of the tile in the cladding is corrected by lightly tapping with a rubber mallet, and the excess mortar is removed.
Then, without waiting for the mortar to harden, a selection is made from the tile joints using curved jointing. Subsequently, these recesses will be filled with grout.
Continuing the theme overhaul in the bathroom in this article I want to highlight in detail the question of how to lay tiles on the wall with your own hands.
What to consider and what materials to purchase
We will proceed from the fact that we have decided on the design of the bathroom - we have chosen the color and size of the tiles, calculated the number of main tiles, decorative elements and borders. How to do this, you can read more in the article "Make right choice ceramic tiles, and every morning it will inspire you to new achievements.
Decided on the arrangement of furniture and plumbing fixtures (bathroom, toilet bowl, sinks, etc.). We hid in the wall all communications for the supply of hot and cold water, planned the installation locations for the bathroom faucet and water outlets to the sink and toilet. Our walls are even and vertical, or at least deviations are within acceptable limits and can be corrected with a thickness of glue.
Bought tile on the wall and glue to stick it. You can start laying ceramic tiles on the wall.
Instruments
For work, we need the following tools: a notched trowel, a small straight trowel, 2 levels (long and short), a tile cutting tool, plastic corners for grouting, a square, a ruler, a pencil.
DIY step-by-step instructions for cladding walls with ceramic tiles
We prepare the surface
This issue must be approached very responsibly. The final result will depend on how well our surface will be prepared.
The surface must be clean, free of dust, dirt and oil stains. If, for example, like mine, the tile will be laid on a painted surface, it is necessary to make notches all over the painted surface. Be sure to cover the walls with coarse-grained concrete contact primer for better adhesion of the tile to the surface. As a result, the wall will look something like the photo below.
All peeling plaster, loose paint, loose wall pieces, whitewash and polymer-based putty must be removed.
Determine the location of the horizontal rows
If you already have a high-quality horizontal finishing floor, you can bind to it, and the first row of ceramics will start from the floor. This is the most preferred option, following which the rows will go very smoothly and horizontally. The first row is placed on the floor with a certain gap equal to the thickness of the joints between the tiles.
Unfortunately, it is not always possible to apply this option, most often you have to start laying from the 2nd row or even from the 3rd row. This is due to the fact that:
Sometimes only the walls are tiled, while the floor remains intact and is rarely perfectly horizontal.
Below, along the wall, there are external communications that need to be bypassed.
And most importantly: when planning horizontal rows, it is imperative to calculate how many whole tiles will fit in a vertical row and, if necessary, either slightly raise or lower the level of the first reference row so that all the whole tiles are in the last, topmost row. , and they exactly fit the ceiling with a gap of 3-5 mm.
If this is not done, it may turn out that when approaching the ceiling it will be found that it is necessary to put a strip in the very top row, for example 2-4 cm. It is very difficult to cut off such a strip, and it will look bad at the top.
It is best to start the calculation from above, immediately marking the location of the horizontal rows and not forgetting to take into account the distance equal to the size of the seam between the rows. So, moving from top to bottom, we get the level at which the second horizontal (reference) row will be located and the size of the first row, which will be cut.
Using this technique, the top, most visible row is guaranteed to consist of whole uncut tiles, and all trimming falls on the first row, located near the floor and inconspicuous.
After we have decided on the location of the bottom line of the reference row, using the hydraulic level we transfer this mark around the entire perimeter of the room. We connect our marks, draw the reference line of the horizon and fasten the supports that will support our row. It is very convenient to use a galvanized mounting profile as a support for the first row drywall sheets size 27*28 mm. It is very smooth, unlike wooden slats, easy to attach to the wall and has a very low price.
When cladding the walls with glazed ceramics in my bathroom, I was tied to the level of an already installed bath.
This was due to the following considerations. Firstly, from this level, taking into account the size of the seams between the horizontal rows, I clearly approached the ceiling with a whole tile. Secondly, along the wall I have a drain sewage pipeØ 100 mm., which makes it difficult to push off the floor. Thirdly, this row adjoins the bathroom very well and there is no question of waterproofing the gap between the bathroom and the wall. And, fourthly, behind the bathroom, I didn’t lay out facing ceramics at all, which is also a kind of savings.
Of course, there is a certain minus - I had to make additional support for the second row from the bottom when laying it out. But, I figured that compared to the number of pluses that I get, I can make such a sacrifice.
Determine the location of the vertical rows
This operation must be done for each wall of the bathroom separately and approach this issue creatively.
We calculate how many whole tiles fit in a horizontal row on the wall, taking into account the width of the joints. Most often it turns out that one tile will have to be cut. If you get a very narrow insert in the corner, then you can use the following techniques:
Offset all rows and cut the tiles in one and the other corner so that they are the same width. In the photo below you can see how I solved this problem on my wall.
This technique will give the symmetry of the arrangement of elements in a row and, accordingly, the wall will look better. When using decorative elements, they will also be arranged nicely and symmetrically.
Position the vertical row to be trimmed in the place where it will be least noticeable. For example, in a corner that is not conspicuous when entering the bathroom. Or in the corner where the shower will stand.
Having solved the problem with the arrangement of vertical rows, we draw vertical lines in the corners with the help of a plumb or level, where the whole tile that does not require trimming ends.
Compliance with the drawn square formed by the lower reference line of the first laid horizontal row and 2 vertical lines at the corners will not allow the rows to deviate, both in the vertical and horizontal directions.
Having made a clear markup on all the walls of the room, you can start laying ceramics on the wall.
Laying tiles on the wall
Step 1. We lay the first support row on the support attached to the wall in accordance with our marking of the verticality of the rows. All tiles should be laid, with the exception of the extreme ones in a row that require trimming. The horizontality of the row is ensured by our support bar, the verticality of the element is controlled using a level, placing it vertically against the tile to be laid.
After laying 3-4 tiles, you need to check the flatness of the row. We apply the level with an edge to the row, as in the photo below, and see how the tool fits to the plane formed by the front layer. If a gap is visible somewhere, we achieve flatness by slightly adjusting the tiles located next to the gap and protruding a little.
When laying, do not forget to insert seam crosses for uniform seam width in a vertical row.
Having laid the entire row of one wall, we finally check the verticality, horizontality and flatness of the row using a long level.
We mark the extreme tiles in a horizontal row, cut them with a tile cutter to the desired width and put them in place. The row is completely ready, go to the next wall and repeat all the operations. We do the same around the entire perimeter of the room. As a result, we get a reference horizontal row around the entire perimeter of the room, as in the photo below.
Step 2. We proceed to laying the next row. We start from any side (right or left extreme element) from our vertically drawn line.
We apply glue to the wall from the base row to a height slightly greater than the length of the tile. In width, you can capture 3 tiles at once.
We apply glue on the laid ceramics. Moreover, I apply glue to the wall and ceramics in different directions, so that when the strips from the comb spatula come into contact, they form squares (see photo below).
We do not touch the last, trimmed tile, we will lay it last, after laying the entire row of the wall.
We put the element in place, combining the vertical reference line and the end of the tile. We insert seam crosses between the lower support row and our tile to ensure a seam between the rows. We apply a vertical level to our first laid tile of the row, and set the verticality of the row. We get this picture.
On the left is a vertical reference line running parallel to the adjoining wall.
We lay out all the elements of the row, controlling the verticality, horizontality and flatness of the row with the help of a level. The plane must be controlled both along the laid tiles of the row and in the vertical direction, matching the laid row with the bottom row.
In conclusion, as well as in the previous horizontal row, we lay the trimmed extreme elements of the row.
We pass to the next wall, repeat all the procedures and close the row around the entire perimeter of the room.
Similarly, go to the next row, repeat all operations and reach the ceiling. Don't forget to include decorative elements and borders according to our tile layout plan.
Step 3. In conclusion, it remains to put the lowest horizontal row. Mark the length of the tiles and cut them. For convenience, I numbered all the places of the tiles around the entire perimeter and numbered the trimmed elements so as not to make a mistake when laying.
If necessary, we adjust and insert the element to sewer pipes, hot and cold water outlets.
To make beautiful holes in ceramic tiles, we use various ceramic drills, circular drills and crowns. Having cut and adjusted all the elements, you can spread the glue and start laying the final row. We control the row for verticality and compliance with the surface plane, both in the vertical and horizontal directions.
This is how tiles are laid on the wall in the bathroom and the entire room is tiled. This work, of course, is not one day, so every time after completion of work, do not forget to clean the seams between the tiles and wipe the tiles themselves from excess glue. In the future, this will facilitate grouting and make them more aesthetic.
That's all for me. All light repairs. See you.
Sincerely, Ponomarev Vladislav.