DIY pumpkin crafts for kindergarten and school. Original pumpkin crafts: fantasy without boundaries DIY pumpkin crafts
Good afternoon, today I will show you which children's You can make your own pumpkin crafts for a competition or exhibition at school or kindergarten. There will be crafts here, accessible for the youngest children, and works that a schoolchild can handle and pumpkin compositions that will require adult help. I have selected the most kid-friendly pumpkin ideas. Here is the most complete selection autumn crafts from pumpkin vegetables for both girls and boys. Here's what you'll find in our article...
- painting pumpkin markers.
- Pumpkin decoration using decoupage technique.
- Autumn crafts from pumpkins with figured carvings.
- Cartoon characters from pumpkin.
- Robots and techno-men from pumpkin.
- Fairy houses from pumpkin.
- Owls and peacocks like pumpkin crafts.
- Cupcakes and donuts made from pumpkin.
There will be a lot of interesting things. Plus, I will tell you TECHNICAL POINTS creating such crafts with your own hands. So that you can create such masterpieces at home, without much mental strain, easily and with pleasure.
The simplest type of craft
DECOUPAGE from a napkin on a pumpkin.
Take the pumpkin and spray it with a can of white paint (auto paint for a dollar and a half). Let's dry it. And then we transfer the picture from the table napkin onto the pumpkin ( using decoupage technique)
Decoupage is when the pumpkin is smeared with PVA glue and put a thin layer of napkin on the glue - the one with the picture on it, and again apply PVA glue on top and dry it. This is a very simple craft for kids. The technique does not cause difficulties even for first-graders. If you are making a craft for the garden, then help your gardening child place a thin piece of paper napkin without wrinkles on the surface of the wet and sticky pumpkin.

Children's pumpkin craft
PAINTING WITH MARKER.
A drawing with a black permanent marker looks beautiful and stylish - it is sold in the same department where CDs are - this is a marker for signing disks. It does not wash off, dries instantly and does not stain your hands.
This owl drawing is very easy to create. And you don’t need to be an artist to make this pumpkin craft - thanks to the small elements and colorful pattern, all the unevenness and crookedness of the novice artist are not visible.

You CAN first draw a drawing with a regular thin felt-tip pen (as if practicing, and erasing unsuccessful lines as you go), and then instruct the children to trace these lines permanent black marker for signing CDs. The patterns consist of simple elements - sticks, arcs, hooks and simple curls, which are repeated many times. And therefore, such an autumn children's craft is suitable for your child.

CRAFTS “OWL made from pumpkin”
- for a competition in kindergarten and school.
You can make these funny owls from pumpkins and vegetables for the “Autumn Crafts with Parents” exhibition for the school. The owl's eyes are made of paper mini cupcake tins. Or from paper candy coasters in a box. And if you don’t have such molds, you can use plastic cups - cut them off not high from the bottom and glue them with glue.
Can decorate pumpkin owl eyes using seeds. We simply glue them onto plasticine. Or hot glue.

You can cut out the eyes of such an owl craft from cardboard - in the form of a multi-layer frame (as in the left photo below).
Or, as eyes, you can attach small patties to a pumpkin craft (prick them on a wooden skewer and stick them into the pumpkin). And you can use small unripe zucchini as a beak.


Let your child choose the owl model for their children's garden craft.
And some elements of the owl can be cut out with a knife. It is more convenient to work with a knife with a short sharp blade.

An owl can also be made from two pumpkins at once - one for the body, the other for the head. For plumage, you can use cutting strips of cardboard, or you can use various vegetables in the craft (orange skins, green skins of hard, thick-skinned cucumbers, nut shells, dried dried apricots, cinnamon tubes, etc.).
Crafts for the garden from vegetables
PEACOCK BIRD.
Here everything is even simpler: from cardboard (or thick felt) we cut out the elements of the head, beak, eyes, beard, and paws. You can cut out the tail, or you can collect beautiful autumn leaves in the park and decorate it like this leaf plumage the tail part of our pumpkin bird.

You can cover the pumpkin with feathers. You can cut these feathers out of paper if you don’t have any ready-made ones.
You can also make a very elegant blue peacock, with brilliant plumage and even with real peacock feathers (you can order them on the Ali-Express website for $1 and you will receive a whole package, although you need to place an order in advance - the delivery time can be 2 weeks). This craft will be a winner in a competition in kindergarten.

Crafts from pumpkin and vegetables
in the form of ANIMALS.
Here are the cute little animals that are most beloved by children. You can make a monkey out of a pumpkin. Make the ears from cardboard, or from two halves of an apple, potato or small pumpkin.

Using white and black paint you can turn a pumpkin into a panda or a purebred cat. This is the simplest pumpkin craft that you can completely entrust to your child - just mark all the lines in advance with a marker - and let the child decorate. A simple and quick to implement children's autumn craft.

Or you can buy a can of pink paint and make a funny Piggy Pig. The nose-piglet is made from potatoes and is pinned onto the nose of the pumpkin. You can also duplicate the fastening using wooden skewers (prick them onto the potatoes and stick them into the pumpkin).

But you can make such a teddy bear if you have a lot of small pumpkin fruits at your dacha. If the pumpkins are different colors, it doesn’t matter - you can then paint the entire bear the same color. You can also make a barrel of honey for him, also in the form of a pumpkin craft.

Insects You can also make your own pumpkins – ladybug ones. A butterfly, bee, bugs, caterpillar can be made from a chain of small pumpkins. The craft is accessible to the youngest visitors of the kindergarten group.
The wings can be cut from thin file folders - they are just hard and transparent. Cut it out and insert it into the slot on the pumpkin - and it will be inexpensive. 
CAT AND MOUSE
Fun fall pumpkin crafts.
And this cat-and-mouse theme can be embodied in pumpkins in a variety of ways. We make a cat out of a large pumpkin. And from small pumpkins there are mice with tails and mustaches. Here are several options for how to make a cat out of a pumpkin.

Here’s an interesting idea for an autumn pumpkin craft in the form of a box with kittens. Ears can be cut out from pieces of fabric or cardboard.


Here’s another great and simple pumpkin craft idea – CHEESE AND MICE. Simply cut out round holes in the side of the pumpkin. And we put toy mice in it. To make the hole round, you can cut it out not by hand, but hollow it out with a hammer (we put a metal cup or tube on the pumpkin and hit the other end with a hammer - the tube cuts into the pumpkin and knocks out a round hole).
And the mice for this pumpkin cheese craft can be crocheted or sewn from rags. Or mold it from plasticine.

You can also make a mouse house out of a pumpkin. To this pumpkin craft, you can attach a cross-shaped lattice to the windows, made from stick twigs. And make a gate with your own hands (put two sticks HORIZONTALLY, coat them with instant glue, and quickly place VERTICAL sticks on these two steel sticks.
And we make a ladder of steps using the same principle as a gate-door.

And since we’ve already reached the topic of houses, here are a couple more housing ideas for pumpkin crafts.
PUMPKIN HOUSES
children's crafts for kindergarten and school.
If the pumpkin is elongated in height, then you can make a two-story mansion. With hanging balconies. Decorated with flowers. We cut out balconies from quartered apples, or quarters of small watermelons. Decorate the pumpkin house with flowers and branches of decorative dried plants.

But overall it’s gorgeous idea for an autumn pumpkin house with brick and stone cladding (photo below). We will make these gray bricks ourselves - from ordinary square BREAD CRUSTS.
You can buy crackers ready-made in the store, or cut the bread into cubes and dry in the oven. After complete hardening we these paint the crackers with WHITE AND GRAY paint. In two bowls we dilute paint (gray and white) - it is better to use acrylic paint, but gouache is also possible. Paint is a must mix a little flour, so that it turns out to be a mixture thick dough like pancakes.
Quickly dip the cracker into the sticky paint and set aside. While the crackers are not yet wet and sticky, we lay out our PIPE from them on a smooth board... PORCH and DOOR PORTAL cladding. And leave until completely dry. We attach the dried elements with instant glue to the side of the pumpkin (you can cut openings in the pumpkin so that our lining fits into them like grooves).

The flour should hold the parts of the building together - but if it comes loose somewhere, then we fasten it with regular instant glue (or hot glue from a gun). Melted caramel also glues perfectly (pour a little water (1 mm) into the bottom of the saucepan, put candy canes and melt them over low heat - it makes excellent glue.
We make doors from small twigs and wood chips - we connect them with glue, or we put them on a PLASTICINE PLATE.
You can come up with your own model of a FAIRY HOUSE made from a pumpkin. Use your imagination. Let your pumpkin craft be the embodiment of the creative power of your brain.


PUMPKIN CRAFTS
with metal things.
You can make a TECHNO-MAN from a pumpkin. Rummage through the tool cabinet, rummage through the box on the balcony, ask your grandfather what of his supplies you wouldn’t mind using to create an autumn craft for school. And based on the received equipment, create your own fantasy pumpkin face.

And if you buy a can of auto paint in a noble bronze shade, you can get a gorgeous robot pumpkin.

Or you can make such a funny pumpkin craft in the form of workers who are carving and crushing pumpkin rock.
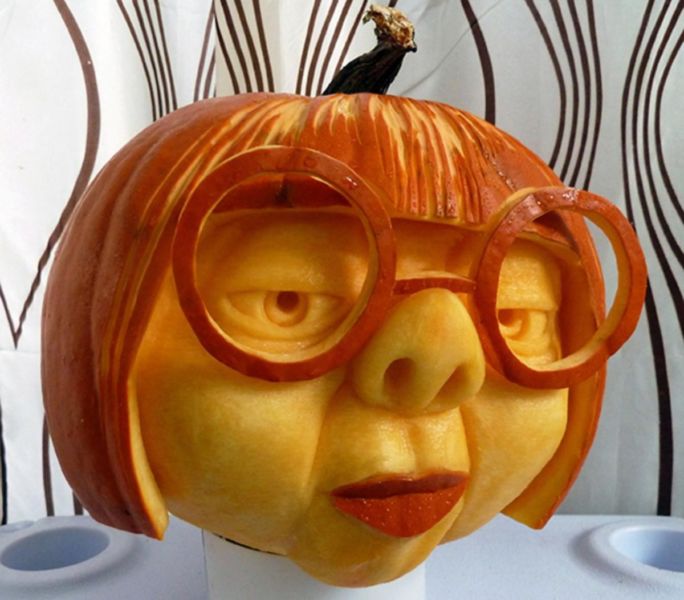
Continuing the topic of HUMANIZING pumpkin heads, I offer a few more options that are worth attention. The tail of a pumpkin can be thought of as a NOSE. And then you can put glasses on this nose, and pick up other parts of the pumpkin image: an old lampshade, a bathing cap, an old wig from a children's party, pendants from a chandelier, buttons and other trinkets from the drawers of the table.
You can make cute old ladies with difficult characters out of pumpkins. You can make a charismatic bespectacled man with a broken nose.

The main thing is to prevent the character from resembling a school principal, the head of a kindergarten, or another person respected in the country.
Or you can try to recreate a resemblance to a mussel character - like Elvis Presley in the right photo below.

Or pirates with a moderate degree of bloodthirstiness. A pumpkin pirate is a craft that boys will love. They will proudly carry this formidable head to the autumn crafts exhibition at school. And such a character is simply obliged to take prizes at a school-wide competition.

Pumpkin crafts
in the form of CARTOONS.
Cartoon characters are those media personalities that are recognized by all children. We may not know such a bug. But any child can tell you many interesting facts from his cartoon adventures.
Try to look at your pumpkin more carefully and see in its shape the BODY OF A FUTURE CARTOON HERO.
This cute fly came from an oval pumpkin, thanks to inspiration from a little book.

Or a character from your favorite book about OLIVIA PIG... a book with wonderful illustrations.

But everyone’s favorite minions – and also in the form of a pumpkin craft. You need white and blue paints and a black marker.

You can make a family of Angry Birds from a pumpkin. You can also make green pumpkin pigs.

Or an orange fish from the cartoon about Captain Nemo.

But here are two green cartoons - one is called AM-NYAM (a fact obtained from my daughter) ... and we cannot remember the second ONE-EYED ... like from the Academy of Monsters.

Here are the characters from the cartoon about SPONGEBOB. You can cut off all the skin from the pumpkin and use a round spoon to cut out holes to create the effect of a porous sponge.
And to create PATRICK (a starfish, SpongeBob's friend), you need to put additional material on the top of the pumpkin. This can be plasticine (but then you need quite a lot of it), you can make a sticky mass from wet newspaper and PVA glue. Dry and paint.

And this is Humpty Dumpty, who was sitting on the wall and fell in his sleep... A simple and easy children's craft for the garden. We make a wall from an ordinary cardboard box - we cover it with colored paper and draw bricks on it with a marker. We make the cylinders from cardboard, and the arms too. A pumpkin ninja turtle is also a craft for boys.

Here’s another cartoon character that seems painfully familiar to me - but I can’t remember where I know this funny face from... In some ways, the style of it reminds me of the characters in the cartoon “The Koloboks Are Investigating”... and also a clown.
And by the way, here’s an idea for creating a cheerful clown in a hat and bow from a pumpkin head.

You can make a Mad Hatter from a pumpkin, a Queen of Hearts, and a pumpkin Cheshire Cat with a big smile - excellent pumpkin art crafts for an autumn exhibition at school.

But here is an iron woodcutter with a loving heart. For this pumpkin craft, you need to buy a can of silver spray paint.

CRAFTS FOR GIRLS made from pumpkin.
Girls will love the cuter and gentler characters made from pumpkin. For example, cute Kitty.

Or girls from the country LALALUPSIA. Hairstyles can be made from knitting yarn, or cut into bangs from strips of cardboard.

And here are the characters from the cartoon FROZEN HEART.
OLAFA the Snowman can even be made with his head torn off; throughout the entire cartoon it was regularly torn off from him. Craft for school in the spirit of “tearing off the head.”

And here is the princess herself from the cartoon - also made of pumpkins - in a homemade wig and dress.
You can also make a children's CRAFTS WITH AN EDIBLE THEME out of a pumpkin. This can be a delicious cupcake, covered with chocolate glaze (it can be made from flour, water, salt, PVA glue and brown paint - the proportions are by eye, so that it is thick, then roll it out with a rolling pin, put it on the pumpkin and smooth out the edges figuratively, with the effect of leaking chocolate).
You can also make donuts from flat, flattened pumpkins.
You can also use several pumpkins to create a three-tier ice cream.

You can make an apple from a pumpkin - poured or nibbled.

CRAFTS FROM PUMPKIN AND VEGETABLES
FOR BOYS.
Here are children's crafts in the theme of THE SUFFERING PUMPKIN... a baby pumpkin is swallowed by a lizard... or a pumpkin has contracted a rotavirus infection. Of course, this option is doubtful for autumn crafts at school. But if you are brave and daring and are used to shocking teachers with an unconventional approach to the material being studied, then you need to live up to it at the exhibition.

And here is a craft made from a pumpkin with false eyes. You can buy the eyes at a weird odds and ends store (look online). Or you can make your own eyes from table tennis balls. These are such cute vegetables. You can put wigs on them from tangled threads, You can make cute hats with flowers from cardboard. That is, make them as friendly as possible.

You can insert a plastic toy jaw into the pumpkin man. You can take other vegetables and give them a similar facial expression. Let's get a family of saber-toothed vegetables.

But the UFO flying saucer with aliens is made of patisona.

And here is a flying saucer made from a ROUND pumpkin - the edges are cut out of cardboard and threaded into a horizontal slot on the equator circle of the pumpkin. Aliens can be made not from pumpkins, but from completely different vegetables. You can take small cucumbers and stick eyes on them. make antenna horns from nails and place them vertically on six legs made from matches.

You can show your imagination and make other mobile modules from pumpkins and zucchini. Any large vegetables can become wagons and trailers on your train.

Pumpkin CARVED CRAFTS.
These children's autumn crafts from a convenient and large vegetable, pumpkin, are very easy to make. First, draw a picture on paper. Then we press the paper against the side of the pumpkin. And with nail scissors (they are sharper and smaller) we pierce point-holes directly through the paper. Thus, the DOTT LINE of the future drawing is transferred to the pumpkin. Next, using a knife, we make cuts along these points, the outlines of the design. And then we remove the crust from the pumpkin INSIDE THE BORDERS OF THE FIGURE.

You can make a floral autumn craft from a pumpkin with flowers. Just drill holes and insert flower stems into them.
Here's an idea for beautiful crafts from pumpkins and vegetables that you can make with children's hands for a competition for school or kindergarten.
Good luck with your creative incarnations.
Olga Klishevskaya, especially for the site
Hi all! Soon autumn competitions will be announced in kindergartens and schools, to which you will be required to bring crafts made from vegetables and natural materials. I think those who have children probably know this first-hand. Since every year, educators and teachers ask parents and their children to participate in such exhibitions.
In connection with the upcoming event, and since my child goes to preschool (so we will also need all this), I decided to make it easier to find crafts that you don’t need to buy, but make yourself. I thought it would be great if a bunch of ideas were collected in one place, do you agree with me?!
In today's post I will show you what children's crafts you can make with your own hands from pumpkins. This is a very popular vegetable. And you can’t even imagine what you can create from it. A bunch of original souvenirs. Moreover, everything is done so easily and simply that even the smallest child can handle it.
I’ll tell you a secret, I have prepared for you the largest selection of autumn pumpkin crafts for boys and girls. Here and now you will find real masterpieces that will definitely allow you to take prizes. So don’t leave the page and save it as a bookmark so you don’t lose it! I am sure you will find something that you will be happy to build with your kids.
We'll start with products that the little ones can do. Of course, you can’t do it without the help of your parents. But how great and valuable it is when mothers and fathers work with their children. Remember, joint creativity not only develops your baby, but also strengthens your entire family.
Probably the easiest way to make autumn souvenirs from such a sunny vegetable is to draw faces on it and decorate it with additional attributes. Look how cool the boy and girl turned out. Just take two good fruits, one smaller, the other larger, and draw eyes, a nose, a mouth and hands. Complete everything with a straw hat and your work is ready.

You can take not a whole pumpkin, but half of it. Draw a shell on top like a turtle, and make legs and a head from potatoes. Your Tortilla Turtle is ready!

Don't forget that orange carriages are especially popular. For this product you will need a small fruit. You need to cut out the windows in it and pull out all the pulp. Make the wheels out of carrots.

Or you can make a house like this, decorating everything with autumn leaves. And the residents will have small peeled onions. Cool idea!

How do you like this house for a spider made from potatoes? It’s just cool. Make a web from ordinary woolen threads. Collect herbs, rowan branches and decorate everything as you wish.

Now I propose to make you such a beautiful snail. Moreover, you will need not only pumpkin, but also yellow zucchini. Plus sparkles, sequins, ribbons and other decorations.

If you have your own garden and the harvest was successful, then select two large fruits and create such a graceful owl. The only work involved is cutting out the wings, muzzle and gluing them.

Or just do some cutting. Draw what needs to be removed directly on the pumpkin and proceed. This is what a cat can turn out to be!

I also really liked the composition with leaves. You can make a very cute chicken. Just little children can cope with such a task.

Or make a whole family of pumpkin men with your child.

Now I suggest you watch a master class on making a candlestick in the shape of a cat. Such work will deserve a lot of applause, and after the competition do not rush to throw it away. After all, Halloween is coming, so the candlestick will look very cool in the country house or in the fence of your home.
Candlestick in the shape of a cat

You will need: large pumpkin, black gouache, brush, spoon, knife, cardboard for ears and tail, pen, fishing line for antennae.
Work process:
1. Take a pumpkin and cut off the bottom so that your craft will stand stable in the future.

2. Using a spoon, scrape out all the insides of the fruit.

3. Now use a pen to draw the cat’s face.

4. Carefully, using a knife, cut out the muzzle along the contour.

5. Paint the pumpkin black.

6. Cut out ears and a tail on black cardboard. Attach the pieces to the pumpkin using glue or toothpicks. Cut a mustache from the fishing line and glue it to the face.

7. Well, place and light a small candle inside.

Well, isn't it beauty? Simply a masterpiece!
Options for DIY autumn crafts using pumpkins

Look what a funny weirdo, I don’t even know what to call him correctly. And it is also made from pumpkin and plasticine.

I also really liked the idea with a vase for fresh flowers. To make such a product, you need to take a small and even pumpkin. Cut a circle from the top and remove the insides with a spoon. Place a glass inside and pour water into it. Then place a bouquet of fresh flowers in the resulting vase. A real autumn craft is ready. 
You can create something like Winnie the Pooh with a barrel of honey. Well, that’s if you have absolutely nowhere to put the fruits). 
Here's an idea with a hedgehog. Well, everything is also very simple to do. Plasticine, toothpicks, olives or grapes and pears, that's all the details.

You can also paint the fruits in different colors and make the faces of any animals out of felt. It turns out very beautiful and impressive. A whole fairy tale can be made this way.

Kids can make their favorite characters from cartoons and fairy tales. For example, from scrap materials and a small pumpkin you can get something like this.

Fruit baskets also look cool. It’s easier to do, well, you can see everything yourself from the photo.

Crafts from pumpkins and zucchini on the theme of Autumn
Now let's take a closer look at what you can create not only from the orange fruit, but also with other vegetables.
For example, make a vegetable machine like this with a trailer. I think the boys will definitely appreciate it.

But what a big mushroom. And cauliflower is right on topic. Schoolchildren can easily cope with such a craft.

Here are some more beautiful mushrooms!

How do you like this zucchini boat? Just a treat. Well, a pumpkin as an attribute of decoration.

Here's another fun company you can build. If you must have a pumpkin, then use it to make wheels for your car.

Popular fairytale carriage. Zucchini wheels fit really well.

And here's another pumpkin house for the zucchini spider!

Well, to be honest, I haven’t found many crafts made from pumpkin and zucchini together, but separately there is plenty to choose from.
What can you make from pumpkin seeds for an autumn competition?
Now I want to show and introduce you to such material as pumpkin seeds. You can also make different souvenirs from them. So keep ideas for your exhibition.
I’ll show you in detail and tell you how to make such a beautiful chicken.
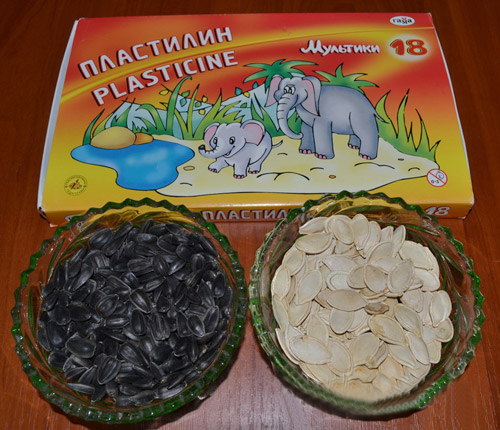
Chicken made from pumpkin seeds and sunflower seeds

You will need: plasticine, pumpkin seeds, sunflower seeds, a small basket, dried grass or strips of colored paper.
Work process:
1. From black or brown plasticine, sculpt the bird’s body and form a tail. Roll a ball of this color. This will be the head. Stick it to the body.
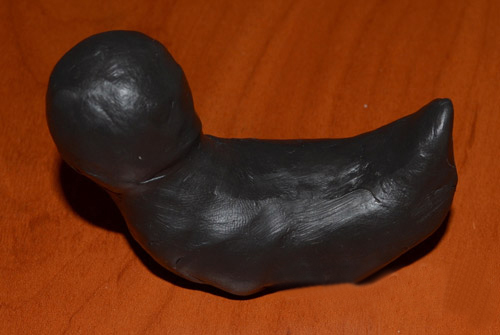
2. Now make wings using pumpkin seeds. Just stick them into the plasticine in several rows.

3. Then do the same ponytail, but start from the top.

4. Take sunflower seeds and insert them with the sharp side, filling the entire surface of the head and breast of the chicken.

5. Make a comb and beak from yellow and red plasticine. Form eyes from white and black plasticine.

6. Take a small basket, add dried grass and place the chicken in the nest. All is ready!

And here are some more works that can be created. Look and choose.
Application "Autumn tree".

Hedgehog. True, in the illustration it is made from sunflower seeds, but it can also be made from pumpkin seeds, you just need small seeds. And also paint them black first.

And here’s another cute snow-white chicken. The manufacturing technique is similar to the option described above.

Application "Spikelets". Work for preschoolers and primary school children.

Sunflowers also look very impressive. The middle can be made from cereal.

I found another composition. Heroes can be made from some vegetables, for example from a pear, but the panel is made from seeds.

By the way, working with pumpkin seeds is very good for developing motor skills, so take it into account.
New ideas for making pumpkin crafts for kindergarten and school
Wandering around the Internet in search of interesting and original works from this vegetable, I came across this cool handicraft by Svetlana Ridzel from the website Crafts Fair. It struck me so much that I saved it and share it with you. Maybe someone will want to perform such an ekibana.
Pumpkin Ekibana

You will need: pumpkin, acrylic paints, brush, piece of sponge, corrugated paper (fabric, felt, foamiran), wax, scissors, wire.
Work process:
1. Wash the pumpkin and trim the tail.

2. Paint the entire fruit with white paint using a sponge. Wait until it dries.

3. Now, starting from top to bottom, color the product according to the colors of the rainbow: red, orange, yellow, green, blue, indigo, violet.

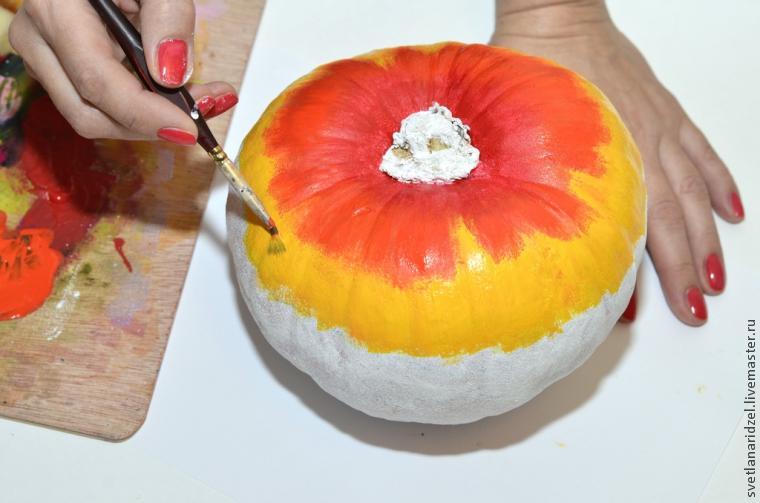
4. Paint the pumpkin with a regular brush, making only vertical strokes.


5. Paint the bottom black and the rest of the tail green.
5. Now dry the pumpkin well. At least a day! And when it is completely dry, cover it with wax.

6. From corrugated paper or fabric, and maybe felt or foamiran, make twigs, petals and flowers.

7. Using wire, attach them to the ponytail. Your “beauty” is ready.
I think you will agree with me that this is a real masterpiece! The author is just great!
And a couple more new ideas for creativity. Especially for those who love to tinker.
- Kittens in a basket;

- Haunted House;

- Autumn candlestick;

- Vessel (pumpkin carving).

Well, of course, this is a difficult level that people who practice this art can do.
Crafts from decorative pumpkins for the autumn holiday
And you choose what is simpler, and what the kids can handle. So look further and never cease to be amazed by what you see.
What wise little owls made from white fruits and seeds. Simple, beautiful and popular.

Another version of a flower vase, but with decoration. Check it out!

Big and funny spider. But you will need metal knitting needles or wires.

Another spider as a candlestick.

Pumpkin carving. Again, the level is difficult, but I really liked the work, in case someone gets carried away and wants to make such a product.
Here is a simple job, like a vase, only berries and fruits are added.

How do you like this old crab? I directly smile looking at him.

Here are some more interesting and charming baskets. Cut out the top and remove the pulp. Place decorative grass inside, make a handle from the branches and decorate everything with ribbons.

Mischievous bun. The kids will be delighted.

Variations of fairytale carriages. Cool idea to patch a vegetable.


Houses for fairy-tale heroes. Get creative, take improvised and natural materials and create!


Well, the fabric letter looks very original.

Master class on making pumpkin souvenirs: we do it quickly and beautifully
I’ve probably already shown you almost all the craft ideas. Well, is there really a lot to choose from? It remains to tell you in detail how you can make a flower vase. As you have seen, it is popular and easy to make.
Vase

You will need: pumpkin, dried or live flowers, felt-tip pen, knife, spoon, foam.
Work process:
1. Take a smooth and beautiful pumpkin. It needs to be stable on the table.

2. On the upper side of the fruit, use a felt-tip pen to draw an outline along which you will cut out the neck of the vase.

3. Then use a knife to cut out the “cap” along the contour.

4. Remove the grains and pulp using a spoon.


6. Prepare dried plant branches and stick them into the stand. Your ekibana is ready.

In conclusion, a small selection of pumpkin souvenirs for children. They will be happy to do such work themselves, since they will need to do a lot of painting and drawing. Look how light the products are and how beautiful they look.


Wow, now I don’t even know what to choose to work with my daughter, because there are so many interesting things. Well, if that’s not enough for you, then I suggest watching the following video story. Then you will definitely say, stop, I found it).
Friends, how do you like these wonderful pumpkin works? I am sure that now you will definitely take part in the autumn crafts competition with your child. Because there are a lot of ideas for creating them, and they are done very easily, quickly and not difficult. Just don't be lazy and everything will work out. Bye, bye everyone!
Friends, I greet you!
Autumn is golden, leaves are falling from the sky... But besides this, there are a lot of vegetables in the garden that require disposal. Adults make preparations for the winter from them, but I suggest you make crafts. Moreover, from one rather large orange fruit, which is called a pumpkin.
At school or kindergarten, teachers always ask something like this, and come up with it, because there are fairs and exhibitions ahead. To which students and preschoolers always bring their unusually beautiful and interesting pumpkin crafts.
What young people haven’t come up with on this topic are royal carriages, Jack’s head for Halloween, which we all see in November, and many other characters and even figurines. As they say, who knows what.
Of course, you can build something simple, or, if you are older and like to make things, then something more difficult. In any case, ingenuity and imagination will definitely come in handy. For kindergarten and primary school children, I suggest making various kinds of paintings from pumpkin seeds. I saw one of these works on one site https://minyt-ka.ru/podelki-iz-tykvy.html, but there, among other things, there are also a lot of new and original ideas. In general, I recommend going in and taking a look, maybe you can pick something from there.
But what no exhibition takes place without is, of course, a carriage or crew. You can also put a prince or princess there. Or maybe you are in love with Cinderella, then make a gift for her.
We will need:
- pumpkin
- kebab sticks, wooden
- paints
- plasticine
- white tape
- wire
Stages:
1. So, create wheels from wire. Make them round, and use a circle of plasticine in the middle to secure the knitting needles.

2. Then make a plasticine edging to make the wheels more powerful.

3. And then wrap the four wheels with white tape. Now take paints and a brush, apply the desired color.
You could use electrical tape, and then you wouldn’t have to paint it, because it comes in different colors, for example, blue or black would be perfect for this purpose.

4. Wrap wooden sticks or any that you have with tape or tape.

5. Now the most labor-intensive process, and of course the creative one. Remove the pulp from the orange fruit. To do this, remove the top with the stalk. And make an entrance and windows on each side.

6. After that, all you have to do is pierce the bottom with a stick and put the wheels on, the car of your dreams is ready for work and defense).

You can go the other way, using a different method and making a craft using the carving technique.
For very young creators, you can easily and quickly recreate any cartoon character. For example, the Carousel channel often shows the cartoon “Thomas and His Friends.” Take this idea as a basis.
We will need:
- pumpkin, decorative - 1 pc.
- acrylic paints - blue
- brush, glue
- eyes
- black colored paper
- scissors
- toilet paper roll
Stages:
1. First cook the pumpkin, wash it and dry it. Then use a brush to paint it blue. This needs to be done in two stages; once the first layer has dried, apply acrylic paints again and let them dry completely.

2. Use scissors to cut out the face for the main character in the form of two circles. One should come out black, the other white, of different diameters. And take the eyes and glue the face to the white circle, you can draw a nose and eyebrows, or you can use colored paper and use it to do this work.


4. In general, you will get a chimney in which you place pieces of cotton wool. This is how it will look.

I also really liked the idea with the snail, bravo to the author! True, they also used zucchini here.

Everyone will certainly remember this option if you make your own lantern from a pumpkin. Take a look at these steps to help you create this little thing.

It really looks cool and stylish, you could even call it a candlestick. Inside, by the way, is an ordinary paraffin candle.
Or these interesting toys that you can simply apply acrylic paint in the shape of a face.


Toys and figurines made from decorative pumpkins for the holiday
I propose to get straight to the point and make the most beautiful gift or souvenir that will remind everyone of a candlestick. It will decorate any interior at school, and even at home it will last for a year.

With this master class you will definitely want to repeat it. The instructions are detailed. Follow all the steps and step by step you will come to success.
We will need:
- small pumpkin
- rhinestones
- glue moment or glue gun
- round candle
- alcohol
Stages:
1. Start by degreasing the surface, wash the pumpkin with water, dry it and then use a cotton pad to wipe the surface with alcohol. Remove the stalk with a knife and make a small indentation on both sides. You will remove the pulp and seeds from one, and a light will shine from the other.

2. The diameter of the hole will be the same as your candle, or a little larger. Paint the fruit with any acrylic paint that suits your taste. You can also draw various kinds of patterns and drawings. Since the holiday is dedicated to autumn, you can draw leaves and twigs.

2. Pour glue into the hole and stick a candle, let it dry completely. Then decorate with rhinestones or you can take sequins. Light it up and admire your creation.

Also, from any decorative small pumpkins you can easily make interesting compositions of all sorts of funny faces. Use scissors to cut out the imaginary eyes, nose and mouth and this is what you can get.

Well, you can also make horror stories or scarecrows in the form of spiders or some other insects. These are usually brought for Halloween.


And of course, autumn is characterized by foliage and flowers. So why not take advantage of this and create some bouquets. And by the way, last time I showed you in more detail a way to preserve fresh flowers for a long time in a pumpkin, for those who haven’t read it, go ahead.

And this is what can happen.

How fun and bright it is, pleasing to the eye. Such baskets or vases, I don’t even know what to call them more correctly, and you can get such wonderful compositions from them.

Here's another solar job.

In addition to all this, you can also make a wreath along the contour of the pumpkin, look how great it looks.

A wreath on the doors will look stylish. This idea belongs to the Americans.

It is also not necessary to decorate with greenery and flowers; you can use berries or pine cones, for example.

Well, the most creative work can probably be called painting with acrylic paints.


I also came across works in the carving style, but in my opinion this is difficult to do, only masters can do it. Pear-shaped or bottle gourds work well for this purpose.

But, nevertheless, if you set yourself a goal, then maybe you will get such a thing. The main thing is desire and perseverance. And to make it easier for you to master this technique, I picked up a video from the YouTube channel. So, go for it! What gorgeous roses the author came up with.
Autumn crafts from pumpkins for kindergarten
For our most radiant children, I found such a work on the Internet, in the form of a house and ghosts. Let older children make Jack's head, but little ones don't need these scary stories. Let them be kind.

We will need:

Stages:
1. Fold a regular leaf four times, as shown in this photo. Ask your child to draw a little man or something that looks like a ghost or a ghost. It should look like this.

2. Carefully cut out the parts with scissors. And then draw the eyes.

3. Dry the collected colorful leaves of different trees and paint them with acrylic paint, which you take in an aerosol can. Let them dry.
Advice! If there are no leaves and there is nowhere to get them, then you can cut them out of colored cardboard or paper.


5. Glue all prepared products onto the pumpkin house. But how to do that? And it’s easy and simple, take a piece of plasticine and roll it into a small ball, and glue the windows, door and ghosts onto it. Good luck!
I can also offer another option: put a pumpkin in a hat and make a nose out of a carrot. Nothing special, but kids will like it and will be very excited.
We will need:
- small pumpkins
- carrots or parsnips
- toothpicks
- black paper
- old glasses
- hat
- cutting board
- black felt-tip pen
Stages:
1. So, take a parsnip or carrot, wash the vegetable, and dry it with a towel. If you are making several heroes at once, then take two or three vegetables at once. Now cut off the tip of the carrot with a knife, but so that it is not short, but about 5-6 cm. Then stick it into the middle with a toothpick.

2. And combine the parsnips with the pumpkin so that you get a nose. Draw eyes and a mouth with a marker.

3. Now all that remains is to dress up the handsome men. Put on a hat, glasses and you can, in principle, tie bows or tie a scarf. Are you grandparents or someone else?

There are even simpler options. For example, you can create this Kopatych from the cartoon Smeshariki together with your child.

The jumping bunny and the cheerful fox will amuse and delight your baby.


Or such a funny and mischievous hedgehog, apply plasticine to the back and stick toothpicks or wooden sticks there.

Here is such a funny mushroom, made not only from pumpkin, but also from zucchini.

Here, in general, the hero is completely made of modeling dough, only a pumpkin is taken as a basis, or use the same plasticine. Put on a cap or hat and the character is ready.

If you find suitable components for the body, then, for example, you can make a kitten or puppy like this.

Beautiful ideas and new crafts on the theme of Autumn using pumpkins
The decoration direction has become quite popular now and as they say in fashion or trend. Remember how you painted using ordinary paper napkins, here it’s about the same. In general, here are a few ideas in video format, take note.
Draw ornaments, lace and create your own new images, don’t be like everyone else. Make the work unique.
I want to show one work in more detail along with a description. I took it from one site.
We will need:
- white spray paint
- PVA glue
- napkins
- pumpkins

Stages:
1. Well, wash the pumpkins and wipe them dry with a towel. Then paint over them with an aerosol so that they become white; if you leave them orange, then the napkin, which is subsequently glued to the product, may allow this bright color to pass through.

2. These are the little white pieces you will get, let them dry completely. Can be painted twice.

3. Cut strips from paper napkins. Ideally, they should be long enough to wrap around the vegetables.

4. Start gluing, apply glue to the surface of the pumpkin and attach a strip, and so on, until the product turns into a bright souvenir.

5. Decorate afterwards with any satin ribbons or other decor.

6. Design the second pumpkin differently, take other napkins with a different design.

In the same way, you can decorate small pumpkins that look like pears.
Wash the vegetables in running water, dry and degrease with alcohol or acetone.

Then paint the entire surface of the pumpkin with white paint. In the meantime, while the vegetable is drying, you can cut out all kinds of pictures from different napkins, these can be any animals, insects, birds and flowers, etc.

Well, then glue it with regular PVA using a brush.

After all your efforts, an excellent result awaits you. The background can also be made monochromatic by gluing the napkin you need. Decorate with an artificial branch with leaves.

Master class Pumpkin seed tree for children
Well, now let's talk about the most basic things. In schools and kindergartens, in principle, at any time of the year, there is always a place for activities that are directly related to natural materials. So, you know everything about a pumpkin, except for the pulp there are also seeds. So why not make something original out of them?
It can be in the form of a painting, or it can be directly in the form of a real tree, which is now fashionable to call topiary.
Let's start with the first option. You will need a whole bunch of well-dried pumpkin seeds, which you can color and dry in advance with paints of different colors. You can even fry the seeds in a frying pan if you want.
For this purpose, take gel food colors (or paint with regular paints). And then drop a couple of drops of paint into a plastic bag and add seeds, shake the bag. So, shake until they are completely colored.

Then place it on a plate and let the pieces dry. In the meantime, you can draw the outline of a tree on a piece of paper.

Then color it with felt-tip pens or paints, or you can also cut out such an image from colored paper and glue it.

All that remains now is to glue the foliage from the seeds with regular PVA. This is such a beauty.
 Or here's an option that might interest you.

Or perhaps such a drawing, as you can see here, the trunk is also made of natural material.

Here's an idea to note, in the shape of a cockerel). In case someone needs it.

Well, as I promised, we are moving on to the next version of work. This is topiary. By the way, this can be done for a teacher or educator on Teacher’s Day.

Take a piece of paper and roll it into a ball. Take any sheet size, you can take two or three, depending on what size the finished product will be. Using regular white or as it is also called masking tape, cover the bun. Insert a wooden stick, it can be a twig or, alternatively, a barbecue stick or a felt-tip pen case.

After that, apply a good layer of PVA glue directly over the tape. And immediately place the seeds so that they lie tightly to each other.

Wrap a wooden stick with a satin ribbon and tie a bow. You can also decorate the ball itself with beads. For an aesthetic and shiny look, coat the product with varnish.
But cover the jar in which the tree will stand with regular twine, just wrap it in a circle. In advance, applying PVA. Pour plaster or building mixture into the container, insert the creation and let the mixture harden completely. Place cotton wool or dry grass on top to hide the real material. This is such a charming flower.

Pumpkin souvenirs Gifts of autumn: quick and very beautiful
Well, in conclusion of everything, I would like to give many more ideas. Which you can implement and conquer your friends and classmates with them when autumn-themed events take place. We usually had fairs. And you?
Of course, I took the photos from the Internet and share my findings. Take vegetables and fruits, leaves, twigs, dried flowers and create! Let your imagination fly.


Well, that's all, with this I say goodbye to you. I hope you liked these ideas and you will certainly create something yourself at home, and then show it to everyone.
Good luck, creative success! Goodbye!
Best regards, Ekaterina
Pumpkin is a versatile vegetable that is difficult to spoil. Pumpkin crafts are incredibly durable and can be stored for a long time. The size of the vegetable gives even the little ones plenty of creative options.
The Halloween holiday came from the USA, first celebrating the end of the harvest. Unpretentious pumpkins were grown in large quantities to feed livestock, so there was an abundance of them. Even after being used at the festival, it was fed to animals.

Let's take a step-by-step master class on pumpkin crafts for beginners. You can choose the simplest one from all the options so that your child can complete the craft (toy).

First you need to collect pumpkins of different sizes, preferably with a tail. The normal stalk is considered to be approximately 6-10 cm. It is better to cut it with a knife (scissors). The easiest ones to make are pumpkin men.


Funny people
Dried pumpkin can be easily decorated with huge eyes. You can buy them or draw them separately and glue them. Cut a mouth out of red paper in a semicircle and glue it on.

Knit or find a small hat (knitted or made of straw or paper), put it on the vegetable, or wrap the person in a scarf. Buttons, a strap, ribbons, straws, bows will do - everything will be useful for creativity.

If you draw the mouth a little to the side, the face will be funnier, and the mustache will give it the age of a grandfather. You can draw large teeth or just 1 tooth for the entire jaw, etc.

Naughty family
People can be created from 2 pumpkins: 1 large (torso), 2 smaller (head). On the head: tie straw in a bun, put on a hat or a bow for a little girl. This will make a fun family. Draw eyes and mouth with a felt-tip pen, as in the picture. Some have a belt, others have a ribbon with buttons.

bear
If you combine several pumpkins of different sizes, you can create a real red bear.

Two large pumpkins - head and torso, 4 small ones - 2 arms/2 legs. Cut very small vegetables in half - 2 ears, 2 eyes, a little larger - a nose. Tie a colored scarf around your neck and the toy is ready.

Turtle
If you glue 4 cucumbers to the bottom of a pumpkin half, you get legs. The body will have to be slightly adjusted to fit the cucumbers. Make a hole for the head (with eyes) a little higher.
Animals
If you use a little imagination, you can create funny gnomes, bears, owls, etc. Without even cutting the vegetable, you can glue ordinary sunflower seeds in circles in 2 rows - these are eyes. You can make holes inside for the mouth and eyes.


Caterpillar
You can paint pumpkins in different colors, arrange them by height: from largest to smallest. Make the tails black. The result is a caterpillar, the body can be multi-colored or with an unusual pattern. It can become a spectacular fencing for paths or flower beds.

Halloween flashlight
Let's look at step-by-step instructions for making pumpkin crafts. You can quickly dry a pumpkin:
- Wash it thoroughly with regular soap.
- Carefully cut off the top of the vegetable with a knife; for a lantern or box, it is better to cut the flesh at an angle (with the tip of the knife inward).
- Carefully add the pulp so as not to damage the peel. It is better to leave at least 1.5-2 cm for the vessel.
- You can sand the inside of the pumpkin, then wipe it with alcohol.
- The vessel should dry for several hours in the fresh air.
- Place newspaper (paper) under the vegetable, change it periodically, it will absorb moisture.


You can place a small candle inside. Light will be visible through the cut holes. You can make a stencil of a funny or scary creature on paper in advance.

Casket
A painted dried pumpkin can serve as an excellent jewelry box. What is important is the correct shape of the vegetable so that the lid is beautiful and the fruit stands firmly on the bedside table or table.

Garden crafts
You can easily tell if a pumpkin is dry by its sound. The seeds inside “ring.” Dried small pumpkins can be used to make bird houses, nesting dolls, pears and other decorative crafts for the garden. They were painted to suit their taste.


Turkey
It’s easy to make a funny turkey, chicken, or other bird from a small pumpkin. To do this, you need to attach a bird's head to a whole pumpkin. You can glue a cardboard head to the cutting of a vegetable.

The bird's yellow (red) nose will be in the form of a droplet. The eyes are sold or you can make them yourself: 2 small black circles on white, slightly larger paper circles.

Maple leaves are perfect for a bushy ponytail. They need to be glued: the largest leaf in the center on the other side of the pumpkin, several others to the sides.

To make a sitting turkey, glue large legs in front of the head. The bird is ready.

Vase
A homemade vase for fresh flowers from the garden looks interesting. It will be a beautiful decoration for the autumn holiday.


The pumpkin needs to be quite large in size, 2 times larger than the selected glass jar (0.5-0.7 l). The inside of the pumpkin should be carefully cut out.

We make a wide neck to place a jar of water inside the vegetable for wildflowers. There are always a lot of asters, cornflowers, daisies and other flowers in the garden.


The combination of a red pumpkin with branches of lilac, dark burgundy asters and tall branches with dill seeds will be especially impressive. These shades go well together; you can create a background below – wide green leaves. This vase is a real table decoration.

We bring to your attention original photos of pumpkin crafts.

Photos of pumpkin crafts


Today I will show you how to make the funniest, most beautiful and brightest autumn crafts! You and I have already made miracles from vegetables and fruits. But pumpkin should be highlighted as a separate topic. She deserved it! The color, shape, and density of the fruit make it possible to prepare many interesting things from the vegetable. By the way, perhaps you would like to share your work? Send photos and tell us how you took them. So, together, we will put together a separate collection of crafts. Feel free to share the link to this build with your friends and subscribers on social networks!
There is another plus for pumpkin! You can make works from this material all year round, both for autumn holidays, such as Halloween, and for winter holidays, such as New Year. We can decorate everyday life with bright colors if we make an original vase or lamp.
Crafts on the theme “Autumn” can be completely different, as simple as with a mono-pattern (carved on the skin of a vegetable or by making an applique). And there are also complex, but incredibly beautiful compositions.
Application Autumn.

- We collect different autumn leaves or cut them out of paper.
- Paint the pumpkin the base color. It is advisable to make it darker than the pattern.
- We paint each leaf in autumn red-orange-yellow tones.
- Glue the leaves to create an autumn pattern.
- You can cut out figures in the form of cones or acorns from the leaves and stick them between the leaves.
Decoupage.
Another great way to decorate a vegetable is to cover it with paper napkins - this will be decoupage.

For example, we paste on cut out motifs.

Another option for those who love shiny decor: paint part of the vegetable, and spread the other part with glue and sprinkle with glitter.

The pumpkin can be painted with spray paints. Completely, or covering part of the vegetable with adhesive tape, in order to get a geometric pattern. You can also paint with a brush or acrylic paints.


And what delicious donuts they make.

You can use stencils with various patterns and apply paint with a sponge or use aerosols.

The easiest option is to decorate the pumpkin using colorful tape. You just need to stock up on colorful tapes. They are sold in craft stores, office supply stores and stores that sell gift wrapping supplies.

Turkey baby.

- Cut out the head, eyes, beak, beard and paws from cardboard or felt.
- Glue variegated autumn leaves from a maple (or other tree) as a tail to the back of the pumpkin.
- We glue the paws on the bottom front.
- On top (towards the tail of the pumpkin) we place the head with a beak and eyes. And under his head - a beard.

This craft using leaves is simple, but looks original.
Forest animals.
We paint it in the main color, add eyes, ears, and a tail from felt, foamiran or cardboard. And we get an owl, a raccoon or a fox.

Cats.
The shape of the fruit, which can be so different in pumpkins, can tell you what to depict. For example, funny cats.

Or these wonderful cats. You can fasten the head to the body using sharp skewers or stiff wire.


Autumn crafts from pumpkins on the theme of gifts of autumn for kindergarten
Making a craft from a material like pumpkin is very interesting! You can come up with such stories!!! At least from a fairy tale. For example, this work!

"Turnip".

- We make the head separately. As I understand it, this is the grandfather who pulls the turnip. We make hair, eyebrows and mustaches from paper or straw. We draw the mouth and eyes. But the nose is half a potato. We place a hat on our head.
- Cut the turnips in half. We need half with tops. We place half of the turnip on brown cloth or paper so that it looks as if the turnip was half taken out of the ground.
- A mouse is running nearby. It can be made from beetroot, carrots or potatoes.
- There is a basket next to grandfather. Peel half a large cucumber or zucchini. Remove the insides of the vegetable. Cut off the bottom for stability. We put a circle of bell pepper on the zucchini. Fill the basket with cherry tomatoes and a bunch of green onions.
- If desired, you can build a fence.
Difficult? Nothing like this. Just a lot of details. And they are all made from different vegetables and fruits.
Animals.


You can also make a house for animals or dolls.

Master class on how to make a vase and ekibana with pumpkin and flowers
It is very difficult to choose what to show you. There is always more work than can be described. Therefore, I decided to very briefly talk about several crafts. Briefly, but so that you can understand and easily repeat.
Ekibana.

- In a large flower pot (or in a small bucket) we place different autumn flowers (preferably, if possible, natural, not artificial).
- We coat a small pumpkin with varnish. Place it on a bamboo skewer and place it between the flowers.
Vase or flowerpot.

- Where the vegetable has a tail, cut a hole. We clean it from the insides literally to the walls.
- Place a vase of water in the middle and fill it with flowers. But you can put a whole pot of flowers in a pumpkin.

Ekibana "Face".

- We have already looked at how to make a vase. Cut out a circle, take out the insides and insert a jar of water.
- By the way, instead of a jar, you can put a sponge moistened with water at the bottom.
- For a real Ekiban, the bouquet is not important, but the plot is important. Therefore, we choose twigs of barberry and rose hips, painted in bright colors in autumn.
- We use two empty snail “houses” as eyes.
- We draw “pupils” on the snails. Making the mouth.
It turns out to be a real ekibana, or a bouquet with meaning and plot!
And here is also an interesting option made from a small pumpkin.

If you use fresh flowers, use a floral sponge to prevent them from wilting.

How to make a carriage out of a pumpkin with your own hands
It turns out that not only Cinderella’s godmother can do such a miracle as turning a vegetable into a carriage, but you and me too! Once again, a huge number of options await you!

With dolls.

- If you have dolls, you can use them to create crafts. You just have to dress up Barbie, because she’s almost a Princess!
- We make 3 holes. One large, two smaller, they are located on the sides of the large hole.
- We cover small window openings along the edging with tape.
- We decorate the carriage doors with curtains and rhinestones.
- Glue a crown on top of the carriage.
White carriage.

- For this and similar carriages, you need a template. Therefore, we immediately draw on paper what kind of doors and windows you want (taking into account the size and shape).
- Using a template, cut holes on both sides.
- We make wheels from wire and attach them to the pumpkin. You can wrap them with foil or rope and cover them with paint.
- We apply the pattern.
It would be good to find small horses, and then we can hope that the carriage will move.
Wheels can be made from cardboard, or wire, or small vegetables.

Here are some more options and ideas.


What kind of craft can be made from a pumpkin for the autumn holiday?
I myself know how unexpected it is to always hear from a teacher or teacher that you need to bring autumn crafts from vegetables or fruits. Because you need to take part in an exhibition on the theme “Autumn”. And the concern begins for moms and dads: they think about what they can do that will be quick, beautiful and simple.
 Author https://www.instagram.com/p/BMBmuOhgXat/?utm_source=ig_web_copy_link
 Vegetables and fruits are taken from the cabinets. Each fruit undergoes careful selection, and the head of the family goes to the neighbors or simply looks for a suitable idea on the Internet.

In general, you definitely won’t be bored. Save the ideas I found in a collection, they might come in handy. The hands of an unknown little animal made of felt - you can outline children's hands. And the eyes are purchased, but you can make them from felt and attach them to sticks, which will have to be installed so that the lid is slightly open.

To lift your spirits in gloomy autumn, you can make such cute little people - snowmen.

Or cute cats.

Kindergarten is a place for creativity. This baby can be made from a pumpkin, a pacifier and a hat.


How do you like this hoof? His face, as you can see, is made of paper, but you can draw it directly on the vegetable with paints. And don't forget to decorate your hat.

A pumpkin house for gnomes is also quick and easy to make, and looks beautiful, especially if you decorate the adjacent lawn.

And here is a pumpkin house for Mole. You will need a small pumpkin on which you need to draw a window and an entrance with a pen, then cut out the holes with a knife. Use a spoon to scoop out all the insides.

We make tiles from dried birch leaves (attach with hot glue). The door and window are made of twigs, also attached with hot glue. 
You can decorate the Christmas tree-cone with pompoms or plasticine balls.

I also liked the house and the palm tree.

And this option is straight out of a fairy tale about a tower house, right?

Or you can do a painting. YOU WILL NEED:
- Pumpkin
- PVA glue
- Sequins
- Acrylic paints
- Tassels
We paint the vegetable white or whatever color you have. Apply a pattern with PVA glue using a brush and generously sprinkle with glitter. When the glue dries, you can attach additional glitter with PVA glue.

Here's how beautifully you can decorate a vegetable with leaves. It is best to glue on PVA.

Using the decoupage technique you can also make a beautiful decorative pumpkin. To do this, glue the napkins you like (only one top layer) onto PVA. You can press the napkins on top with a damp kitchen sponge. This way the drawing will stick well and will look as if it was drawn.

If you don’t want monsters and monsters, you can do something cute and positive. For example, little fox, what do you think of the idea? We cut out parts from colored cardboard and paper and glue them using a hot gun. True, hot glue does not stick well to vegetables. So, if you decide to repeat it, it’s better to use tape, or more hot glue.

Here are some cool cartoons. This is how you can make all round characters, for example Smeshariki or Angry Birds.

Here's a real pirate!

It seems to me that no vegetable/fruit conveys the atmosphere of autumn like pumpkin. Children can be entrusted with the eyes of owls, because the goal of this task is not to strain parents at night, but to bring them closer to their children through joint creativity.
 Author https://www.instagram.com/p/BovkHAsBmxY/?utm_source=ig_web_copy_link
Basket.
The vase that we made a little earlier and the basket differ in that one has a hole on top, while the other has a hole on the side.
Of course, you can make even side cuts on both sides of the pumpkin. That is, I’ll explain this point a little more clearly: we cut out semicircles on the sides. At the same time, the lower side of the semicircle is flat, and the top is an arc. If this is done on both sides, a thin strip will remain on top, reminiscent of a basket handle.

If you want to make the cuts uneven, as in the picture, it is better to make a template on paper and transfer it to the vegetable on both sides.

We made a hole, and now we take out everything from inside the pumpkin.

We cleaned the insides and placed a sponge moistened with water inside. We stick autumn flowers and leaves into the sponge.
But you can put fruits and vegetables in the basket.

How do you like the idea of making a summer cottage with a house inside, or a forest and a wolf howling at the moon?

Or you can make a puppet theater.


DIY jack-o'-lantern (Jack-o'-lantern in Minecraft)
According to legend, the Irishman Jack, who led a very riotous and idle lifestyle after death, could not get to either heaven or hell and wandered between worlds with a lamp in the form of a pumpkin with a candle.
In Minecraft, the authors of the game drew such a lamp. Moreover, unlike the torch in the game, it can be placed under water and it will not go out. This makes it one of the best sources of underwater lighting. Unfortunately, we will not be able to purchase a cube-shaped vegetable. Therefore, we will have to go a different way. We will make the pattern almost the same as in Minecraft, i.e., pixelated.

- We cut out the eyes square.
- We cut out the mouth from a row of squares: the outer squares look down, the square in the middle is at the top.
It turned out to be a scarecrow! Don't forget to place a candle in the middle of this head.
By the way, if you have a thin skin, you can cut out both the eyes and the mouth from more pixels!!!

How to cut a lamp correctly:
- Select a vegetable, wash it well and dry it. Cut off the “lid” and carefully remove seeds and fibers through the hole. Try to get rid of the pulp as much as possible, so your craft will last longer.
- Degrease one side on which you plan to cut out the applique. Draw a face with a marker. It will be easier and more accurate to print the desired design on a sheet of paper and secure it to the vegetable using safety needles and cut out everything you need using the finished template. If you did not use a template, but drew the outline of the design on the pumpkin with a marker, then wipe the traces of the marker with alcohol, giving the craft a neat look.
- After you have cut out the face, leave the vegetable to dry overnight. Then complete the composition by inserting a candle or other light source inside.
I love patterned lamps. Holes are easy to make with a drill.

How to make a pumpkin head for Halloween
To get a head, you need to take a very ripe fruit. Then it will be easier to cut, and the craft will dry quickly, which means it will last longer and “delight”)

- First, prepare a paper template, the design of which is transferred to the pumpkin.
- When we have outlined from the template where and what the holes will be, we boldly cut them out.
Remember, the expression of the “face” can be different, from sinister to sweetly smiling! I am not a supporter of this “holiday” and do not want it to enter Russian culture. Since this is not a holiday at all, and every year on this day many children disappear. Although for some reason the media and educational institutions diligently promote this tradition. And there is a demand for carving, even in kindergartens they give such a task. Therefore, I will show several interesting and not creepy options.

I will also show you the simplest option, which can be cut out even without a template.
Cat's head.

- Cut out round or triangular (as it turns out) eyes.
- Under the eyes we cut out a nose, a strip from it downwards and two more to the sides, the edges of which are slightly raised.
- We make small cuts - mustaches.
- We attach the ears to wooden skewers or toothpicks.
I don’t even know whether such a pumpkin head will scare or amuse me. What do you think?

You can create something like Winnie the Pooh with a barrel of honey. Well, that’s if you have absolutely nowhere to put the fruits).

Probably the easiest way to make autumn souvenirs from such a sunny vegetable is to draw faces on it and decorate it with additional attributes. Look how cool the boy and girl turned out.

Another option is to paint the head with gouache or acrylic. You can even eat such a pumpkin after the holiday. What will come of this? Look!

So, the collection is over and is waiting for your additions.

In the meantime, you can subscribe to know about every new article!