How to make a home antenna. Options for making a TV antenna with your own hands
Humanity lives in the digital age. Television is switching to digital signal transmission. The peculiarity of digital broadcasting is that it is conducted in the decimeter range.
Transmitting stations have low power of the transmitted encoded signal. Therefore, to receive the signal and display the image on televisions that are remote from the station, a receiving digital antenna is required. If you don’t know how to make an antenna for a TV, then the answer is simple: you can assemble it with your own hands from scrap materials in literally one hour.
Types of receiving antennas
To reliably receive a signal from a television tower, there are many different television antennas. They differ in shape and range of receiving frequencies.
Antennas can be divided into several main types:

Currently, the vast majority of television signals are transmitted using digital coding. Broadcasting is carried out in the UHF range. The format of such transmission is called DVB - T2.
Theoretically, this signal can be received on some old universal antennas, which is what marketers took advantage of, calling them DVB - T. In order to distinguish the new narrow-profile decimeter antennas from the old classic ones, the number “2” was added at the end of the abbreviation.
Digital TV Basics
Television transmitters transmit digital signals over relatively short distances. The transmission range does not exceed sixty kilometers and is limited by the line of sight of the emitter from the television tower.
For these distances, a low-power signal is sufficient. But the design of signal-receiving antennas must meet certain requirements:

The digital signal has its own unique feature. You can either catch him or you can't. He has no middle position.
If a digital signal is one and a half decibels higher than noise, then its reception is always high-quality. The signal may disappear if the cable is damaged or the phase is distorted in the transmitted section. In this case, even if the signal is strong, the image breaks up into small squares.
In order to catch UHF broadcasts, an appropriate antenna is required. According to theory, any antenna will do, but in practice there are nuances.
There are several types of antennas for DMV reception offered by manufacturers:

It’s not at all difficult to make your own antenna for digital TV.
Assembling antennas at home
The shape of the bends should be as smooth as possible. Basic phase distortion appear due to dips and sudden emissions.
Homemade digital antennas are frequency independent. They do not have the best characteristics, but are easy to assemble and require little time and money for construction. Suitable for working in noise-free air at a short distance to the repeater.
Reception of signal to beer cans
You can construct a simple all-wave antenna from ordinary beer cans. Of course, it is inferior to industrial designs and is not always able to provide a stable signal, but it serves its purpose well. This device receives at least fifteen channels as a minimum.
To assemble this structure, you will need:

 After washing and drying the metal cans, DVB - T2, you can begin to assemble the antenna.
Carefully, so as not to deform, pierce the hole in the upper parts of both cans. A screwdriver is suitable for this procedure. With its help, self-tapping screws are screwed into the prepared holes.
Then take one end of the cable RK75 and at a distance of ten to twelve centimeters, using a knife, it is cleared from the upper shell. In this case, the copper braid should not be damaged. The braid is twisted into a pigtail. The aluminum screen is removed.
Then the polyethylene shell is cut off by six to seven centimeters and the central core is exposed.
The resulting pigtail and central core are screwed to the self-tapping screws. If you have a soldering iron and the skills to use it, then it is best to solder parts of the wire to the cans.
The cans are secured sequentially, using tape, along a plywood board or other base that is at hand. The distance between the banks should be seven and a half centimeters.
To complete the work, a plug is attached to the second end of the cable.
To do this, the end of the cable is stripped and the central core is passed through the hole in one of the plug halves. The cable braid is attached to the plug body. One half is screwed onto the other and as a result we get a plug , ready to go.
All that remains is to connect it to the antenna input of the TV and place the antenna in the right place where the quality of the received signal will be good.
If the created structure is placed outdoors in the open air, it is necessary to protect the device from moisture and dampness. For these purposes, you can use plastic bottles in which the bottom and necks are cut off. The metal parts of the antenna are located inside them.
The resulting model is easy to “customize” by rotating it in space and simply moving around the apartment, balcony or summer cottage.
Zigzag antenna Kharchenko
This zigzag broadband design was invented by engineer K.P. Kharchenko in 1961. It was perfect for receiving a digital signal and received wide, well-deserved recognition. People call it the “eight” and the complete assembly looks like two diamonds, located one above the other.
When making a figure eight you will need:
- Copper wire with a diameter of 3-5 millimeters.
- Coaxial antenna cable 3-5 meters long and 75 Ohm resistance.
- Soldering iron with solder.
- Scotch tape or tape.
- Plug.
- Bolts for assembly.
- Base: sheet of plywood or plastic.
 At the first stage, we assemble the antenna frame. We take a wire 109 centimeters long and bend it into a frame. The frame has the shape of two consecutive rhombuses with sides equal to thirteen and a half centimeters. One centimeter will remain. A loop is made from it that holds the wire together. The ends of the frame are soldered to each other and it thus turns into a closed circuit.
After this, the coaxial cable is stripped. The cable screen is rolled into a tight rod and soldered to the frame wire at the point where the diamonds meet. The central cable rod is also soldered in the central part of the frame. The core and braid should not touch each other.
The second end of the cable is connected to the plug. The plug at the soldering points is first wiped with alcohol and treated with sandpaper. The monocore is soldered to the central output of the plug, and the twisted braid is soldered to the side.
If the frame will be used outdoors, the future plywood base can be painted or varnished. Soldering points can be wrapped with tape or tape. But this is not the best option, since the adhesive tape may unravel over time. If you put plastic tubes of a suitable diameter on the wire before soldering, then at the end of the work the tubes are pulled over the soldered areas and reliably protect the frame. After which the frame is installed on the prepared base.
The digital antenna is assembled with your own hands and is ready for use.
If desired, you can assemble an antenna tuned to a specific wavelength. To do this, you need to calculate the length of the square. This is not difficult: the wavelength of the desired signal is divided by four. The result is the desired length of the frame diamond.
The simplest cable antenna
It requires one television cable with a resistance of 75 Ohms. The required cable length is calculated based on the required digital broadcast frequency. Its value in megahertz is divided by 7500 and the resulting amount is rounded.
The resulting value is the desired cable length.
 After this, one end of the cable is cleared of external insulation and inserted into the antenna connector of the TV. A mark is made on the cable from two centimeters after the connector.
It is from this mark that the required cable length is measured. Use pliers to pinch off the excess part.
After this, you need to return to the mark on the cable. Only the insulated rod is left in this place, and the outer braid is removed. The cleaned part is bent at an angle of ninety degrees.
All is ready. The TV can be tuned with a new antenna.
Installation safety precautions
For reliable operation of such antennas, it is necessary to place them above the ground at a level of 7-10 meters. Therefore, during installation it is necessary to strictly observe safety regulations:
- Do not install the structure in heavy rain or heavy fog.
- It is not advisable to go upstairs alone, especially in icy, cold, or snowy conditions.
- If it is necessary to climb a shaky structure or high-altitude work is carried out in dangerous places, then a fixed mounting belt is required.
After proper installation, homemade antennas work no worse than factory ones, with significant budget savings.
In the process of arranging a summer cottage, each owner tries to turn it into the most comfortable area not only for gardening, but also for recreation, and often for seasonal living. To realize this, it is enough to install the usual communications on the site - water supply, heating and electricity, as well as arrange everyday life, creating comfort in the house. Despite the widespread use of the Internet, an integral attribute and symbol of comfort (especially for older people) is still a television, the adequate operation of which is ensured by an antenna. If you have at least once asked the question: “What to do if, due to the high cost of such devices, the budget does not allow for the purchase of an antenna for the dacha?” and “What to do if the outdoor antenna of your dacha suddenly fails?”, this article will be useful to you.
Fundamentals of radio electronics and organization of TV broadcasting
Some time ago, when factory antennas were a scarce commodity, and their service life left much to be desired, interest arose in such self-made devices. It continues to this day, despite the fact that the market situation has radically changed. The development of innovative technologies has contributed to a radical change in the conditions for receiving a TV signal, but the principle of manufacturing and operation of antennas has not changed significantly, and is unlikely to change, since the main feature of antennas is still the ability to interact with a signal that propagates over the air.

Changes that have occurred in the field of TV broadcasting:
- Almost the entire volume of TV broadcasting is carried out in the UHF range, which makes it possible not only to simplify, but also to reduce the cost of the antenna-feeder system of transmitting stations;
- The territorial boundaries of the coverage of television sensors have expanded significantly, the signal of which is distributed in almost every corner of a more or less populated territory;
- The conditions for the propagation of radio waves in urban areas built up with reinforced concrete high-rise buildings have changed. Despite the fact that industrial interference does not affect the quality of TV broadcasting, multi-story structures act as mirrors, repeatedly reflecting even a strong signal until it is completely attenuated;

Requirements for antennas for summer cottages
- To catch a television signal in any terrain, you need to know that the determining factor in the quality of signal reception is not the protective and directional coefficients of the antenna, but its own gain. This indicates that the antenna viewing the air rather than receiving a small range of power creates a small margin of power range;
- When installing an outdoor antenna for your dacha yourself, do not resort to engineering tricks, which will allow you to preserve its electrical parameters in their natural form. Antennas whose electrical parameters are naturally preserved are called band antennas;
- The clarity of the signal received by the antenna is greatly influenced by its amplitude-frequency characteristic. The smoother it is, the stronger the received signal will be. Significant overshoots and dips contribute to phase distortion;
- The matching of the television antenna and cable must be carried out in the operating range, without the use of auxiliary matching and balancing devices.

TV antenna efficiency
The last three requirements are determined by the principle of receiving digital signals. The range of tuned antennas, from a theoretical point of view, operating at the same frequency, can be expanded artificially, thanks to which they will capture from the 21st to the 40th channel. To do this, they must be agreed upon with the feeder. However, it is used in conjunction with matching and balancing devices, some of which can significantly absorb the signal (ferrite), or disrupt the phase response at the edges of the range (tuned). This will lead to deterioration in the reception of a digital signal by an antenna that effectively operates on analogue.
Types of television antennas: brief description
Taking into account the above, there are a large number of varieties of television antennas, some of which are available for self-production. They will be discussed in this article and, after familiarizing yourself with their characteristics, you can decide which antenna to choose for your dacha.
- All-wave (frequency-dependent) antenna- a budget option that is easy and quick to install. Despite the fact that it cannot boast of high parameters, outside of urban areas, where the air is quite clean, it will be able to effectively receive a digital or powerful analog signal, provided there is a nearby television center;
- Log-periodic band antenna, which is often compared to a fishing net that sorts prey during the capture process, is also characterized by ease of manufacture. Ideally matching the feeder throughout the entire range, it retains its parameters unchanged. Due to average technical parameters, a log-periodic antenna will provide effective signal reception outside urban areas, and in the city it can be used as an indoor antenna;
- UHF zigzag antenna- a significantly simplified modification of a zigzag or Z-antenna, operating under almost any signal reception conditions.

UHF zigzag antenna for a summer residence
Subtleties of making TV antennas for a summer residence
- Remember that the structural elements of the antenna that conduct the useful signal currents must, in all cases without exception, be connected by soldering or welding. Experts recommend not to neglect this recommendation, since the electrical contacts in any assembly placed outdoors will soon oxidize, which will lead to a deterioration in the antenna’s parameters until it is completely unusable.
- If you prefer a homemade antenna for a TV at the dacha, the desire to achieve perfect contacts will be unnecessary - even if they corrode, this will require a fairly long period of time. However, to ensure sufficiently clean and, at the same time, stable reception, it is necessary to minimize the number of connections in the antenna design.
- For the braiding and production of coaxial cable cores, it is currently customary to use inexpensive alloys that are resistant to corrosion. Unlike traditionally used copper, they are difficult to solder, and therefore, when working with them, it is necessary to keep the entire soldering process under control to prevent burning of the cable.

Coaxial (antenna) cable
It is recommended to manufacture a cable antenna and connect it using the following materials and tools:
- Soldering iron, the power of which does not exceed 40 W;
- Flux paste, which successfully replaces rosin;
- Low-melting solder.

Important! In the process of manufacturing outdoor television antennas for a summer residence, experts recommend abandoning the use of aluminum wire, as it will soon oxidize and corrode, as a result of which it will lose its ability to conduct electric current. The most suitable materials recommended for the manufacture of outdoor television antennas are copper or cheaper brass.

Important! Keep in mind that one of the important parameters of a television antenna, which determines the quality of its operation, is the reception area. To ensure effective signal reception, it must be maximum. To achieve this, several rods made of the same metal are symmetrically attached to the screen-frame designed to filter out noise and ethereal debris.
- If you are faced with the problem of a weak and dirty signal, to solve it you need to purchase an amplifier for the TV antenna in the country, connected directly to the antenna. To ensure normal reception power, place the antenna on the roof of the country house and point it towards the nearest television tower.

Making a frequency-independent antenna from beer cans with your own hands
The described version of a homemade television antenna is one of the simplest and fastest to manufacture. The maximum number of channels available for viewing in this case is 7, but it may vary depending on the region.
Important! The simplest version of an all-wave antenna is a design consisting of two metal plates, which are mounted on a wooden strip and connected by several turns of copper wire of various diameters. When installing such an antenna, experts recommend observing certain parameters, namely, the width of the antenna is equal to its height, and the opening angle of the panels is 90 degrees. To achieve optimal antenna performance, it is enough to ensure that the wire is securely fastened at the zero potential point. In this case, it will not be possible to solder it.

To make a frequency-independent antenna from beer cans, you will need the following materials and tools:
- 2 small self-tapping screws, called “bugs” in professional circles;
- 2 beer cans, previously washed and dried;
- Television cable 3 to 5 meters long (can be taken from a device that has failed);
- Soldering iron and tin (recommended for use, as it improves the quality of fixing contacts, but you can do without it);
- Wooden trempel;
- Screwdriver;
- Scotch tape or tape.
Almost all of the materials listed can be found in every home, so there will be no difficulties in the process of preparing them, and therefore you can immediately get down to business.
Technology for making a homemade antenna from beer cans:
- Prepare the cable and, by making a cut at a distance of 10 cm from the edge, remove part of the top insulating layer, which will allow access to the screen. After that, roll it into one turn. Then you need to cut off the middle insulating layer, exposing the thin copper core of the cable. There should be a regular plug at the second end of the conductor;

- Prepare jars that will act as signal receivers. Usually there are no difficulties with them, since the main thing is the selection of the optimal dimensions of beer containers. Experts recommend giving preference to liter jars, but if they are not available, you can use 0.5 and 0.75 liter containers, which will also do the job perfectly;
- The next stage is making contacts. It involves attaching a twisted cable to one of the cans. The copper core itself is brought to the opposite bank. Secure them using a screwdriver and self-tapping screws. To improve the quality of signal transmission, thereby making the quality of the picture on the screen higher, experts recommend fixing the wire not only with self-tapping screws, but also with a soldering iron, with which you need to “grab” them a little;

- After you have prepared the signal receiver, proceed to assembling the supporting structure, which is used as a trempel. Using electrical tape, secure the containers to the trempel (in accordance with the picture shown). When securing metal containers, remember that they must be strictly in one straight line, otherwise the signal receiver will not work effectively;

- The final stage is setting up the antenna for the TV. During this process, it is recommended to experiment with the optimal distance between beer cans, as well as find the most effective place to hang the antenna in which it will most effectively catch the signal.
- After reading the instructions presented, you have probably come to the conclusion that making and installing an antenna at your dacha is a fairly simple and quick process. The optimal distance between the ends of the cans, according to experts, should be 75 mm, and the best location is near the window. In exceptional cases, the distance between banks can be reduced or increased.
Making an antenna for a summer house with a wire amplifier
In this section we will talk about another option for making antennas, which is suitable for use in the country or in the village.
To implement this idea, prepare the following materials and tools:
- Two pieces of copper wire 1.8 m long;
- A piece of metal or wood plate measuring 15 x 15 cm;
- Amplifier (you can use any one, even from an old device);
- Welding machine or electric drill with a set of drills;
- TV cable of the required length;
- A section of iron pipe;
- Small bolts;
- Hammer.
Technology for manufacturing a television antenna from copper wire:
- The first stage is preparing the catcher. To make it, it is necessary to bend the copper wire so that it takes the shape of a rhombus, all sides of which are 45 cm. According to craftsmen who have experience in making such devices, this size is the most suitable for the effective operation of the device;

- Prepare the plate and fix the wire to it. To do this, you need to flatten the wires at the fastening points, drill holes and tighten the bolts. If you have a welding machine, you will complete the task much faster, since in this case you only need to grab the resulting signal catchers to the plate (if it is made of metal). At the same stage, the amplifier is connected (the connection principle is shown in the photo below);

- Connect the cable - to do this, simply insert the plug into the connector;
- The next stage is making the mast. To do this, use an iron pipe of suitable height, which is firmly dug into the ground. Having installed the mast, start setting up the channels.

Important! In the presented photo you can see that the copper wire, reflector, and amplifier are coated with paint, which will protect the structure from the effects of adverse external factors and prevent the development of corrosion processes, significantly extending the service life of a home-made television antenna.
Universal television antenna: manufacturing procedure
After studying the instructions presented below, you can make a powerful antenna for a TV from scrap materials, which can be used not only in the country, but also in the apartment.
To do this, prepare the following materials and tools:
- Copper wire 4 meters long and 4 square meters in cross section. mm;
- Board of any thickness, 7 cm wide and 55 cm long;
- Wood screws;
- Soldering iron;
- Screwdriver;
- Ruler or tape measure;
- A simple pencil.
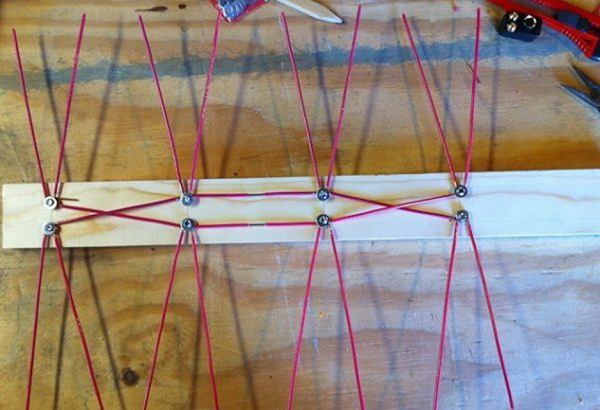
According to the drawing below, drill holes in the board;

Transfer the data indicated in the drawing onto the board and drill holes in the required places;

Cut the copper wire into 8 parts, the length of each of which will be 37.5 cm;
In the middle part of each of the resulting wire sections, remove the insulating layer, as shown in the figure;

Cut two more pieces of copper wire 22 cm long and conditionally divide them into 3 equal parts and remove the insulating layer at the bend points in the same way;

Bend the wire in the prepared (exposed) areas. Please note that the distance between the ends of the wire, bent in half, should be 7.5 cm, since this value is optimal for receiving a signal with a television antenna made independently.

Having prepared a homemade structure, attach a plug to it, and then attach a television cable to it. This stage was the last in the manufacture of the antenna; having completed it, you can look for the most suitable place to install it.

By following the proposed instructions, you can quickly make the simplest designs of television antennas from available materials, without spending the whole evening. In addition to the options presented, there are other types of antennas that you can make yourself. These include wave, frame, and even the simplest satellite antennas. However, no matter which option you choose, you need to make a competent calculation of the parameters. You can familiarize yourself with the calculation methodology in specialized technical literature.
In the days of huge tube TVs, a good antenna for high-quality analogue television reception was in short supply. Those that could be bought in stores were not of high quality. Therefore, people made UHF television antennas with their own hands. Today, many are interested in homemade devices. And even when digital technologies are everywhere, this interest does not fade.
Digital era
This era also affected television. Today T2 broadcasting is developing especially widely. It has its own characteristics. In those places where the signal level is slightly higher than the interference, fairly high-quality reception is obtained. There is simply no further signal. A digital signal does not care about interference, however, in a situation where there is a cable mismatch or various phase distortions almost anywhere in the transmitting or receiving path, the picture can appear in squares even with a strong signal level.
There have been other changes in modern television. Thus, all broadcasting is carried out in the UHF range, the transmitters have good coverage. The conditions under which radio waves travel through cities have changed greatly.
Antenna parameters
Before starting manufacturing, you need to determine some parameters of these structures. They, of course, require in-depth knowledge in various fields of mathematics, as well as the laws of electrodynamics.
So, the gain is the ratio of the power at the input of the reference system to the power at the input of the antenna used. All this will work if each of the antennas creates values of intensity and flux density with the same parameters. The value of this coefficient is dimensionless.
Directional coefficient is the ratio of the field strength created by the antenna to the field strength in any direction.

It is necessary to remember that parameters such as KU and LPC are not interrelated. There is a UHF antenna for digital TV, which has a very high directivity. However, its gain is small. These structures are directed into the distance. Highly directional designs also exist. Here it comes in combination with a very powerful gain level.
Today you don’t have to look for formulas, but use special programs. They already take into account all the necessary parameters. All you have to do is enter some conditions - and you will receive a complete calculation of the UHF antenna, so that you can then assemble it.
Manufacturing nuances
Any structural element in which signal currents flow must be connected using a soldering iron or welding machine. Such a node, if it is located in the open air, suffers from contact failure. As a result, various antenna parameters and reception levels can become significantly worse.
This is especially true for points with zero potentials. According to experts, voltage can be observed in them, as well as current antinodes. To be more precise, this is the maximum current value. Is it available at zero voltages? No wonder.
Such places are best made of solid metal. Creeping currents are unlikely to affect the picture if the connections are made by welding. However, due to their presence, the signal may disappear.
How and what to solder with?
It is not very easy to make a UHF antenna with your own hands. This involves working with a soldering iron. Modern television cable manufacturers no longer make it copper. Now there is an inexpensive alloy that is resistant to corrosion. These materials are difficult to solder. And if you heat them long enough, there is a risk of burning out the cable.

Experts recommend using low-power soldering irons, low-melting solders, and fluxes. Don't skimp on paste when soldering. Solder will lie correctly only if it is under a layer of boiling flux.
Catching T2
In order to enjoy digital television, it is enough to purchase a special tuner. But it does not have a built-in antenna. And those that are offered as digital specials are too expensive and pointless.
Now we will learn how to catch T2 on a completely homemade design. A homemade UHF antenna is simple, cheap, and of high quality. Try it yourself.
The simplest antenna
To assemble this structure, you don’t even need to go to the store. To make it, a regular antenna cable is enough. You need 530 mm of wire for the ring and 175 mm from which the loop will be made.

The TV antenna itself is a ring of cable. The ends need to be stripped and then connected to the loop. And to the latter you need to solder a cable that connects to the T2 tuner. So, on the ring, the screen and the central core are connected to the loop screens. At the latter, the central cores are also connected. And the cable to the tuner is soldered as standard to the screen and central core.
So we got a UHF antenna, made with our own hands. Its design turned out to be very cheap and practical. And it works no worse than expensive store-bought options. It needs to be fixed to plywood or plexiglass. Construction clamps are perfect for this.
"People's" antenna
This design is a disk made of aluminum. The outer diameter of the element should be 365 mm, and the inner diameter should be 170 mm. The disc should have a thickness of 1 mm. First you need to make a cut in the disk (10 mm wide). In the place where the cut was made, a printed circuit board made of PCB should be installed. It should be 1 mm thick.

The board must have holes for M3 screws. The board must be glued to the disk. Then you need to solder the cable leads to it. The central core should be soldered to one side of the disk, the screen to the other. As for quality, such a TV antenna will receive better with two disks, especially if it is located far from the television repeater.
Universal antenna
Nothing supernatural will be used to make this design. We will make it from various available materials. However, even though it is homemade, it will work perfectly in the entire decimeter range. So, this UHF antenna, quickly made with your own hands, is in no way inferior to store-bought, more expensive designs. It will be completely enough to take T2.

So, to assemble this structure, you will need empty cans of canned food or beer. You need 2 jars with a diameter of 7.5 cm. The length of each is 9.5 cm. You also need to stock up on strips of textolite or getinax, always with foil.
Our cans need to be connected to PCB strips using a soldering iron. The plate of this material that will connect the containers at the top should have a continuous coating of copper foil. The foil on the bottom plate should be cut. This is done for convenient cable connection.
It is necessary to assemble the structure in such a way that the total length is not less than 25 cm. This antenna (UHF range) is a broadband symmetrical vibrator. Due to its surface area, it has large gain factors.
If suddenly you cannot find suitable jars, then you can use containers with a smaller diameter. However, then the foil will have to be cut on the upper connecting plate as well.
"Beer" antenna
Do you like to drink beer? Don't throw away cans. You can make a good antenna out of them. To do this, you need to attach two beer cans to any dielectric material.
First you need to choose a suitable cable, and then bring it to mind. To do this, the cable must be stripped. You will see shielding foil. There will be a protective layer underneath. But under it you can directly observe the cable.
For our antenna, you need to strip the top layer of this wire by about 10 cm. The foil needs to be carefully twisted so that you end up with a branch. The protective layer for the central core needs to be stripped to 1 cm.
On the other side, you need to solder a plug for the TV onto the cable. If you were a cable network subscriber, then you don’t even have to purchase this part and cable separately.
Now about the cans. It is advisable to use 1 liter beer containers. However, good German beer in such cans is expensive, and domestic beer is not sold.

Banks must be uncorked very carefully. Then you need to empty the container of its contents, and then dry it well. Next, use a self-tapping screw to connect our screen on the cable and the can. You need to screw the central core to the second one.
For higher image quality, it is better to connect the containers and cable using a splice.
The cans must be secured to some kind of dielectric material. It is necessary to take into account that they should be located on the same straight line. The distance between them depends on the capacity. All this can only be determined empirically.
Zigzag
The UHF zigzag antenna has the simplest possible design. The part itself is broadband. Its design allows for various deviations from the original design parameters. In this case, its electrical parameters will be almost unchanged.
Its input impedance in a certain range depends on the size of the conductors that will form the basis of the fabric. There is a dependency here. The greater the width or thickness of the conductors, the better the antenna will be matched with the feeder. In general, any conductors can be used to make the fabric. Plates, tubes, corners, and much more are suitable for this.

In order to increase the directivity of such an antenna, it is permissible to use a flat screen that will act as a reflector. The latter will reflect high-frequency energy toward the antenna. Such screens are often quite large, and the phase depends mainly on the distance.
On the practical side, only in rare cases is a reflector made from a single sheet of metal. More often it is made in the form of conductors that are connected in the same plane. For design reasons, you should not make the screen too dense. The conductors from which the screen itself will be made are connected by welding or soldering to a metal frame.

This design is very simple to make. It works well in the UHF range. In the USSR it was a real folk and irreplaceable model. It is small in size, so it can be used as an indoor UHF antenna.
The material will be copper tubes or aluminum sheet. The side parts can be made of solid metal. They are often covered with a net or covered with a tin. If one of the above methods is used, then the structure must be soldered along the contour.
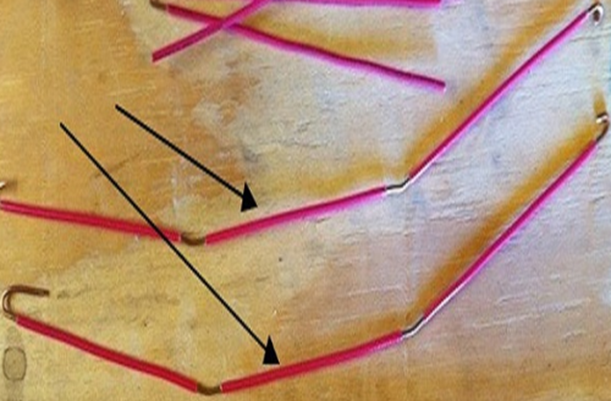
The cable must not be bent sharply. You can see how to carry out this element in the presented pictures.
It must be guided in such a way that it reaches the side corner, but does not go beyond the antenna or side square.
UHF indoor antenna
This design is designed for easy and reliable reception of digital television signals. It can be made easily and very quickly. To do this you will need an aluminum or copper rod. Its length should be up to 1800 mm. This antenna can also be used as an outdoor antenna.

The design is a diamond-shaped frame. There should be two of them. One acts as a vibrator, the second works as a reflector. To receive T2, we need the side of our rhombus to be approximately 140 mm, and the distance between them to be 100 mm.

After the frame is made and the structure becomes rigid, a dielectric is mounted between the two ends of our rod. It could be anything. The shape and size are completely unimportant. The distance between two points of the bars should be approximately 20 mm. The upper parts of our diamonds need to be connected.

The feeder can be made from cable. It must be connected to brass or copper petals, which should already be attached to the antenna terminal.
If the resulting design does not meet your expectations, for example, the reception quality is poor or the repeater is located far away, you can equip the antenna with an amplifier, and the result will be an active UHF antenna. It is used both in the city and in the country.
The simplest UHF loop antenna
This design resembles the number "zero". By the way, this is its gain factor. It is ideal for taking T2. This part can work better than the products offered in stores.
It is also called digital because it can be used to perfectly catch digital broadcasts. It is narrowband, which is a significant advantage. It operates on the principle of a selective valve, which means reliable protection against interference.

For assembly you will need a regular coaxial cable with a resistance of 75 Ohms, as well as a regular TV plug. Of all the options, it is better to choose a cable with a larger diameter. You can use a cardboard box or anything else as a stand.
We determine how long the frame will be using programs for calculating antenna parameters. The material for making the frame can be used the same as for the cable. By the way, for calculations you need to know the digital broadcasting frequencies in your city.

The central core of the cable is not needed in the frame design. The stripped wire is twisted together with the core and braid of the frame. Then this connection needs to be soldered.
The structure must be placed on a dielectric base. It's best to keep it away from your tuner. It is important that there is no voltage at the antenna input.
So, we found out how to make a UHF antenna with your own hands. As you can see, this is not such a difficult task. But now you can watch your favorite TV shows in digital quality. And this design is installed in the same way as a regular store one - on the roof. You can use screws or a bolted connection. It should be installed in a safe place so that during gusts of wind it does not fly off along with a piece of slate. It is advisable that the antenna be mounted at the highest possible height. This way you will avoid interference when showing cable or digital television.
Television today and twenty years ago are two very different things. The number of channels, transmission range, and broadcast format have changed. But, in essence, the principle of transmitting a television signal remains the same. Radio waves of a certain frequency travel through the air; they can be received using an antenna and sent to the TV tuner. We will not consider cable and fiber optic TV signal transmission systems, as well as IPTV (broadcasting via the Internet and SMART TVs).
Just like a couple of decades ago, and today, thrifty owners have a reasonable question: how to make an antenna for a TV with your own hands? And if during the USSR there really was a problem in purchasing a high-quality TV antenna (total shortage), today a TV antenna is made with your own hands solely for reasons of economy.
Options for homemade designs: general principles
Depending on the distance between your TV receiver and the transmitting antenna of the television center, the signal level will change. Another negative factor affecting the quality of television wave propagation is the presence of obstacles. Ideal reception occurs when there is a direct line of sight between the two antennas. That is, you can see the mast of the television center, even through binoculars. If there are buildings or tall trees in the path of the TV signal, there will be no reliable reception. However, waves reflected from other objects can be received by a TV antenna amplifier. If even weak waves do not “break through” to your house, you will have to make a mast. The network of television and radio broadcasting stations is located in such a way that you can receive a signal in any locality.

Beer cans (Pepsi-Cola cans work too)
Why is this material so popular?
- firstly, the missing segment sizes are compensated by a large receiving area: if you unfold the can into a plane, you get a standard sheet;
- secondly, aluminum has excellent conductivity, falling slightly short of copper: accordingly, resistance losses will be minimal;
- thirdly, the aerodynamic shape reduces windage (which is especially important when placed outdoors), and the lightness of the structure does not require particularly strong fastening;
- and, finally, this is an affordable and absolutely free raw material; in addition, lacquered aluminum perfectly resists the influence of moisture.

Before making an antenna out of beer cans, make sure that there are no high-rise buildings between the television center and the reception point that could block the signal.
Despite the relatively high reception quality, this design does not have a high self-gain factor. Connecting a standard amplifier may not have an effect due to the complexity of selecting coefficients.
Necessary materials:
- Two identical liter beer cans, washed and dried. As a last resort, you can use half-liter ones, but the reception range will be reduced.
- Antenna cable RK-75 of the required length (a design with a wiring length of more than 10 meters will most likely not provide reliable reception).
- Antenna plug to match your TV.
- A dielectric fastening bracket for fastening cans: a wooden block, clothes hangers, a plastic pipe (metal-plastic will not work).
- Fastening elements: electrical tape, tape, or plastic clamps.
- Soldering iron, standard solder, flux for soldering aluminum.
- Knife, side cutters, sandpaper.
There is no point in describing formulas for calculating sizes based on the reception frequency; anyway, it will not be possible to change the sizes of the segments. This DIY antenna made from beer cans has been tested many times under various conditions, so we’ll just use a ready-made sample.
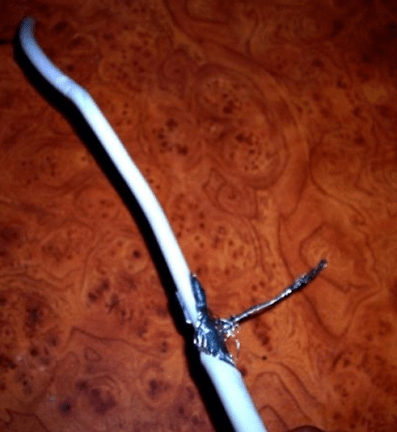
We cut the antenna cable. There will be a plug at one end, open the other end so that there is at least 100 mm from the central core to the screen wound into a bundle. To prevent the “bare” braid from being exposed to corrosion, it can be hidden in a heat-shrinkable casing.
We clean the areas for soldering the cable: at the upper ends of the cans. Fine sandpaper is suitable for this.
Stripping is carried out immediately before soldering and to the “bare” metal.
We roll each end of the wire into a ring 3–5 mm in diameter and carefully coat it with solder. Then we screw the resulting terminal to the can using a galvanized self-tapping screw. After that, we clean the joints with flux and solder until the solder “sticks” normally.
We fix the cans (from the point of view of the theory of radio reception, these are now symmetrical vibrators) so that there is exactly 75 mm between the ends with the cable. This is the optimal gap for receiving analog and digital television.

An important step: setting up the product for optimal TV signal reception. Most likely, you know the direction to the broadcast center tower. If not, Yandex cards will help you. Find a television center, your home, and conduct a virtual live broadcast. If you don’t want to bother with azimuth (this is impossible without a compass), determine the direction reference within your visibility zone. For example, a boiler room pipe or other object. For reliable reception, the home TV antenna is positioned strictly perpendicular to the vector to the tower, and horizontally.
If the signal is received reliably, you were lucky the first time. At a considerable distance from the transmitter, you can catch the reflected signal. Even a simple antenna made from cans requires correct orientation in space (although it is not a satellite dish). In an area of uncertain reception, all-wave technology can unexpectedly “shoot” in any direction.
A do-it-yourself “beer” decimeter antenna allows you to confidently catch analogue channels. How to make an antenna for digital TV? No additional secrets. Digital broadcasting is produced in the same range. If you have a DVB-T2 tuner, you can tune in to one or two multiplexes, and receive a free set of Russian channels on beer cans.
Information:
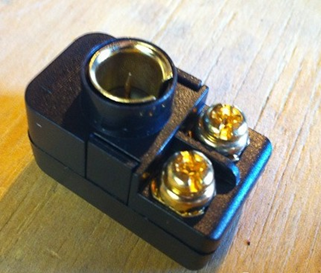
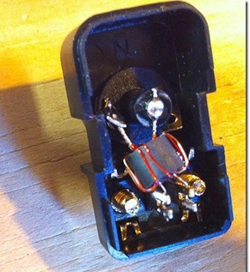
If the signal strength is still not enough, you can make an antenna amplifier yourself.
Typical diagram in the illustration:

However, in order to solder and configure such a device yourself, basic knowledge of radio engineering is required. Still, it’s easier to buy a ready-made device, especially since you’ve already saved on the antenna.
“Eight”, aka rhombus, aka “Z” shaped

Perhaps the most popular design for do-it-yourselfers. This fairly powerful Kharchenko antenna confidently receives meter and decimeter frequencies in analog and digital format. When the question arises: “How to make an antenna with your own hands?”, this option is first of all assumed.
What is its advantage? With compact dimensions, in most cases no amplifier is required. Unless you want to receive a signal on the 1st–3rd floor in a densely built-up microdistrict, where there are dozens of high-rise buildings between you and the television center.
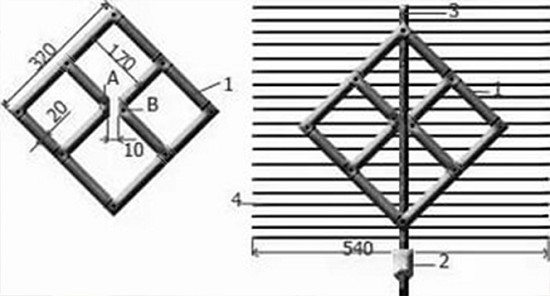
How to make a homemade antenna without complex calculations? For a typical broadcast grid, there is a basic diamond arm size: 140 mm. Distance between wire connection points: 10–15 mm.

Kharchenko's antenna with such dimensions falls right in the middle of the typical broadcast range. If it is necessary to capture other channels (in some regions the grid may operate at non-standard frequencies), a wire structure can be made in several rows. The illustration shows a drawing from Radio magazine from 50 years ago.

Then the meter range was accepted, and the antennas had correspondingly gigantic dimensions. They were made from wire to reduce windage. This manufacturing technology requires patience and a large amount of material. Modern “homemade” people prefer a copper tube or an aluminum plate.

To make an indoor antenna using this technology, all you need is a piece of wire. The device hangs in the window opening (in the direction of the television center) and there is no need to worry about it being bent by the wind. Several diamonds can be made, and the reception range will be significantly expanded. An ideal option for digital television, which you can do yourself at the dacha or in a private home.

We amplify the signal without an amplifier
The reception efficiency (primarily this concerns the option under consideration) can be increased without additional electronics. It is enough to install a reflector or reflective screen. It will return television waves back to the antenna field, almost doubling the level. The canvas is located at a distance of 100 mm on the opposite side of the TV tower. A prerequisite is no electrical contact. Moreover, the reflector does not have to be solid. A series of metal tubes or openwork mesh is sufficient.

You can enhance the effect by using the “double biquadrate” design. The same dimensions apply, but the range remains the same. The extra length simply increases the signal strength.

And finally, the most complex antenna for digital TV that you can make yourself
The log-periodic circuit allows you to get maximum gain without additional circuits.

The principle of operation of the design: in the direction of the signal source there are two conductive busbars, on which perpendicular vibrators are installed in strict sequence. Their length and distance between each other are calculated according to a strict algorithm. An error of 2–5% will lead to complete system inoperability. But a properly assembled antenna will receive analog and digital signals with the highest quality.
Note:
This type of antenna requires careful orientation towards the TV tower.
Can be used with a screen that helps strengthen a weak signal.
Bottom line
Making a homemade antenna is not just about saving money. This is an excellent opportunity to practice radio engineering, without the risk of damaging expensive radio elements and materials. And if your receiving point is located in an unfavorable location, you can always try a different configuration without buying several factory-made antennas.
Video on the topic
Despite the huge number of television antennas presented on the consumer market, which can be easily purchased at any electronics store, interest in how to make an antenna for a TV with your own hands does not disappear. This interest can be explained by a reluctance to spend money on buying an antenna, being away from retail outlets (if you are in the outback or at the dacha) or the failure of the purchased one.
Antennas for a television receiver can be divided into several types.
- All-wave antenna– the design is easy to manufacture; it can be made from simple available materials. It picks up a digital signal quite well outside the city, where there is not much interference. When located near a broadcast tower, it can receive analog television.
- Log-periodic band antenna also easy to make. It has perfect consistency with the feeder across all ranges, without changing its parameters. Since this design has average technical parameters, it can be used in the country, or as an indoor antenna in the city.
- UHF antenna. A simplified modification of the Z-antenna is often used; it works well, regardless of the signal reception conditions.
All-wave antenna
All-wave TV signal catchers are also called frequency independent (FIN). Their designs can be different.
Of two petals
The figure shows an all-wave antenna made from two metal plates triangular in shape and two wooden slats on which copper wire is stretched in the shape of a fan.
Copper wire can be taken of any diameter, it does not play a special role. The ends of the wire are attached at a distance of 20 to 30 mm from each other. The plates with the other ends of the wire soldered together should be located at a distance of 10 mm from each other.
The metal plate can be replaced with a square piece of fiberglass, which has copper foil on one side.
Since the design of the homemade antenna is square in shape, its height will be equal to its width, and the angle between the panels will be 90 degrees. Zero potential point marked in yellow in the figure. There is no need to solder the cable braid in this place - tying it tightly will be enough.
A television signal receiver assembled in this way in the form of two lobes is capable of receiving both all decimeter channels and meter ones. Moreover, it picks up signals well in all directions. But if you install the CNA in an area of poor signal reception from a TV tower, it will only work normally with amplifier. Others can also be used.
Butterfly shaped
You can make a television antenna in the shape of a butterfly with your own hands. To make this fairly powerful antenna yourself, you need to prepare a board or plywood with dimensions of 550 x 70 x 5 mm, a wire with a copper core with a cross-section of 4 mm, and, accordingly, a PK75 cable.
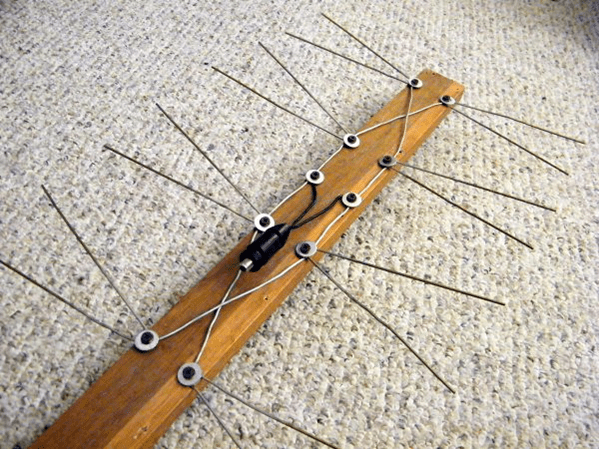
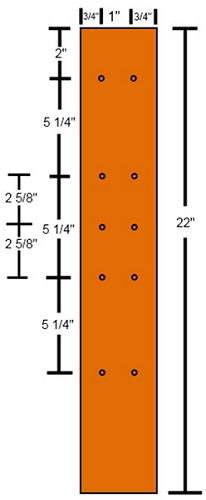
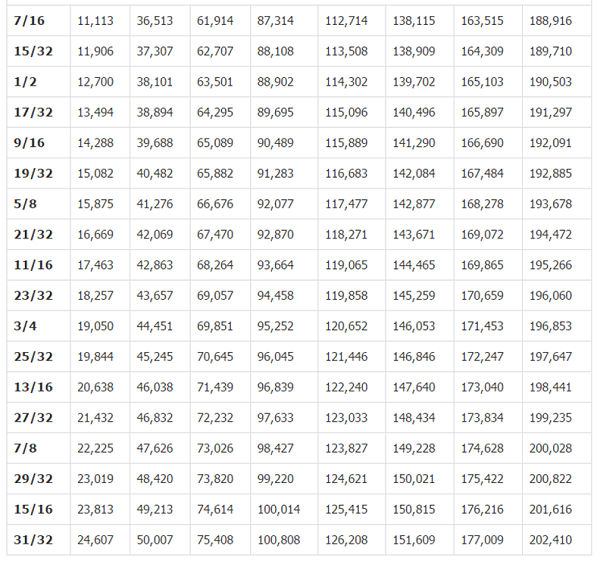
- Mark the holes on the plywood and drill them. Dimensions in the picture are in inches. Below the figure is a table for converting inches to mm.

- From copper wire you need to cut 8 pieces of the same length, 37.5 cm each.
- In the center of each wire, clear sections of insulation (2 cm each), as in the figure.

- After this, you should cut off 2 more pieces of wire, already 22 centimeters each, divide them into 3 equal parts and remove the insulation at the separation points.
- Give the segments V-shape. You should be careful to maintain a distance of 7.5 cm between the ends of the wire. This is the optimal distance to receive a clear signal.

- Connect all the elements according to the figure below.
- Next, you need to purchase a socket to connect the plug to it.
- The cable must be soldered to the coil contacts, as in the figure.

- Make 2 more pieces of wire of the required length to connect the antennae to the socket.

- Screw the socket onto the board and connect all the elements.


That's all - you have made an antenna for your TV with your own hands.
From beer cans
To make such an original ChNA you will need 2 cans (0.5 l or 0.75) of beer or other drink. But before you make a television antenna, you need to consider some material requirements. Namely, it is recommended to purchase a high-quality television cable with a resistance of 75 ohms per meter. Which is correct? Make sure that the central core is strong and that the braid is double and continuous.
Don’t forget, the longer the cable, the stronger the signal attenuation will be, which is especially important for receiving meter waves, in contrast to UHF, for which the length of the wire also matters, but not so much.
It will also be necessary to prepare the usual wooden trempel, a couple of self-tapping screws, electrical tape or tape and, if possible, a soldering iron with tin.
An antenna made from beer cans can receive both the UHF and meter wavelengths.
To illustrate the entire process, you can watch the video.
Log-periodic antenna
A log-periodic antenna (LPA) can be used to receive radio waves in both the meter and decimeter ranges. To make such a signal receiver, you can use an aluminum tube with a diameter of 10 mm and metal rods (studs) as a stand, which can be purchased at a store that sells fasteners. Ideally, instead of threaded rods, it is better to use smooth tubes or rods. A plastic U-shaped box is used as a base.
When the soldering is completed, the manufacture of the device can be considered complete and you can begin testing your creation.
UHF antenna
Homemade decimeter signal catchers can have different shapes and designs, from the simplest to manufacture to more complex devices.
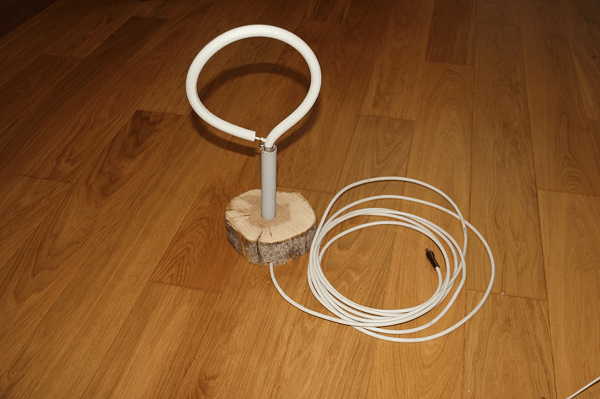
Ring-shaped
The simplest design for receiving UHF can be made in a short time with your own hands from scrap materials. All you need is a coaxial cable and a piece of plywood of the appropriate size.

Now all this needs to be assembled:
- prepare a piece of coaxial cable (RK75) 530 mm long (a ring will be made from it);
- also cut another piece of cable 175 mm long - this will be a loop;
- make a ring (1), solder a loop (2) and a cable (3) to it, which connects to the TV;
- secure it all to a plywood sheet and point the completed TV signal receiver towards the TV tower.
If your TV receiver uses such an antenna, try making a more complex device.
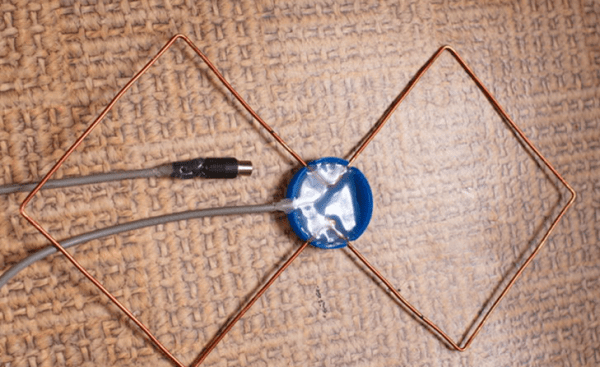
Figure 8
You can make your own home UHF antenna from wire in the shape of the number 8. To make such a receiver, you can use copper or aluminum wire with a diameter of 3 to 5 mm, as well as PK75 cable. During the manufacturing process you will also need glue gun

Manufacturing progress.
- Using wire cutters, you need to cut 2 pieces of wire 56 cm each.
- At the ends of each segment, make a loop, which should take 1 cm.
- Bend the wire squares and connect the loops. Solder the cable to the squares as shown in the picture. The central core is soldered to one square, and the braid to the other. The distance between the elements should be 2 cm. The entire structure can be secured in the lid of a 20 liter water bottle, filled with glue.

Such a UHF receiver can be placed anywhere, and it does not require an amplifier. Perhaps an amplifier may be needed if the device is outdoors and the cable length is significant. In this case, to compensate for signal losses, its installation will be required.
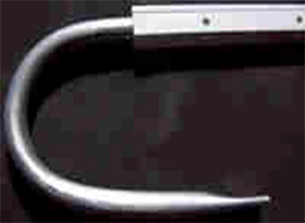
From a metal-plastic pipe
You can make a television antenna with your own hands from an ordinary metal-plastic pipe. This will result in a device for receiving UHF with a possible range from 480 MHz to 1000 MHz. This “model” uses a pipe with a diameter of 16 mm and a cable of 5.5 m. The ring will require 55 cm of pipe, and the stand will require 14 cm, which is equal to a quarter of the wavelength. This serves to better match the outer braiding of the cable and reduces high frequency currents.
The cable exit in this design is made through a hole in the pipe. The cable braid should be attached with a clamp to the stripped part of the pipe. The central core of the cable is attached to the ring (you can use a screw with a washer and a nut). This homemade product works well as an indoor antenna in apartments with reinforced concrete walls that do not transmit television waves well. Thanks to the extended cable, you can take it out onto the balcony or place it on the windowsill - the quality of reception will only improve.
In the form of a frame
Another UHF antenna design is assembled in the form of a frame. It will be made from aluminum plates(stripes).
Thus, home-made antennas will help you save money on purchasing them, and in some cases get out of the situation where you have a TV, but the standard antenna is out of order, or it doesn’t exist at all. Moreover, the quality of reception of homemade products is no worse than their factory counterparts. If you do not want to make the device yourself, then the information in the store will be useful to you.